





Tips
How to Use JotMe Desktop App 1.0: Complete Guide to Every New Feature

Viraj Mahajan
August 28, 2026
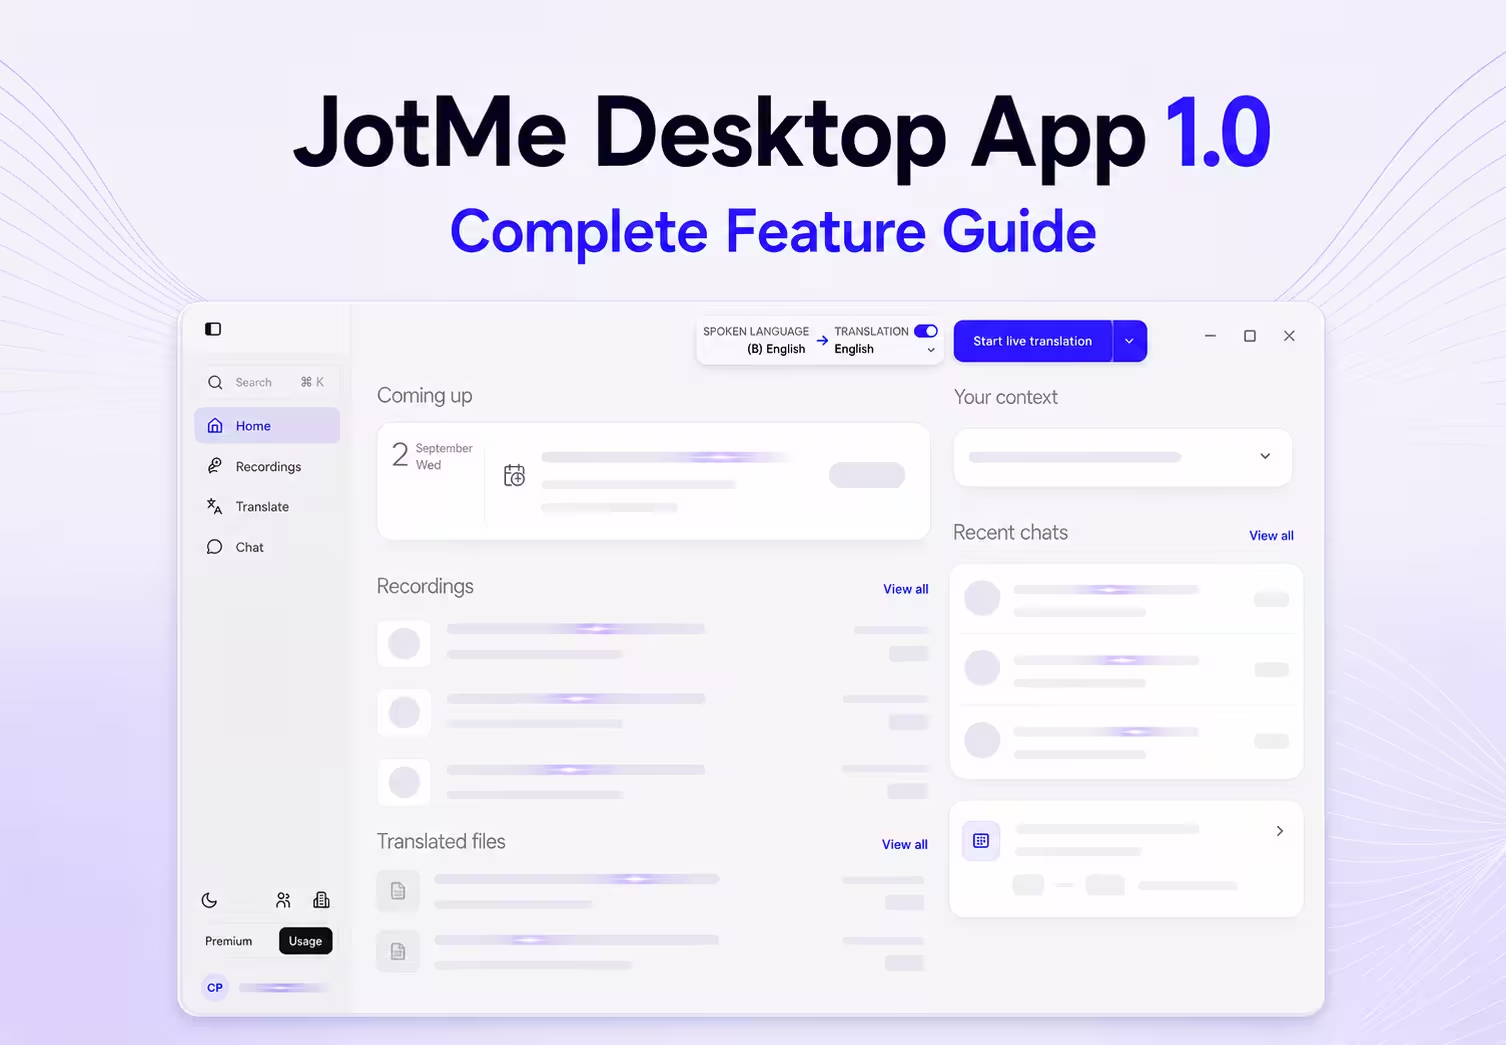
JotMe Desktop App 1.0 brings live translation, transcription, meeting notes, file translation, multilingual chat, and post-meeting assistance into one desktop workspace. You can use it during an online call or an in-person conversation, return to the recording afterwards, ask questions about what was said, and continue the discussion across languages.
The shortest way to begin is to open JotMe, select the language being spoken, choose the language you want to receive, and select Start live translation. JotMe captures audio from your computer without adding a bot to the participant list. When the session ends, the app can retain the transcript, generate AI meeting notes, and save the recording according to the preferences you selected.
The new interface goes much further than that basic workflow. The Home screen brings together your calendar, recordings, translated files, chats, and operational context. Separate workspaces handle live sessions, saved recordings, translation jobs, multilingual conversations, and account-wide settings.
This guide walks through Version 1.0.0 in the same order in which most people will encounter it, beginning with the Home screen and ending with translation quality, privacy, and custom vocabulary settings.
What Is JotMe Desktop App 1.0, and What Can You Do From the Home Screen?
JotMe Desktop App is a bot-free meeting and language workspace for Mac and Windows. It listens through the microphone and computer audio permissions you grant, so it can work beside Zoom, Google Meet, Microsoft Teams, Webex, LINE, and other applications without joining the call as another participant.
The app is not limited to meetings. You can also use it for an in-person discussion, a conference, a recorded interview, a translated document, a multilingual team chat, or voice typing in another desktop application. The important distinction is that each workflow starts from the same account and feeds into the same searchable history.
JotMe currently documents more than 200 languages and dialects for desktop live translation and transcription. Coverage varies by feature. For example, uploaded-file translation supports more than 100 languages, while AI meeting notes have a smaller set of output-language options. Always check the language picker for the workflow you are about to run instead of assuming that every feature uses the same list.
Install JotMe and complete the initial setup
Download the desktop installer from the official JotMe website. On macOS, choose the build that matches your computer, either Apple silicon for an M-series Mac or the Intel build. Windows users can download the Windows installer and follow the standard installation prompts.
Sign in with your JotMe account after the app opens. The same account can be used across the desktop app, web app, mobile app, and Chrome extension, so account-backed recordings, notes, chats, translated files, minutes, and credits remain connected.
JotMe needs access to the audio sources required by your chosen workflow. Microphone access lets JotMe hear you. Computer or system-audio access lets it hear the other people in an online call. Voice Keyboard requires microphone access and its own system-level permissions because it types into applications outside JotMe.
On macOS, quit and reopen JotMe after granting system-audio permission. The permission may appear enabled in macOS Settings, but the running app will not necessarily receive the change until it restarts.
Practical check: Before using JotMe in an important call, run a short test with the exact microphone, headphones, meeting platform, and audio output you plan to use. A correct language selection cannot compensate for an audio source that JotMe cannot hear.
Understand the Home screen
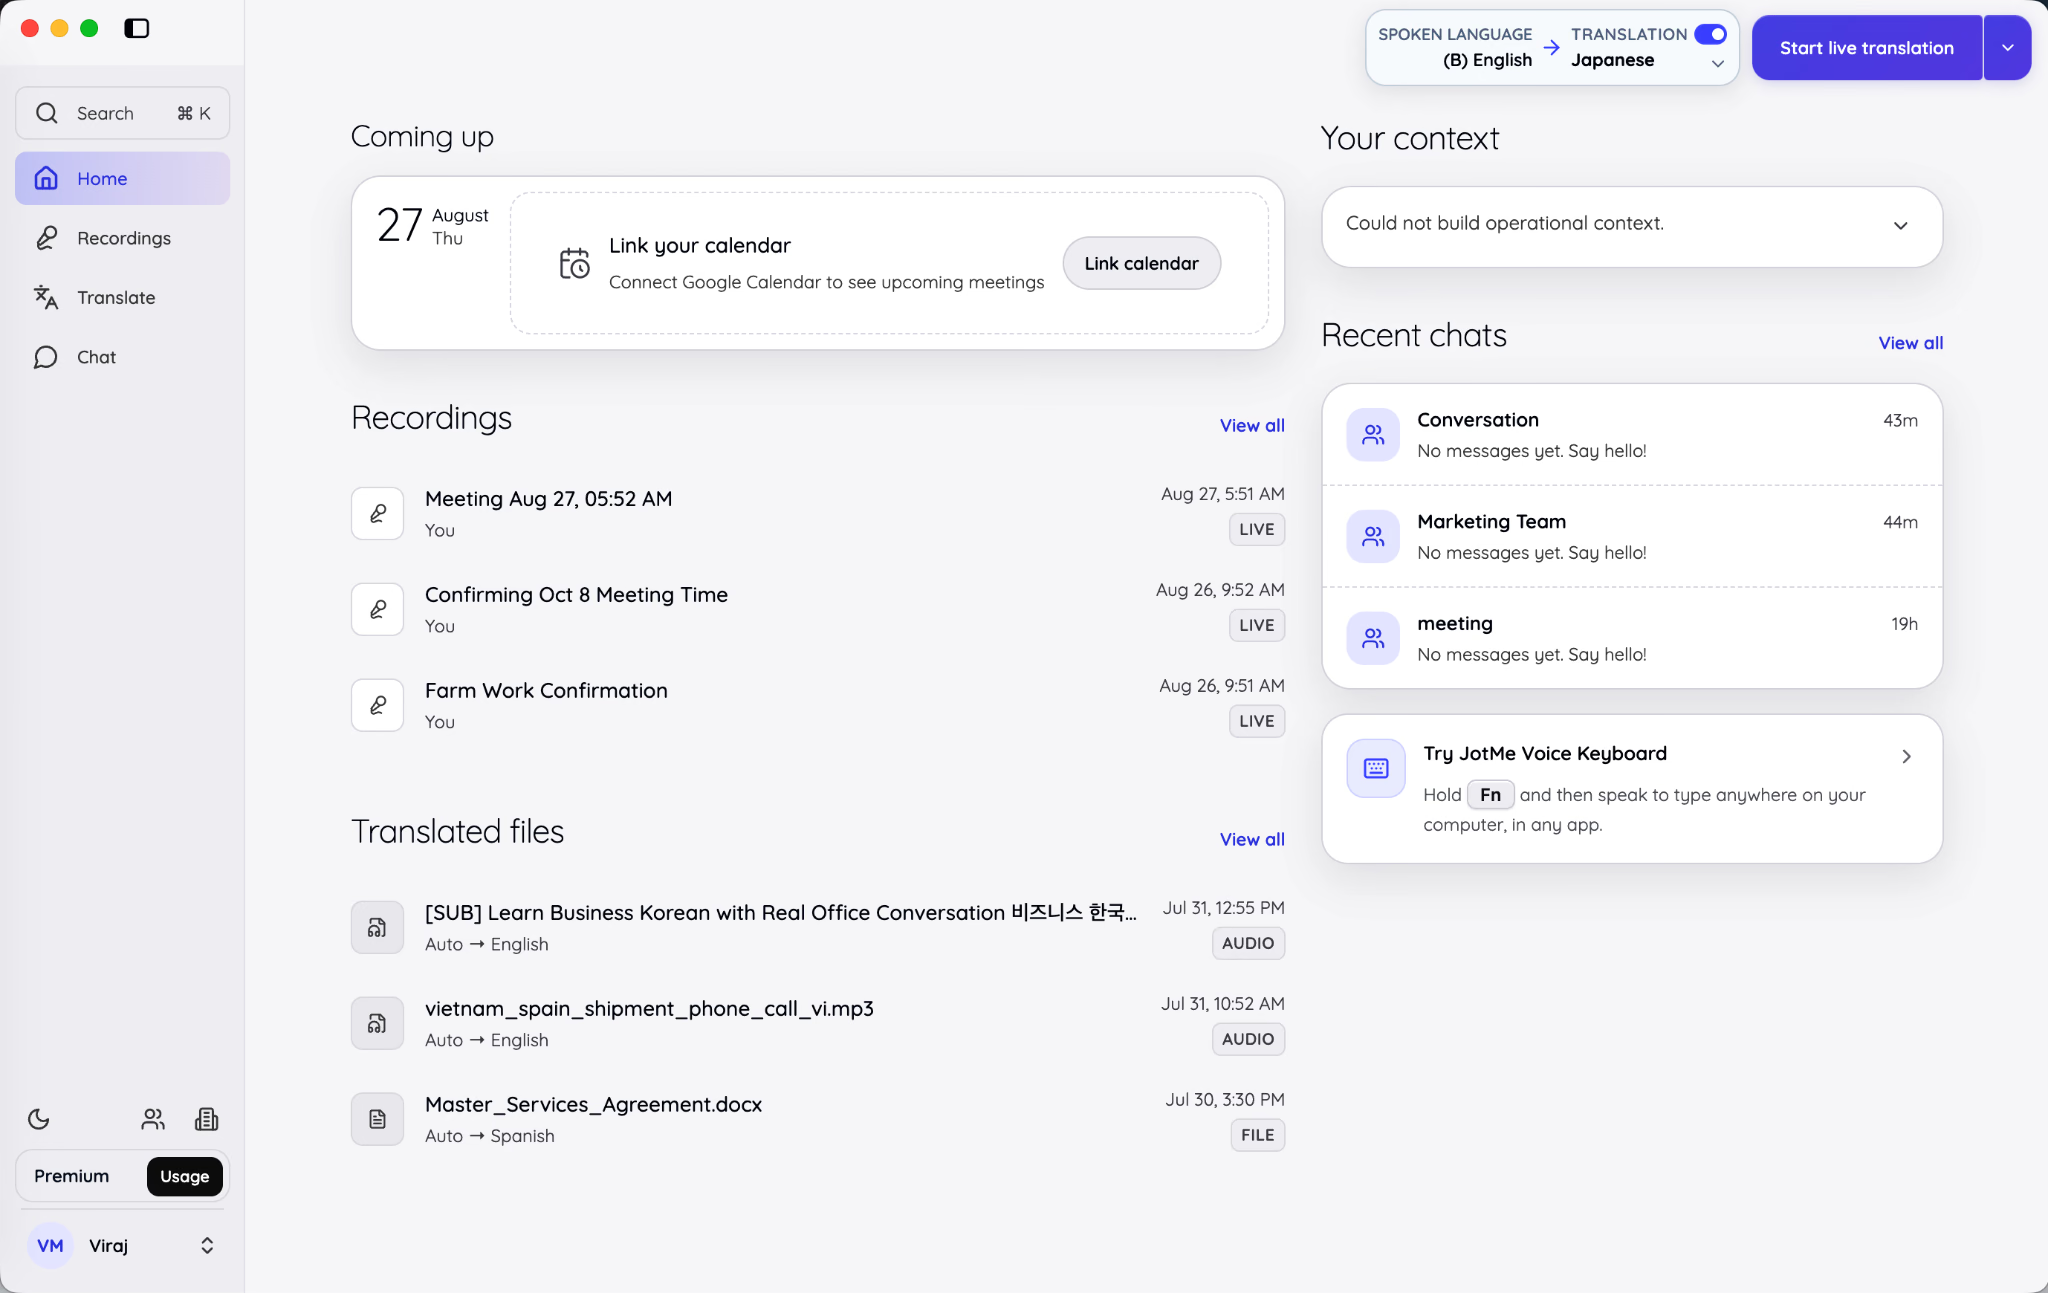
The Home screen is a working dashboard rather than an empty launch page. It shows what is coming up, what you recently recorded, what you recently translated, and which chats need your attention.
The left sidebar provides four main destinations:
- Home brings you back to the launch dashboard.
- Recordings opens saved live sessions and uploaded audio or video.
- Translate opens text, file, image, and media translation tools.
- Chat opens multilingual conversations.
The search field at the top left can be opened with the displayed keyboard shortcut. Use it when you know the name of a meeting, file, transcript term, or conversation and do not want to browse through each workspace separately.
The middle of Home shows upcoming calendar events, recent recordings, and translated files. Recent chats appear on the right, giving you a quick way to return to a conversation without opening the full Chat workspace first.
Connect Google Calendar
Select Link calendar from the upcoming-events area to connect Google Calendar. Once connected, JotMe can display the day's scheduled meetings and let you open a meeting workspace before the call begins.
Starting from a calendar event is useful when the same meeting has specific language or audio requirements. JotMe can remember the spoken language, target language, translation model, microphone, environment, and other live-session choices for that individual event on the same computer.
The calendar connection does not make JotMe start recording automatically. Opening a meeting link and opening JotMe only prepares the workspace. You still choose when to begin note-taking, transcription, or live translation.
Google Calendar is currently the connected calendar described in JotMe's documentation. JotMe reads events but does not create or edit the calendar events themselves.
Choose what you want to start
The purple action button in the upper-right corner has a dropdown arrow. Open it when the default action is not the workflow you need.
The menu shown in Version 1.0 includes the following choices:
- Live transcription and translation: Use this for a meeting, interview, class, call, or event happening now.
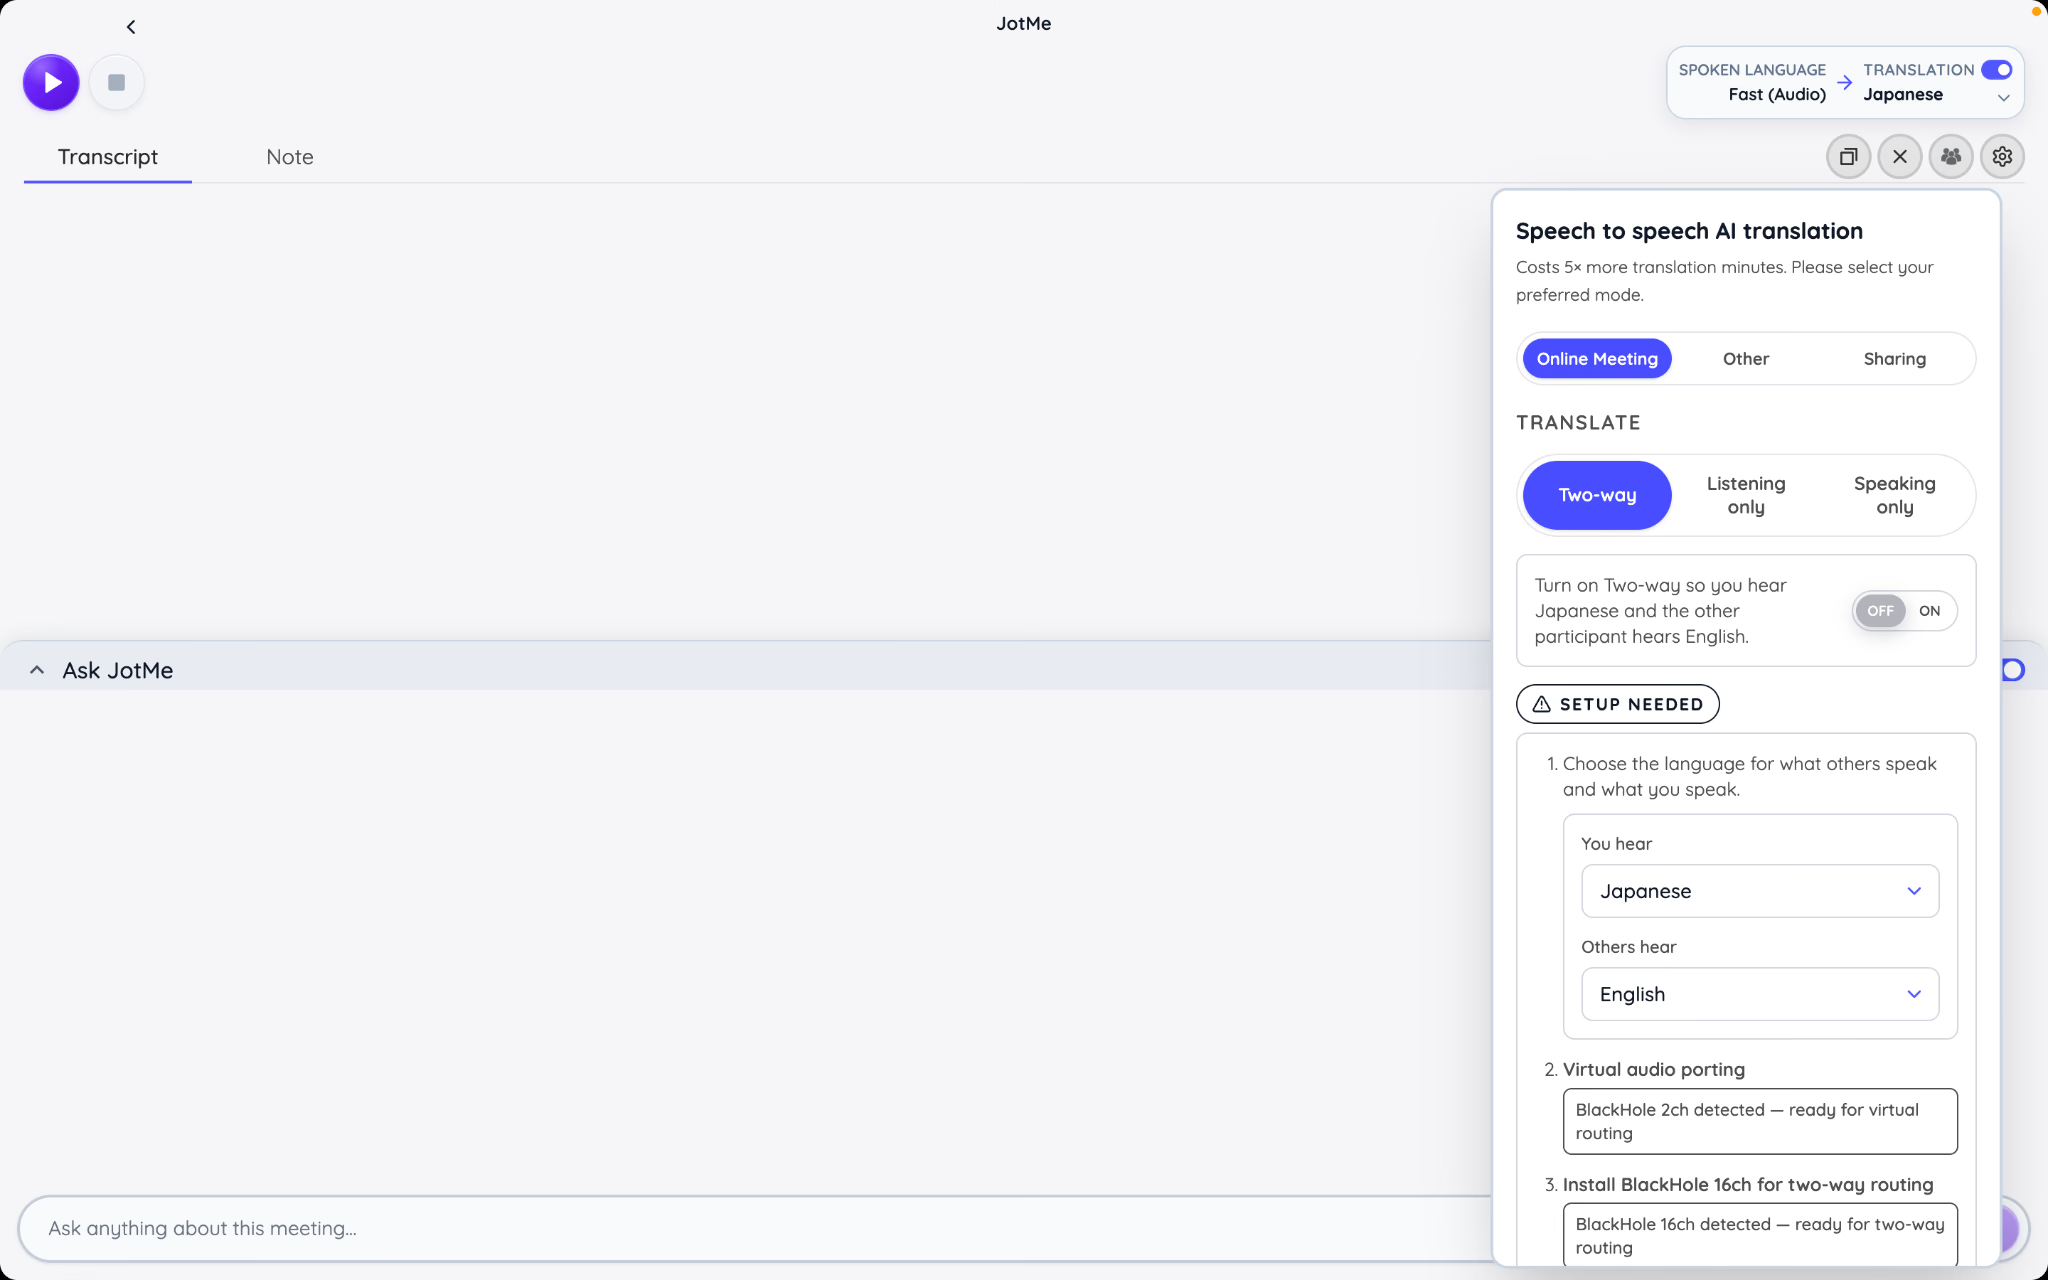
- Voice-to-voice real-time translation: Use translated audio when one side needs to hear the other side in another language.
- Share live translation: Prepare a browser link, QR code, desktop code, or subtitle output for other participants.
- Upload file: Process an audio or video recording that already exists.
- Change meeting notes language: Select the language in which JotMe should generate AI meeting notes after the session.
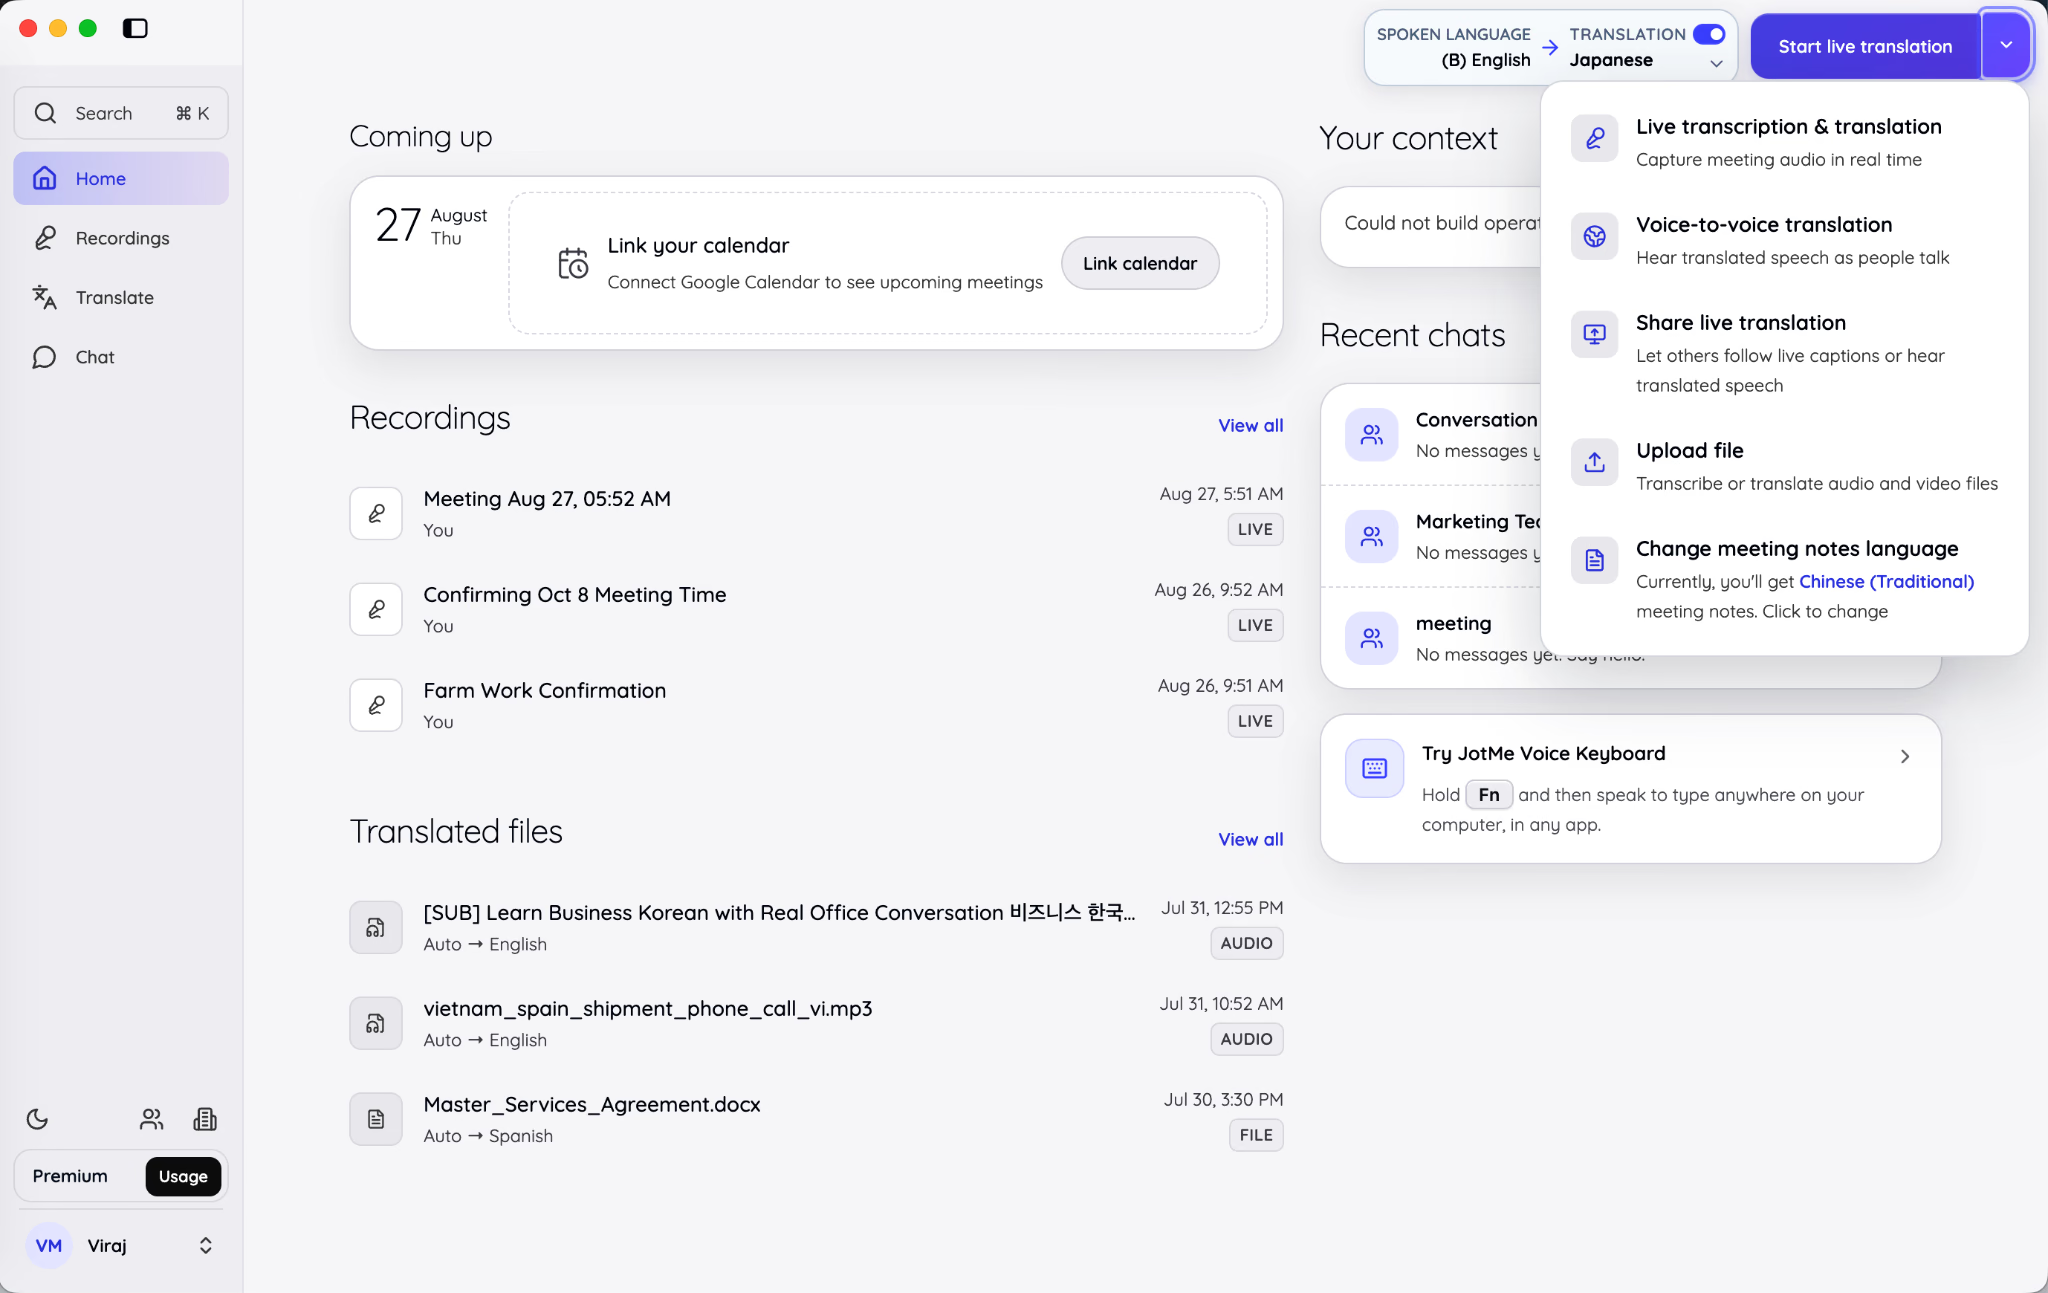
The labels are important because they separate actions that look similar but consume different resources. A transcript-only session does not require translated output. Voice-to-voice translation adds audio generation. Uploading a completed recording is a file-processing job rather than a live session.
Choose the narrowest workflow that matches what you actually need. If everyone understands the spoken language and you only want searchable notes, start transcription or note-taking with translation turned off. If attendees need another language while the discussion is happening, start live translation.
Give JotMe operational context
The Your context panel on Home lets you record information that would otherwise be missing from an isolated transcript. It can include your current goal, project status, open items, and key terms.
For example, the word “Mercury” could refer to a planet, a chemical element, a car brand, or an internal project name. If your context says that the team is preparing the Mercury product launch, JotMe has a stronger basis for keeping the intended meaning in translations and meeting notes.
You can edit the context manually and choose whether JotMe updates it automatically. The connected-source controls at the bottom of the panel allow context to be enriched from supported tools associated with your work.
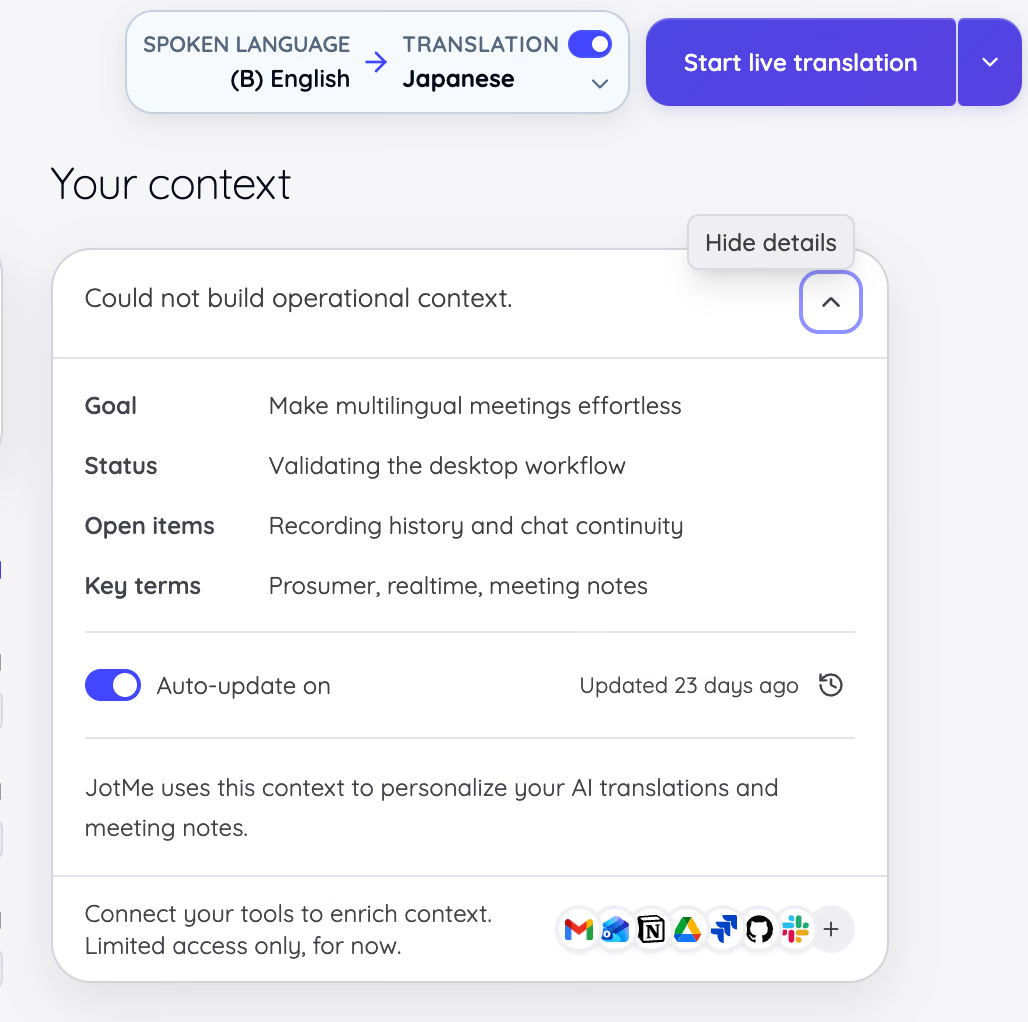
Context is especially valuable when meetings repeatedly use the same internal vocabulary. It complements custom vocabulary rather than replacing it. Use Your context for changing information such as goals and blockers. Use Custom vocabulary for stable names, acronyms, product terms, and specialist language that should be recognized consistently.
How Do You Start and Customize Live Translation or Transcription?
A live JotMe session begins with three decisions: what people are speaking, what you want JotMe to produce, and which audio sources JotMe should listen to. Making those decisions before pressing Play prevents most avoidable problems. Here is how to use live translator:
Select the spoken language and translation output
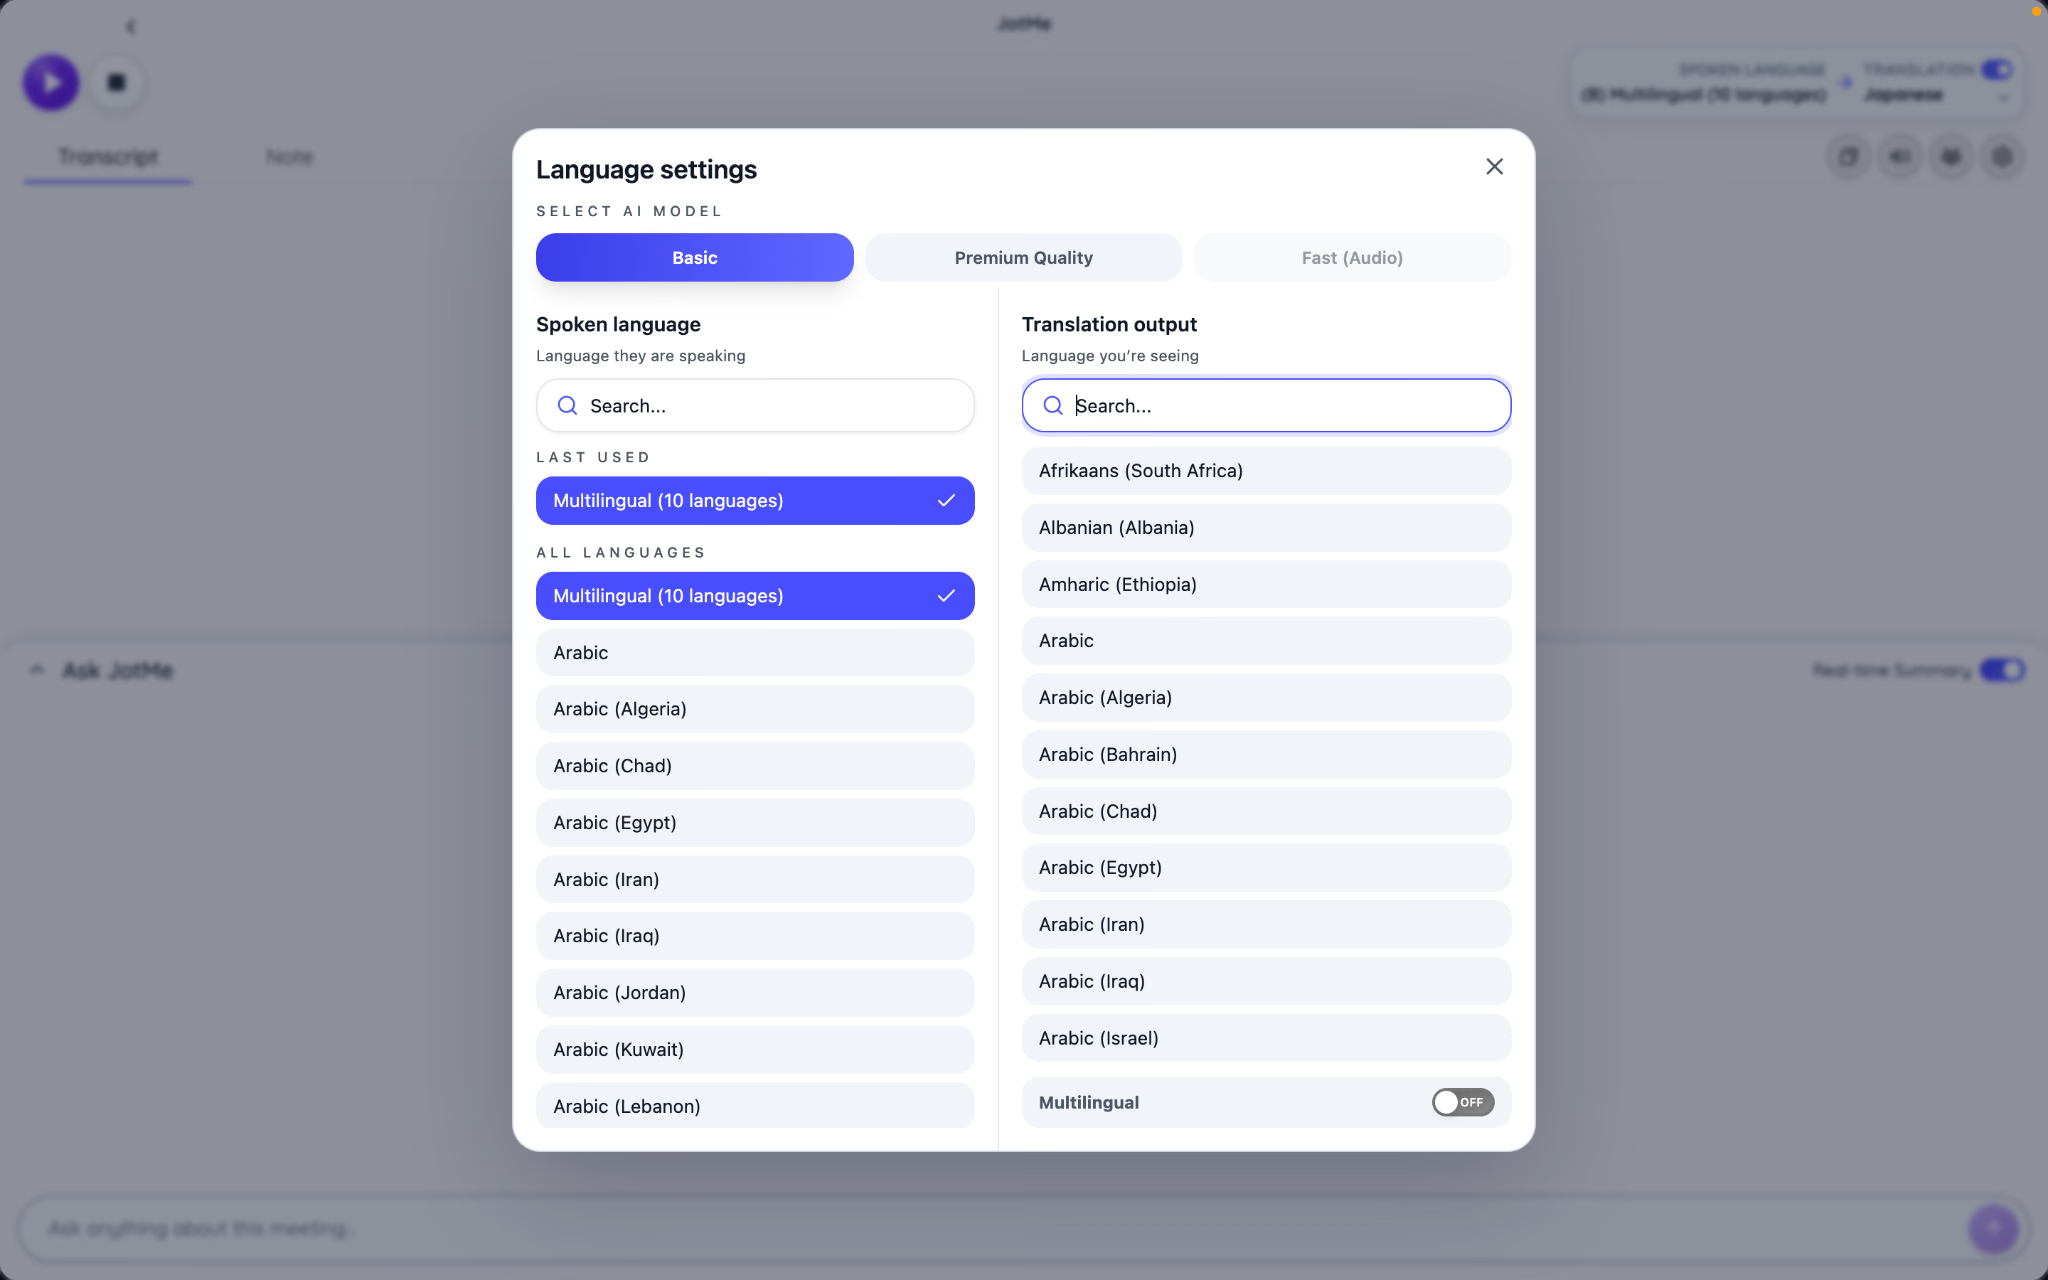
The top-right language control displays the spoken language on the left and the translation output on the right. In the screenshots, English is selected as the spoken language and Japanese as the translation language.
The spoken-language setting tells JotMe what it needs to recognize. The translation setting tells JotMe what you want to read or hear. If you only need a transcript, turn translation off and keep the correct spoken language selected.
JotMe provides different live models for different situations:
Select the spoken-language model before the recording starts. JotMe does not let you replace the active transcription stream's spoken-language model in the middle of a recording.
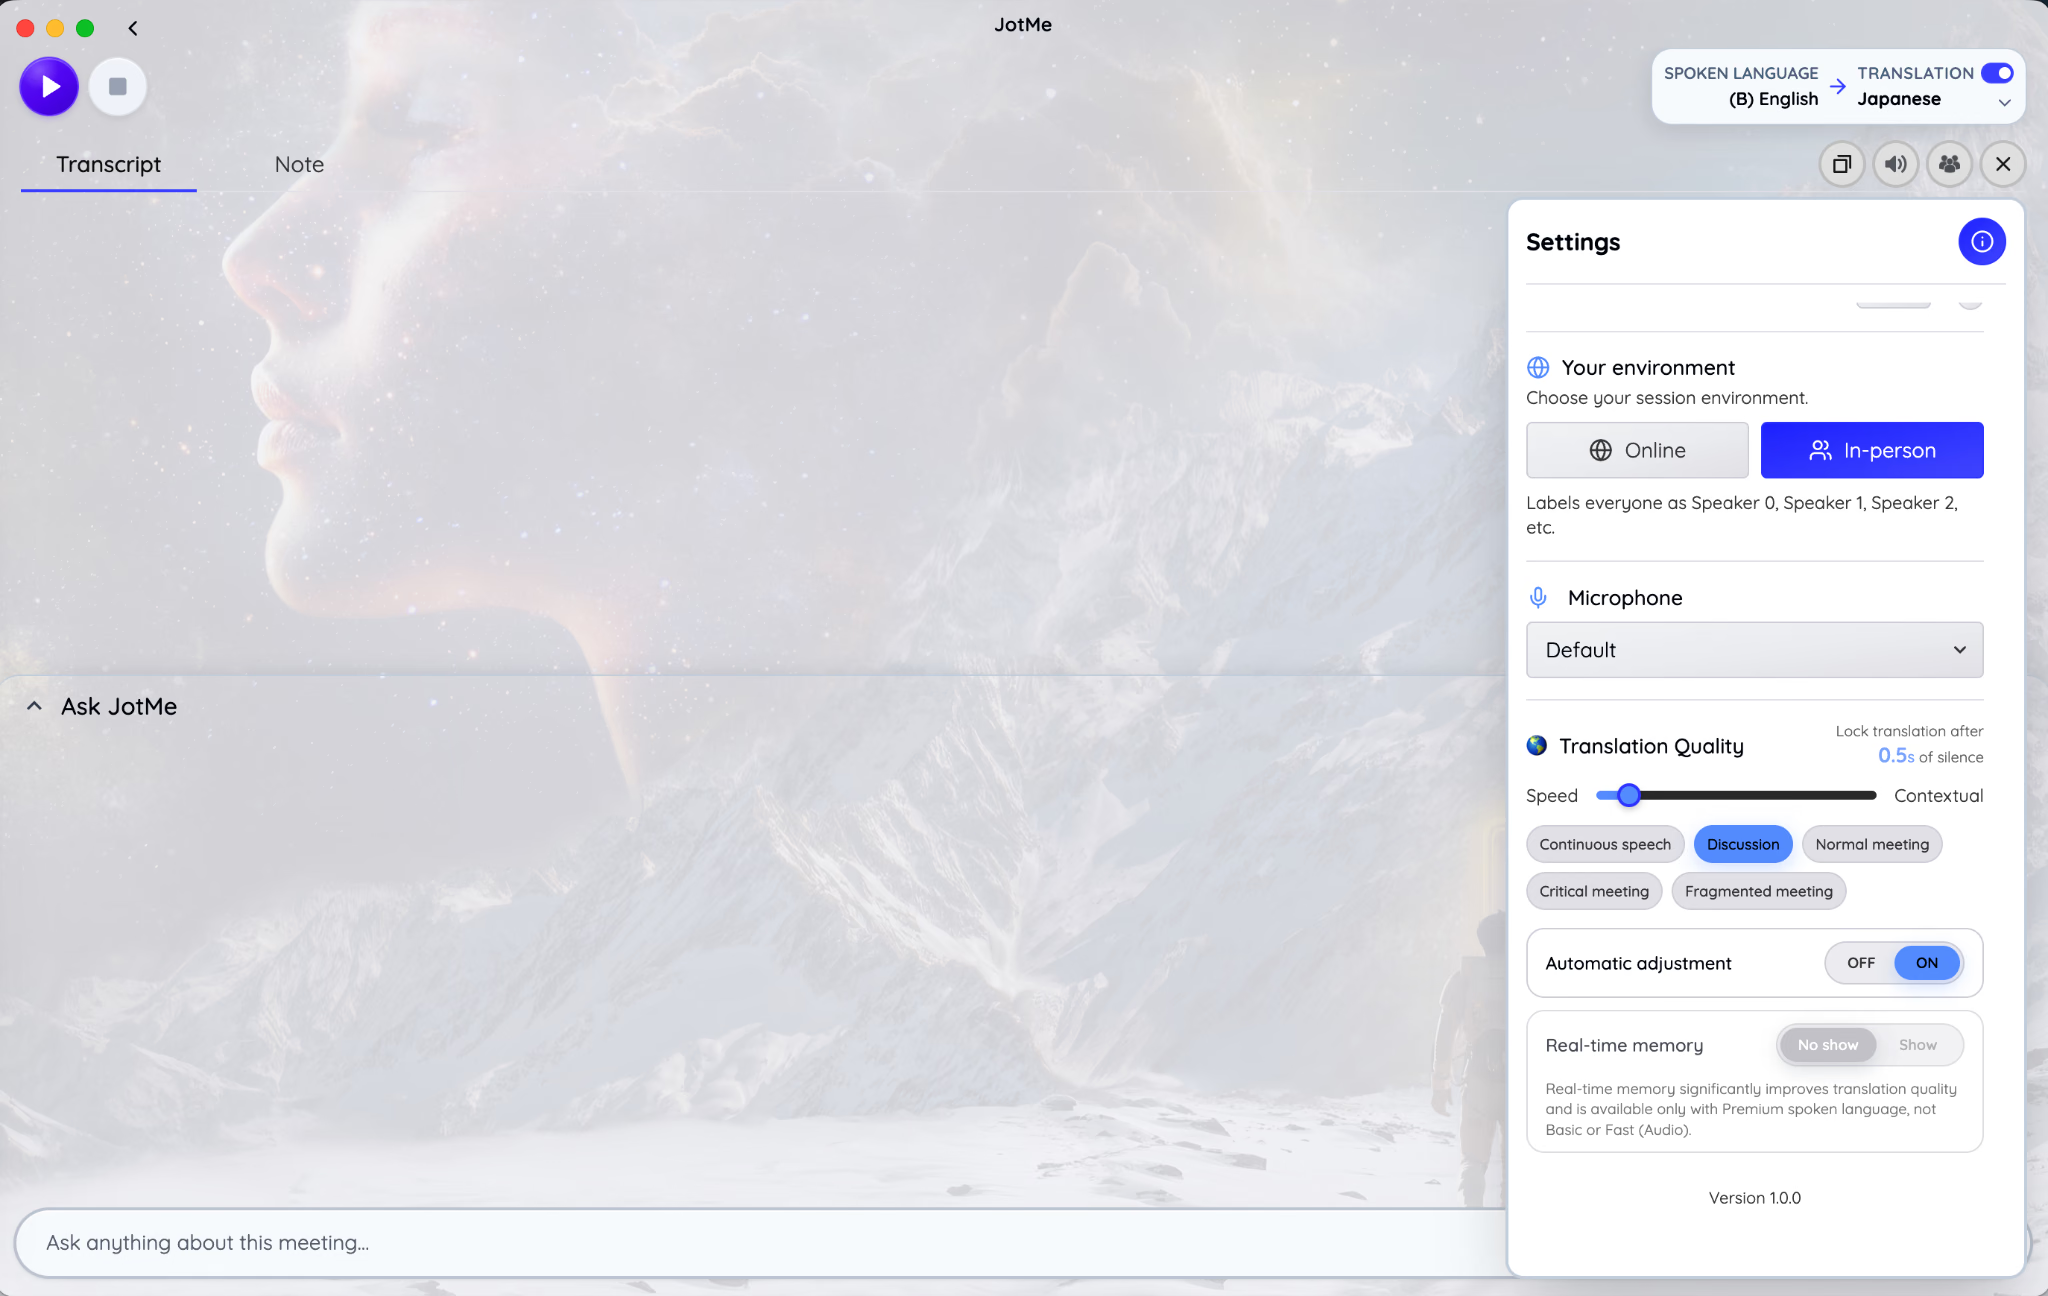
Choose Online or In-person as the environment
Open the live-session settings and choose the environment that matches where the sound comes from.
In Online mode, JotMe can distinguish your microphone from the audio coming from the meeting application. Your microphone is identified as “You,” while the other side is separated into numbered speakers.
In In-person mode, everyone is heard through the room microphone and appears as Speaker 0, Speaker 1, Speaker 2, and so on. This is the appropriate starting point for a face-to-face interview, workshop, conference room, panel discussion, or lecture captured from a shared microphone.
Environment selection affects speaker labelling, not merely the appearance of the interface. Choosing Online for a room recording can produce confusing assumptions about who is speaking. Choosing In-person for a remote call removes the distinction between your microphone and meeting audio.
Select the microphone
Use the Microphone dropdown to choose the device that should identify and capture your voice. The default device is suitable only when your computer's current system selection is the source you actually intend to use.
For a remote call, a headset microphone often gives cleaner separation between your voice and the meeting audio. For an in-person group, use the microphone positioned to capture the entire room or the audio feed supplied by the venue.
Watch the transcript during the first few seconds of a test. If JotMe captures your speech but not the other participants, check system-audio permission and the meeting-audio capture device. If it captures the room poorly, change the microphone placement or input before the real session begins.
Start the session and use the live workspace
Press the purple Play button to begin bot-less real-time translation with JotMe. The Stop button sits beside it, making the recording state visible without hiding the transcript behind another window.
The live workspace brings together:
- Transcript, where recognized speech and translation appear.
- Note, where you can write your own notes during the conversation.
- Ask JotMe, which can answer questions using the current session.
- Audio, display, participant-sharing, and window controls.
Your own notes remain separate from the transcript. JotMe can later use both sources to create Enhanced notes, but it does not overwrite what you wrote. This separation matters when your notes contain personal reminders or judgments that should not appear in the shared meeting record.
Balance translation speed and context
Live translation is not a simple choice between “fast” and “accurate.” JotMe needs enough speech to understand what a sentence means, but waiting for more context also delays the moment at which the translation becomes final.
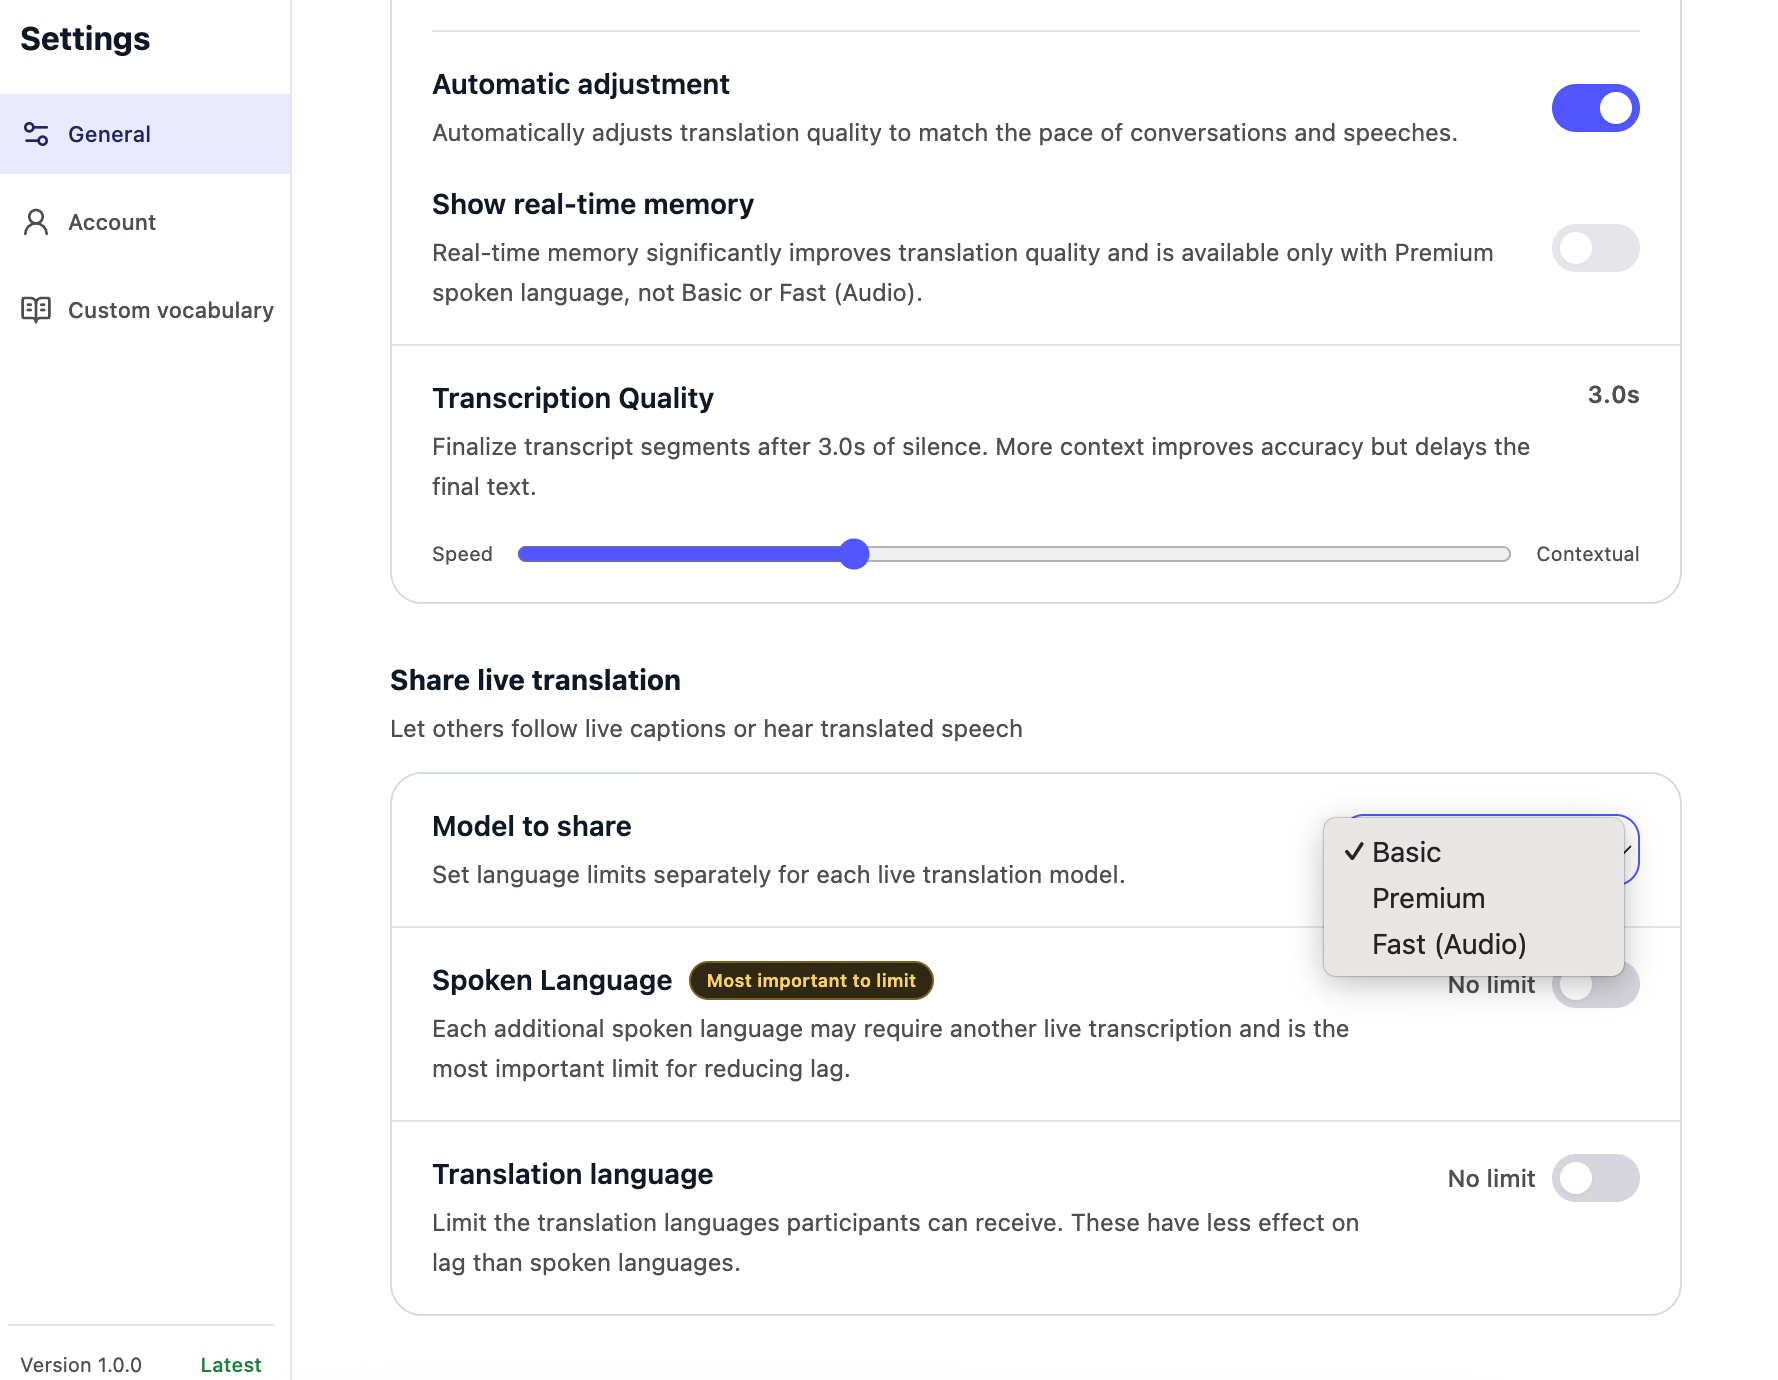
The Translation Quality slider lets you move between Speed and Contextual. Moving toward Speed finalizes translation sooner. Moving toward Contextual gives JotMe more time to interpret the sentence around a phrase before locking the translation.
The displayed silence value shows how long JotMe waits after speech pauses before locking the translation. A shorter wait suits quick exchanges where participants need immediate captions. A longer wait can help when speakers use complex sentences, domain terms, or pauses in the middle of a thought.
Version 1.0 also provides named starting points:
- Continuous speech for a steady presentation, lecture, or monologue.
- Discussion for frequent exchanges between participants.
- Normal meeting as a balanced default for regular calls.
- Critical meeting when retaining more context matters more than shaving off every fraction of a second.
- Fragmented meeting for stop-and-start speech with incomplete or interrupted phrases.
These presets are useful because the best delay is shaped by how people speak, not just by the meeting platform. Start with the closest pattern, then adjust the slider during a short test if captions feel too slow or sentences are being finalized too early.
Use Automatic adjustment and real-time memory
Turn on Automatic adjustment when you want JotMe to adapt translation quality to the pace of the conversation. This is useful for sessions that alternate between long presentations and faster question-and-answer exchanges.
Real-time memory lets the live translation use more of the ongoing conversation as context. It can improve consistency when names, topics, and decisions recur throughout a meeting. Availability depends on the selected spoken-language model.
If the conversation contains stable specialist terms, real-time memory works best alongside Custom Vocabulary. Memory helps JotMe retain what the current session is about. Vocabulary tells JotMe exactly how specific terms should be recognized or preserved.
Adjust transcription finalization
The Transcription Quality control changes how long JotMe waits before it considers a spoken segment complete. More waiting time provides more context but delays the final text. Less waiting time makes text appear final sooner but gives the model less of the surrounding sentence.
This setting is useful when speakers pause frequently. If fragments are being separated too aggressively, move toward Contextual. If the transcript feels noticeably behind a rapid conversation, move toward Speed.
Do not judge the setting from one sentence. Test a short passage that resembles the real session, including the same speaking pace, microphone, and vocabulary.
Share live captions or translated speech
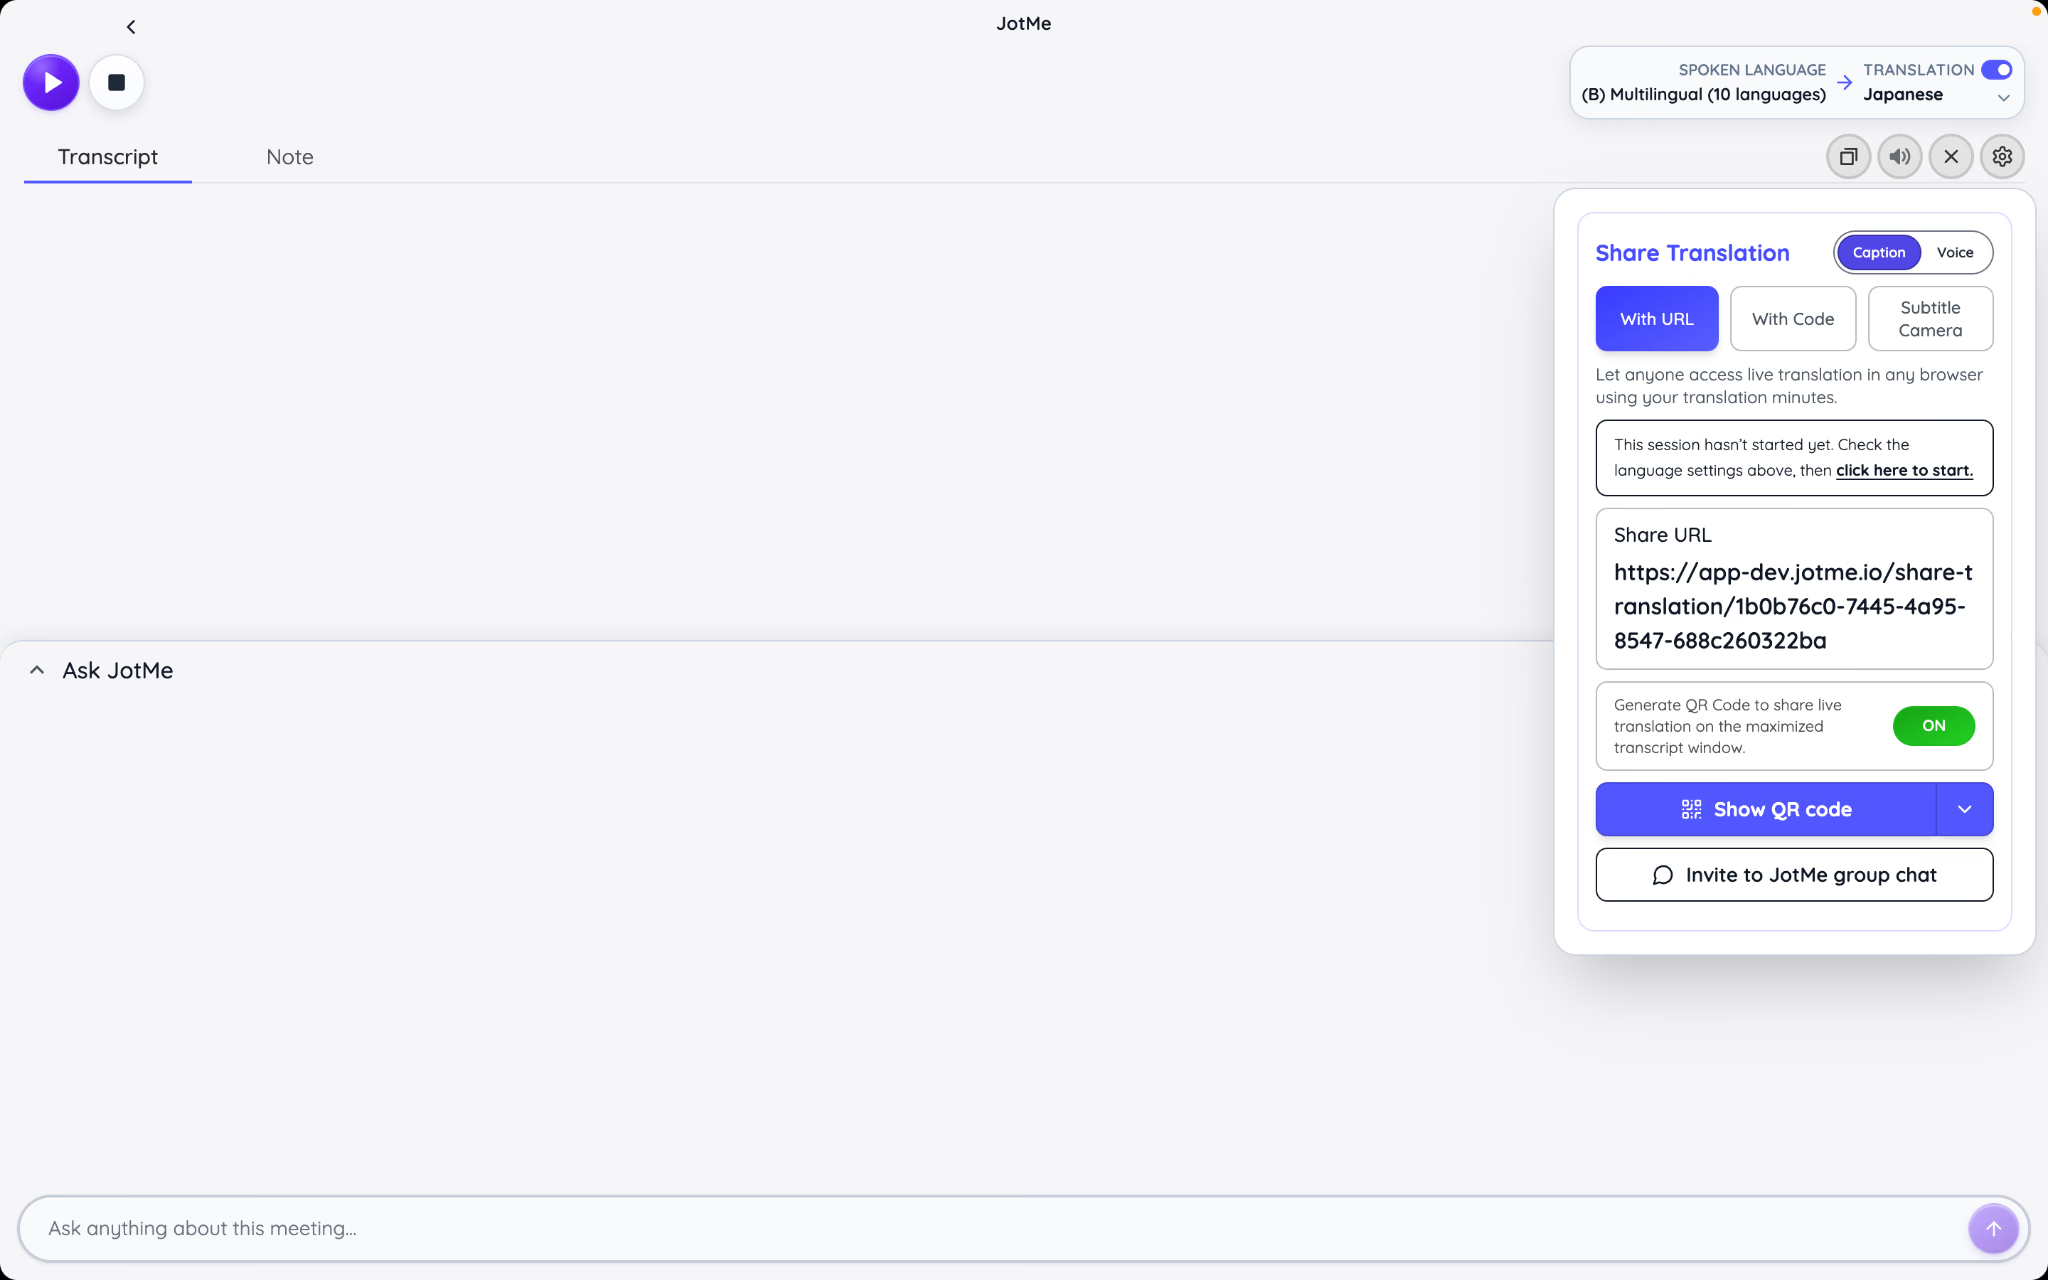
JotMe provides AI live translation sharing option through several delivery methods:
- A browser URL for participants on phones or computers
- A QR code for an in-person room or event
- A code for another JotMe Desktop user
- Subtitle Camera for captions inside a video feed
- A maximized transcript window for a projector or shared screen
Participants receiving a shared translation can read captions. When Voice is selected, they can also hear translated speech while the translated text remains visible. For in-person voice translator needs, provide headphones or earpieces so the translated audio does not feed back into the room microphone.
If you expect a large audience, limit the spoken and target languages offered through the shared session. Each additional live language creates more processing work. The Settings section later in this guide explains where to configure those limits.
For a scheduled event, create and distribute the link before the session begins. The detailed guide to sharing live translation with a URL explains the participant flow. A QR code that first appears after the speaker has started forces the audience to choose between joining the translation and following the opening remarks.
Stop the session and decide what happens next
Select Stop when the conversation ends. Depending on your saving preferences, JotMe can upload the audio, preserve the transcript, and generate AI meeting notes.
Keep the app open while the final audio finishes uploading. JotMe's documentation recommends allowing a few seconds at the end so the tail of the recording is captured. The saved item appears under Recordings, where notes and transcript processing can continue.
Your General settings determine whether JotMe generates AI meeting notes and stores the transcript, stores only the transcript, or stores neither. Review that preference before handling a sensitive discussion rather than after it has already been processed.
How Do You Review Recordings, Meeting Notes, and Transcripts?
Recordings is where a live conversation becomes usable after the call ends. Instead of presenting the audio, transcript, notes, and follow-up tools as separate files, JotMe keeps them attached to the same session.
This makes the meeting recording useful even when you do not plan to replay it from beginning to end. You can scan the generated notes, search the transcript, jump to a moment in the audio, leave a comment, share the result, or ask a direct question about what happened.
Find and open a recording
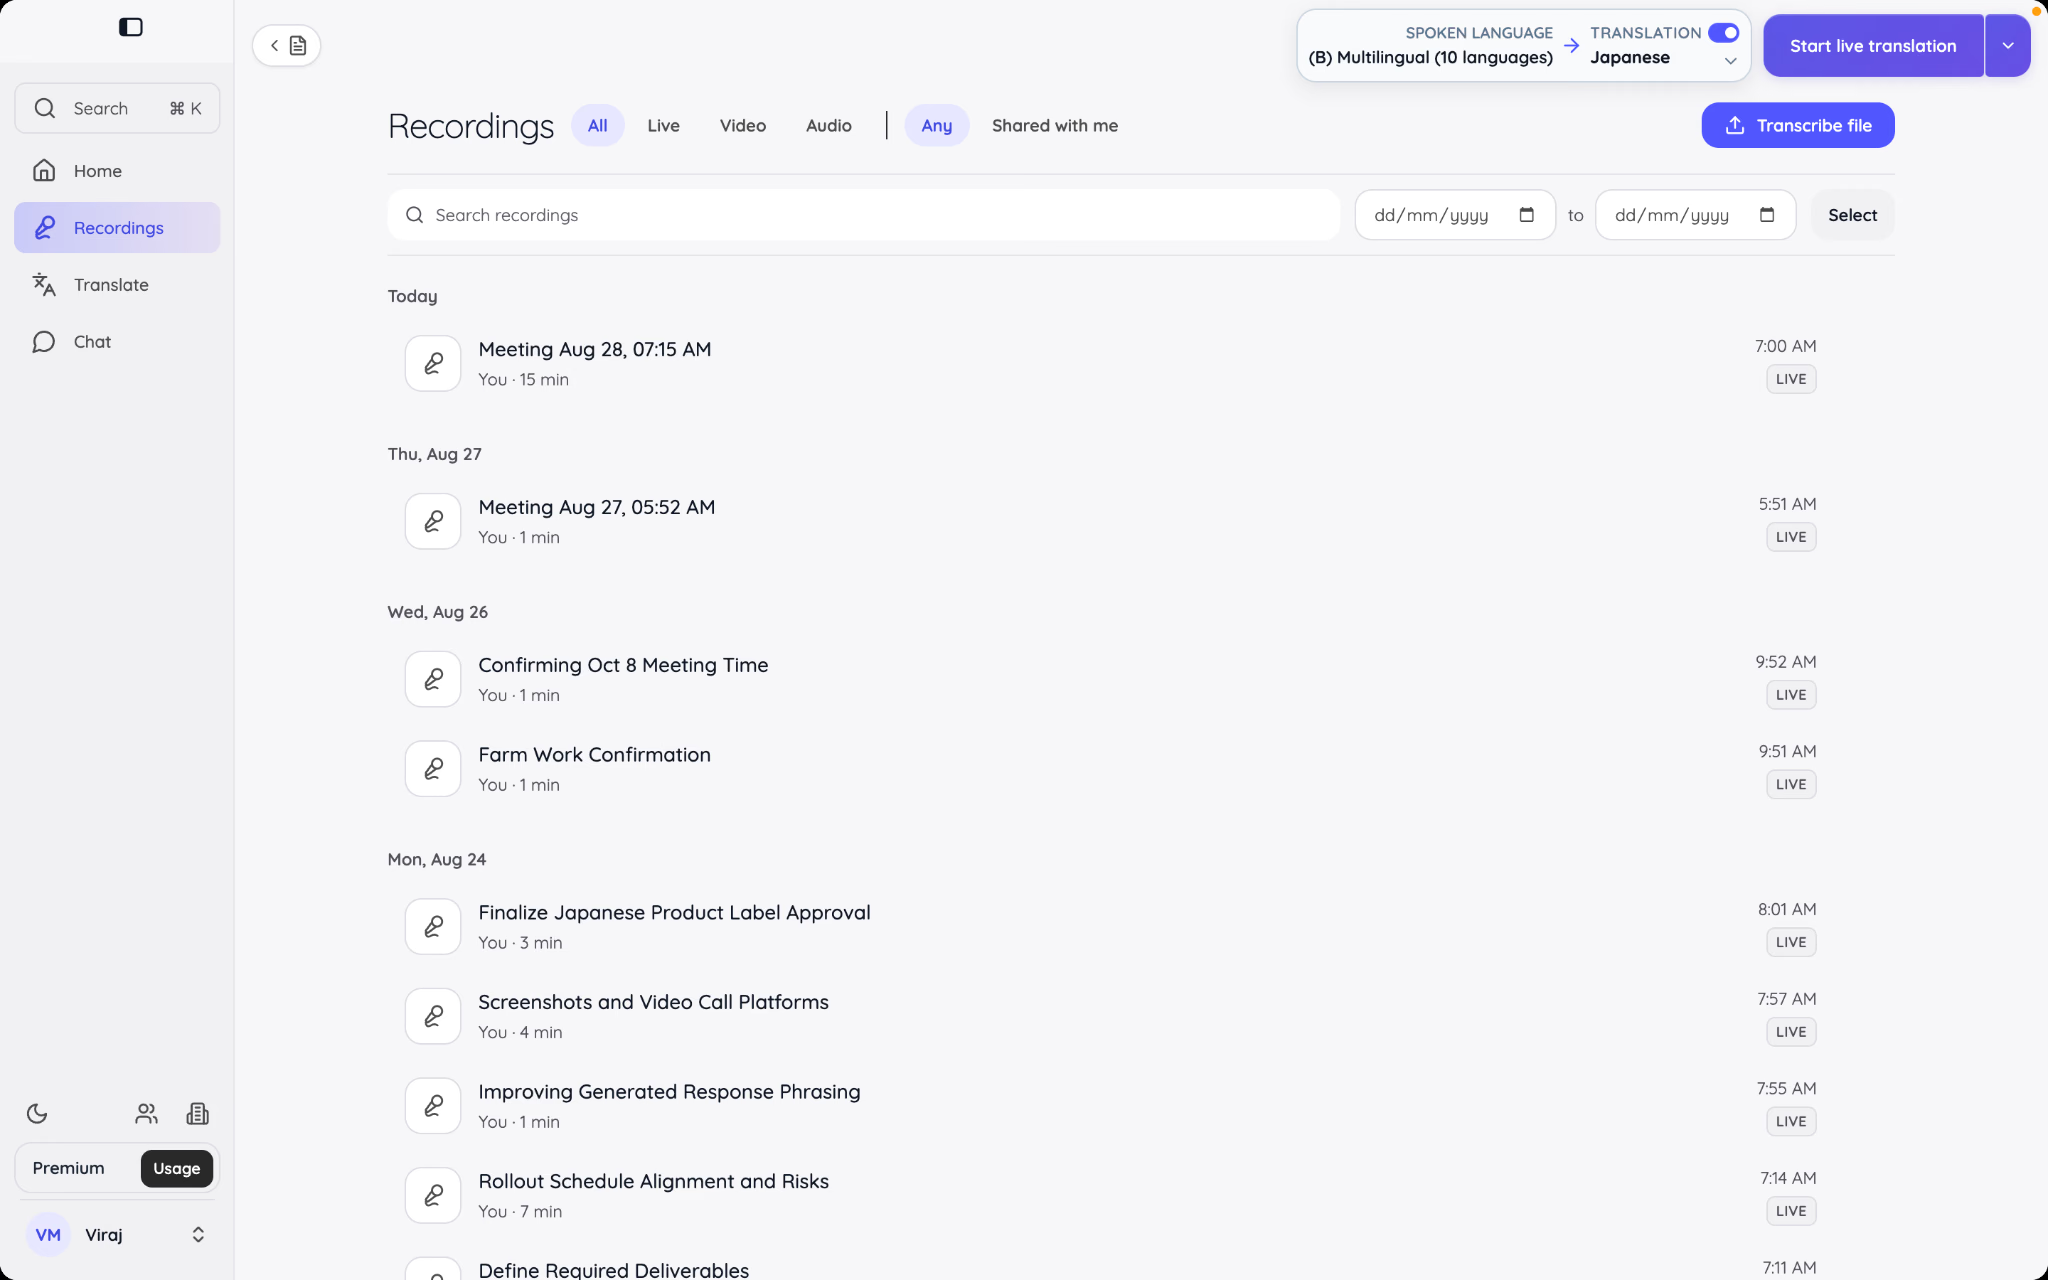
Select Recordings from the left sidebar. The full recordings library can be filtered by type, ownership, date, or search terms. Live sessions, uploaded audio, and uploaded video return to this same library after processing.
Use transcript search when you remember a subject but not the meeting title. JotMe can search inside the transcript rather than requiring an exact filename. Date filters are useful when a recurring meeting produces similar titles every week.
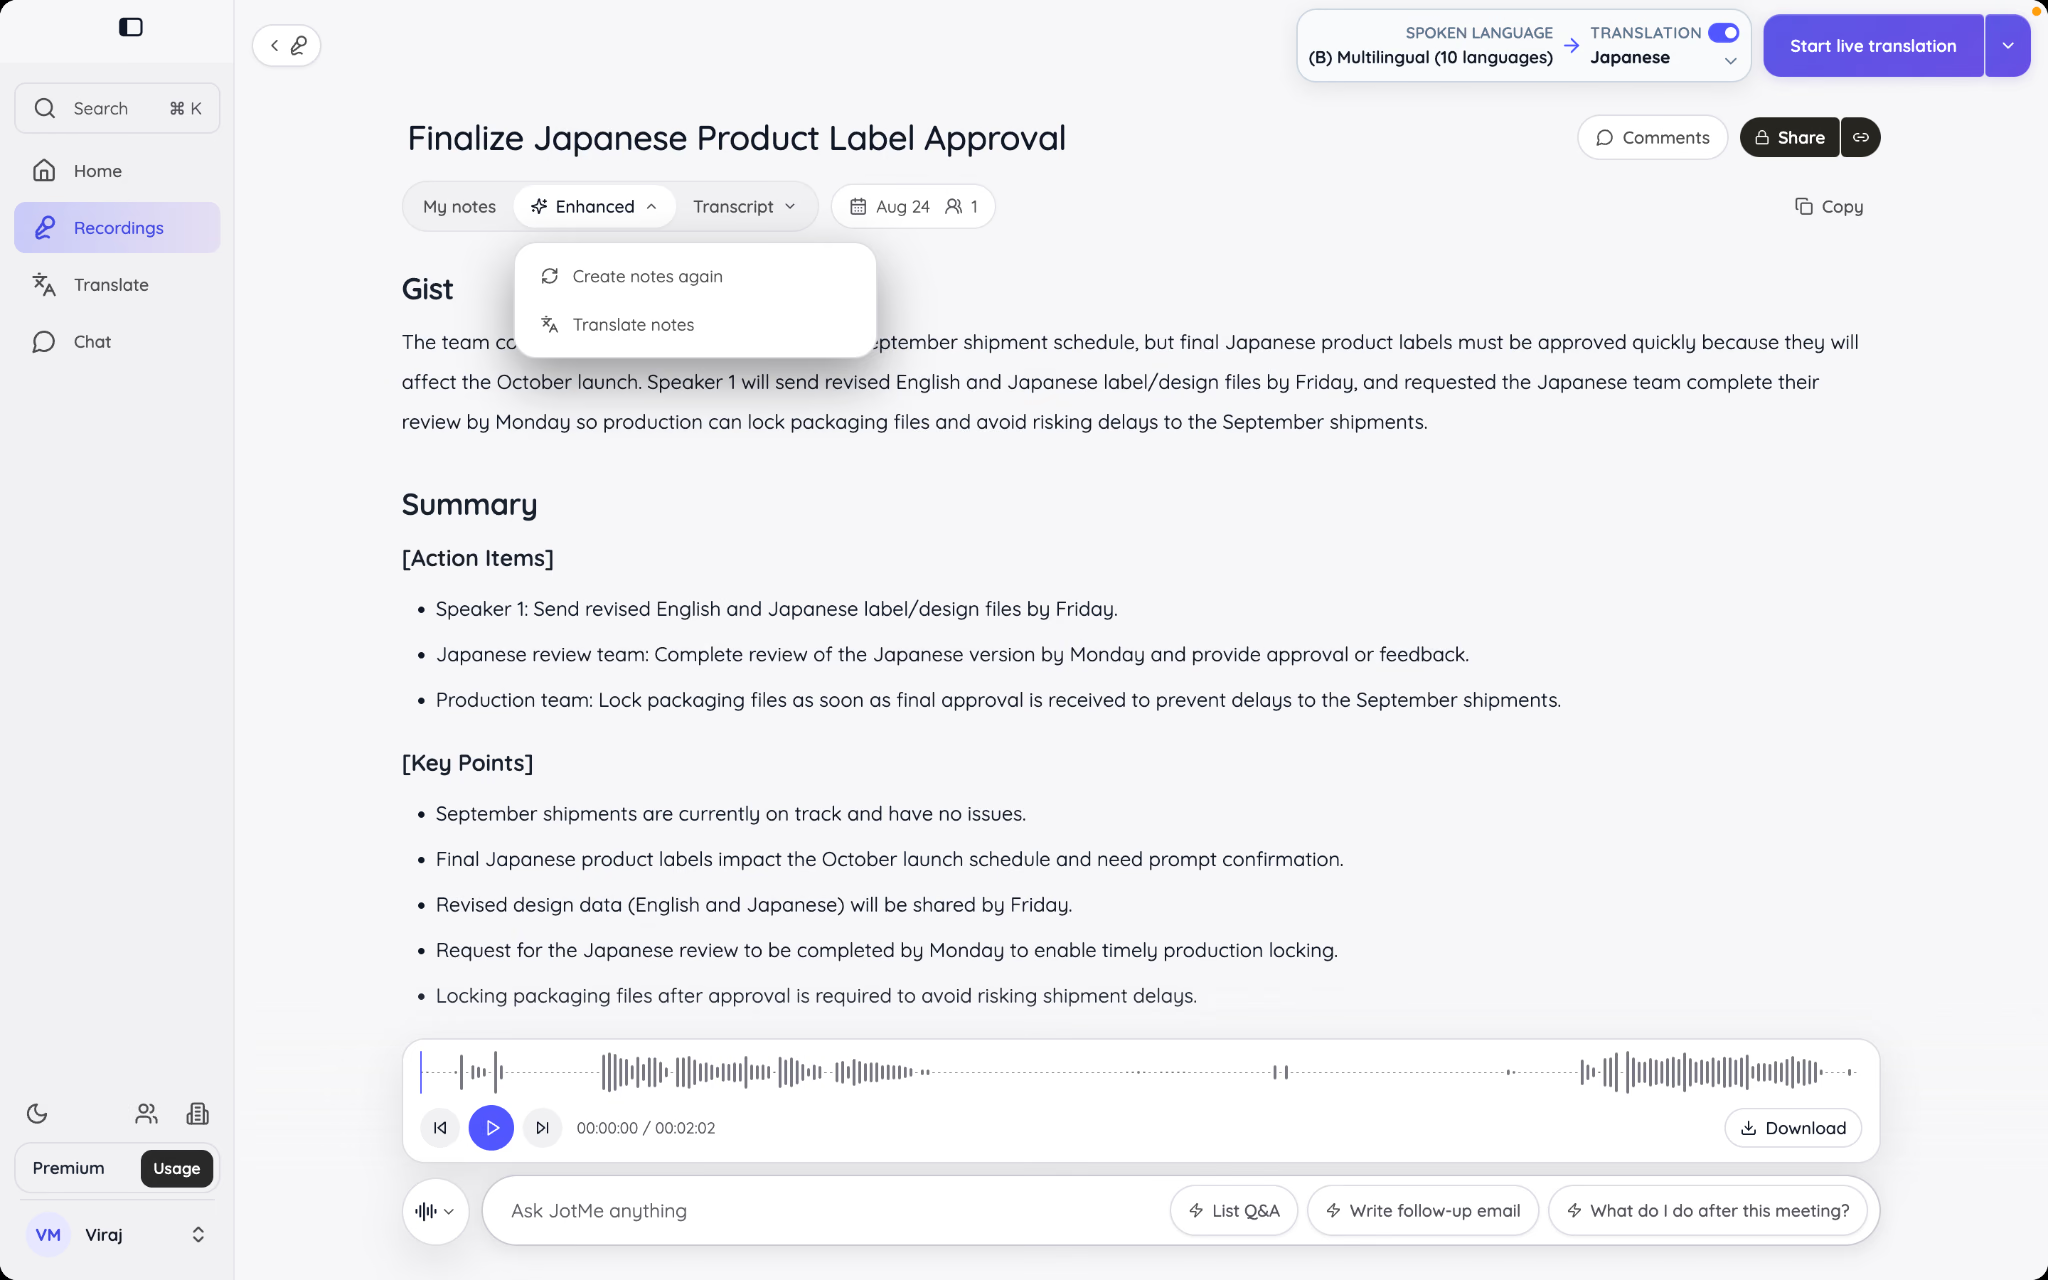
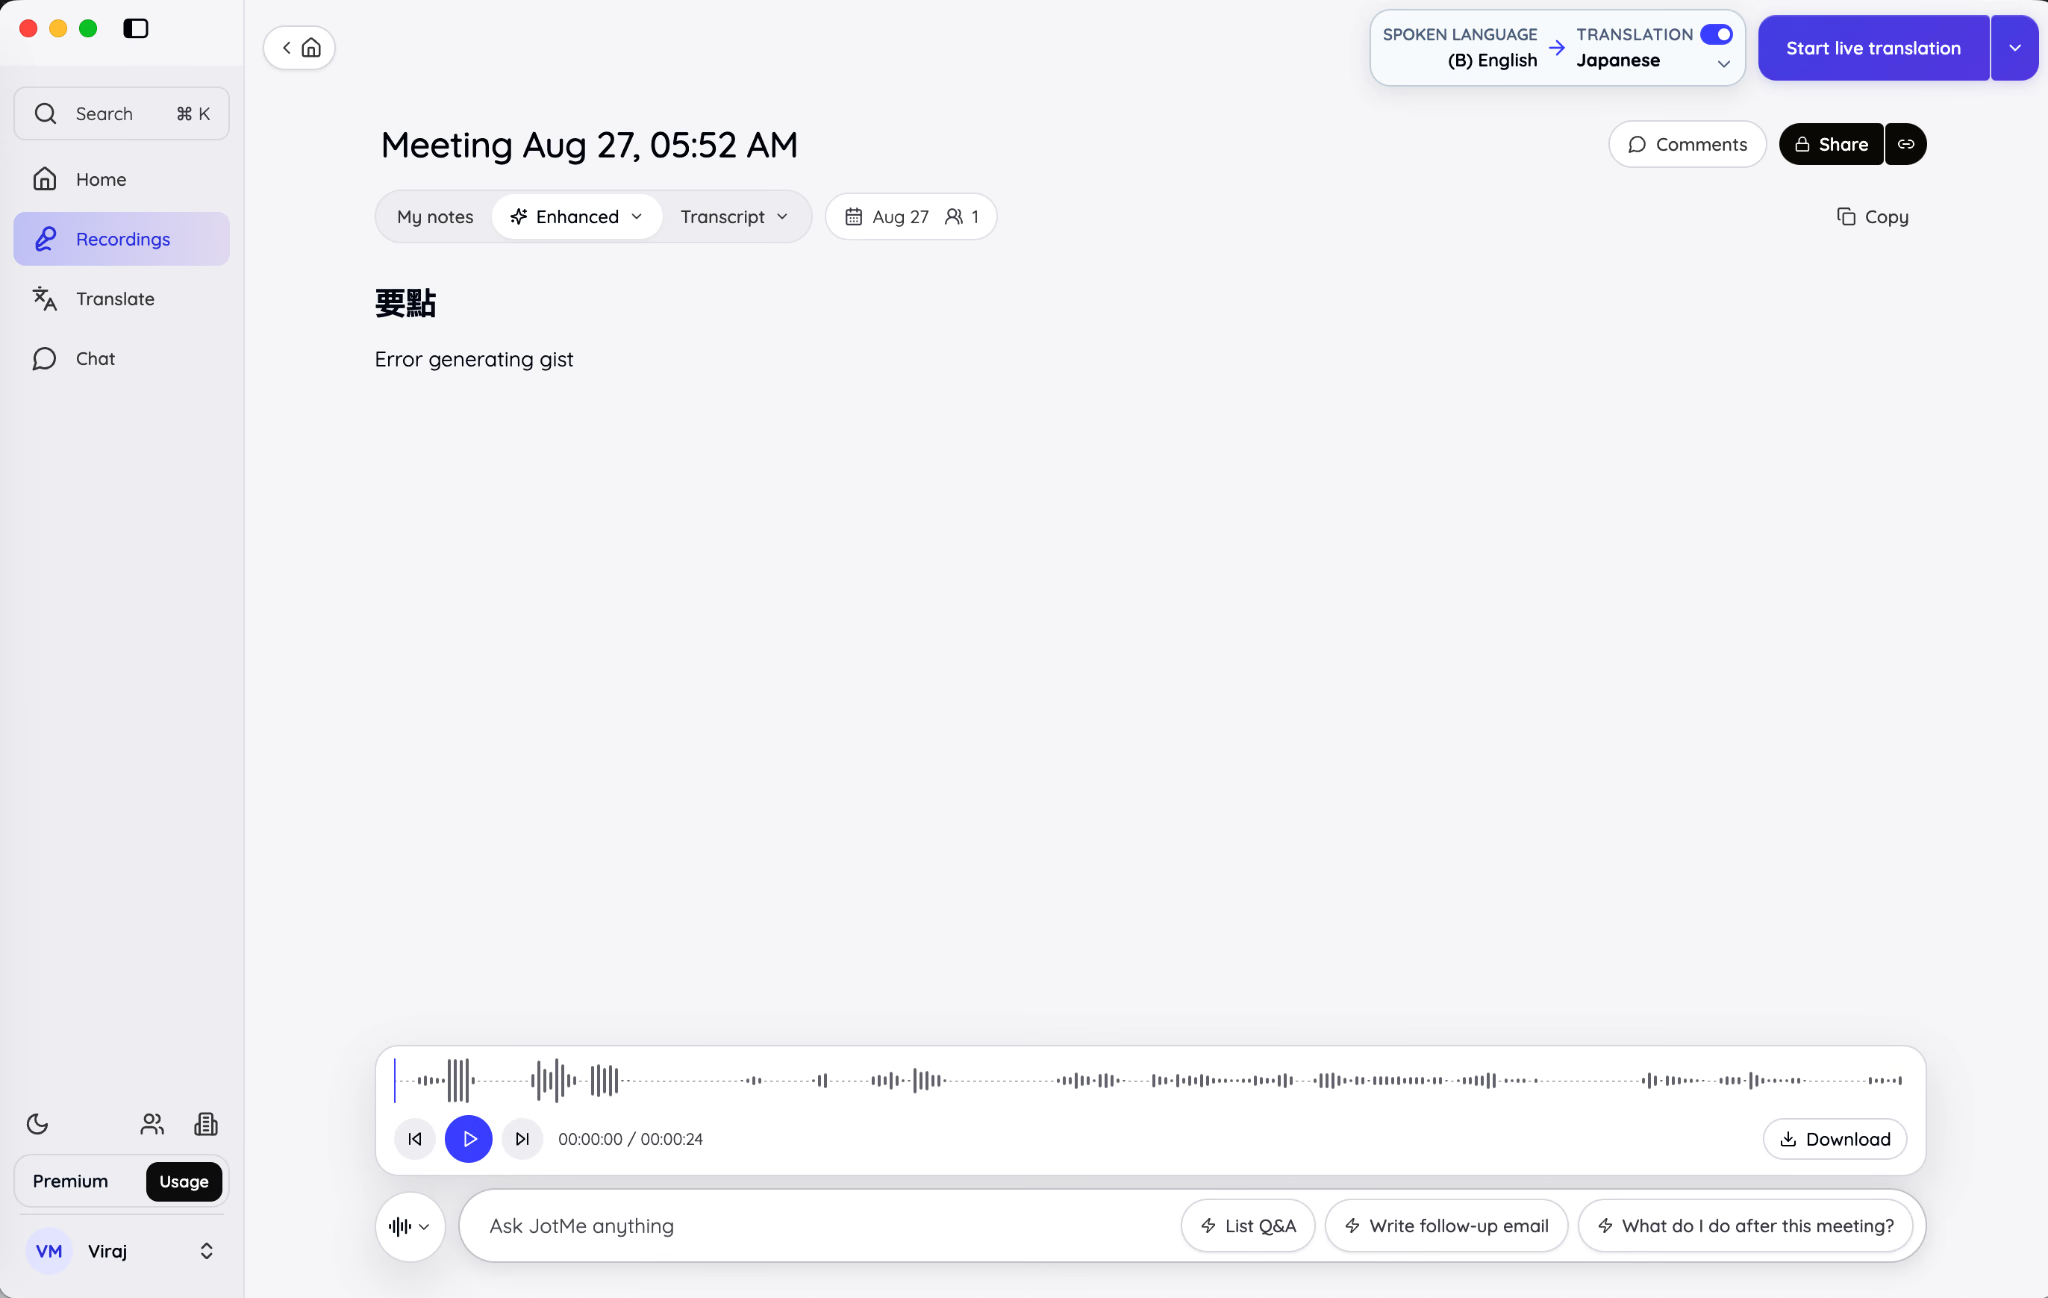
Open a recording to see its name, date, language settings, notes, transcript, audio controls, sharing controls, and Ask JotMe panel. The saved recording becomes the source of truth for the work that followed the conversation.
Review My notes, Enhanced notes, and Transcript
A saved session separates three types of information:
- My notes contains what you wrote yourself during the session.
- Enhanced contains the AI meeting notes JotMe generated from the transcript and your notes.
- Transcript contains the detailed speech record with speakers and timestamps.
This separation solves a common meeting-notes problem. Your personal notes may contain a reminder such as “Check the budget figure before sending this to the client.” That reminder can help JotMe understand what mattered, but it should not automatically become a claim in the shared summary.
Enhanced notes are designed for fast review. Depending on the conversation, JotMe can organize the output into a gist, meeting summary, key points, action items, and other points. Use the transcript when you need the exact wording or surrounding context behind one of those summaries.
Treat AI meeting notes as a structured first review, not as a replacement for judgment. Before sending notes outside the meeting, verify names, figures, owners, dates, and statements that could change a decision.
You can also read our guide on how to take meeting notes with AI on live calls.
Play the recording and navigate by time
The playback controls appear along the bottom of the recording. The waveform makes it easier to move to another point without dragging through a featureless progress bar.
Use playback when the transcript alone cannot convey tone or when a sentence appears ambiguous. A pause, interruption, or correction can change how a written line should be interpreted.
Speaker labels and timestamps help connect text to audio. If the recording contains several people, rename unclear speaker labels before widely sharing or citing the transcript. Clean labels make every later task, including Ask JotMe queries and action-item review, easier to understand.
Add comments without rewriting the source
Comments let reviewers discuss the saved meeting without editing the original transcript or generated notes immediately. Select the comments control, write the comment, and post it against the relevant recording.
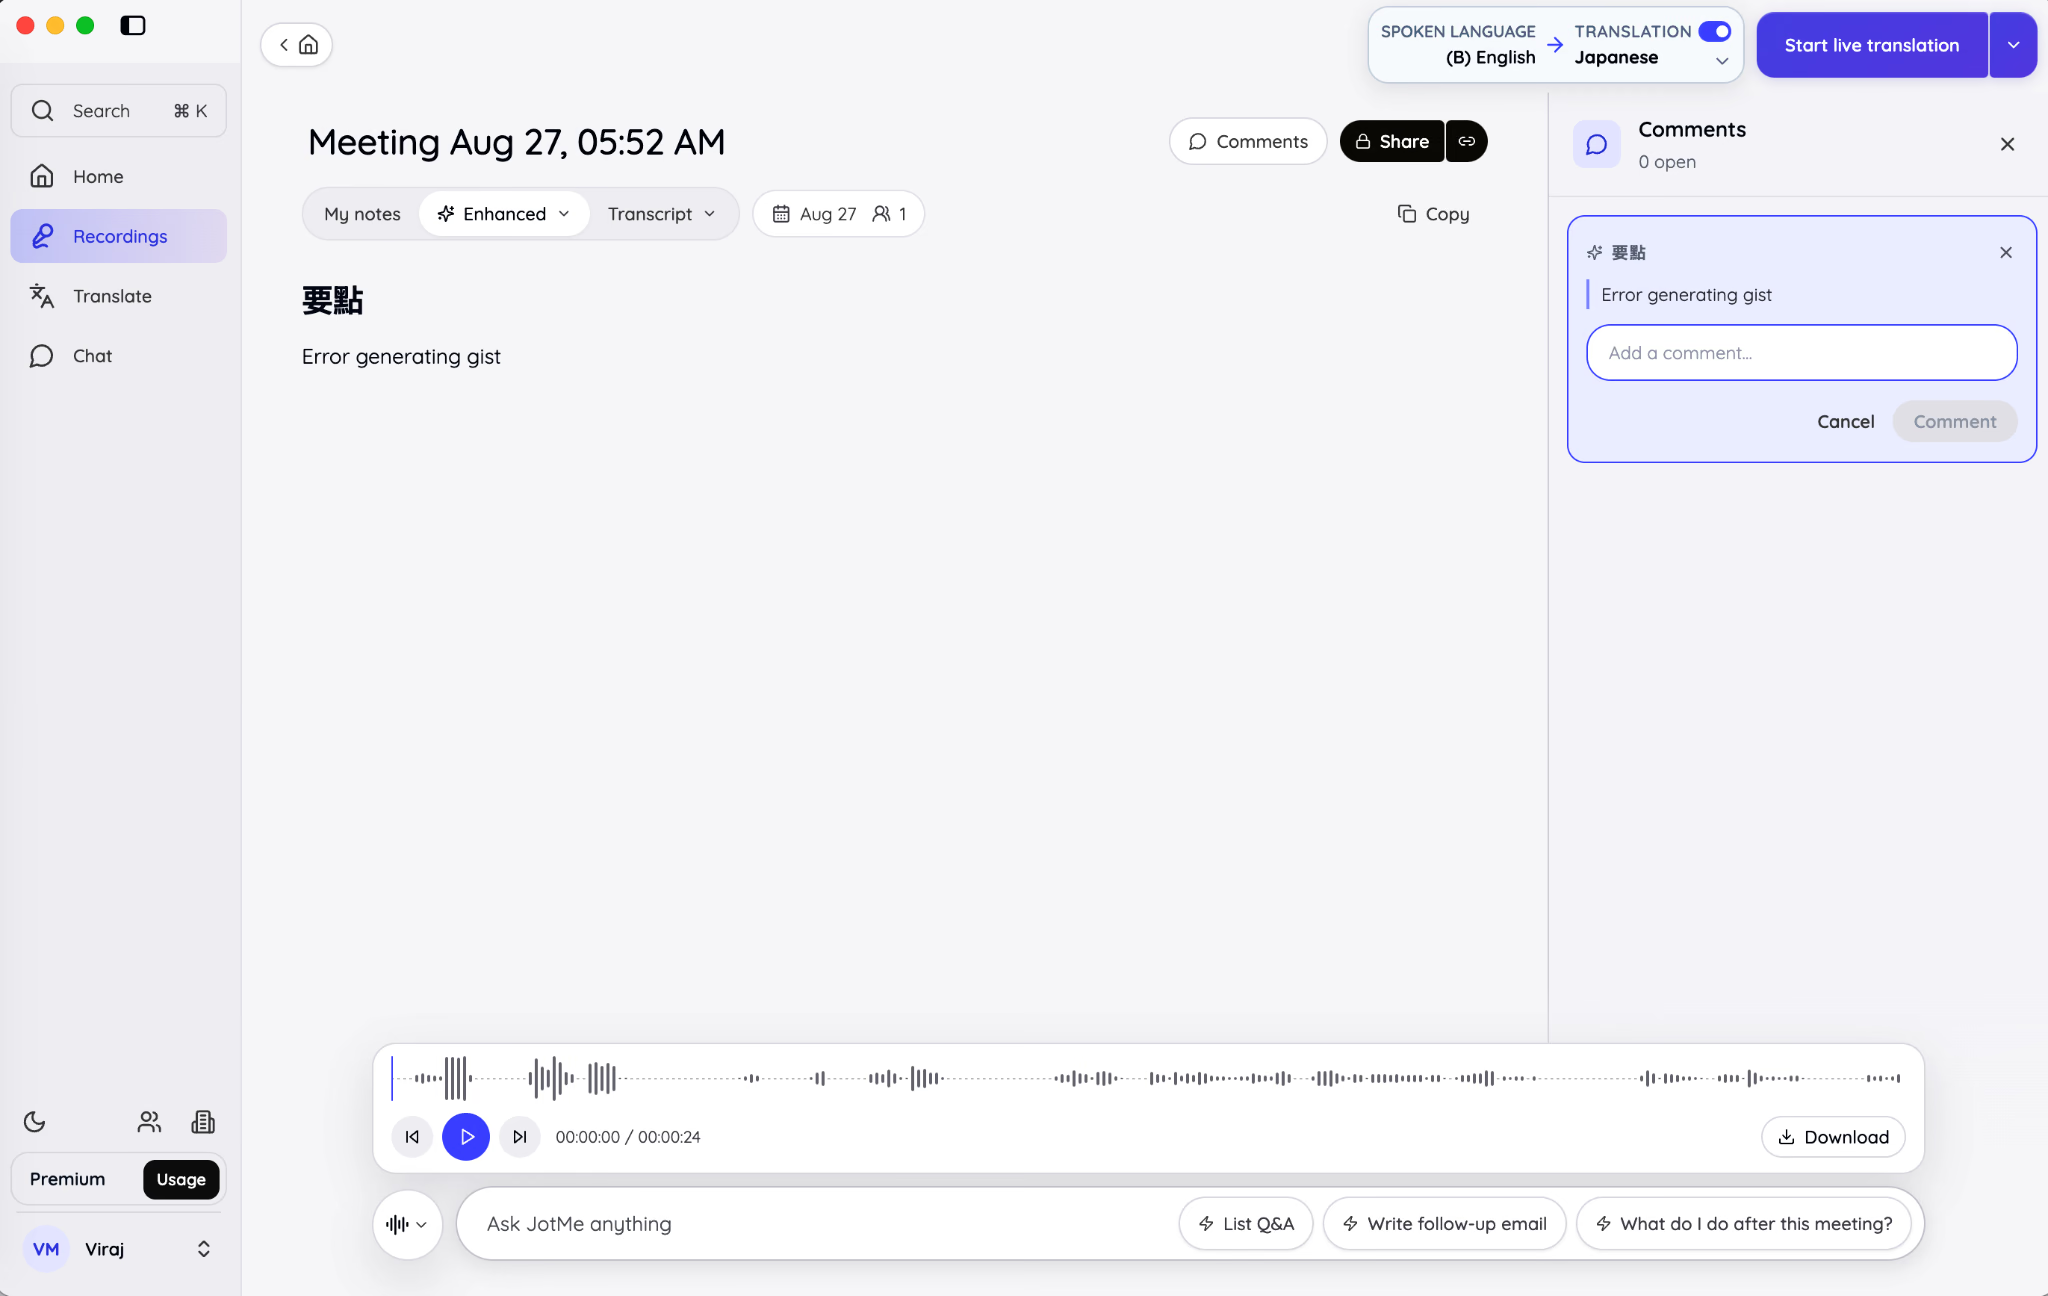
This is useful when a reviewer wants to challenge or clarify a point. For example, a project manager can ask whether a date was confirmed or merely proposed. The team can resolve the question before altering the shared notes.
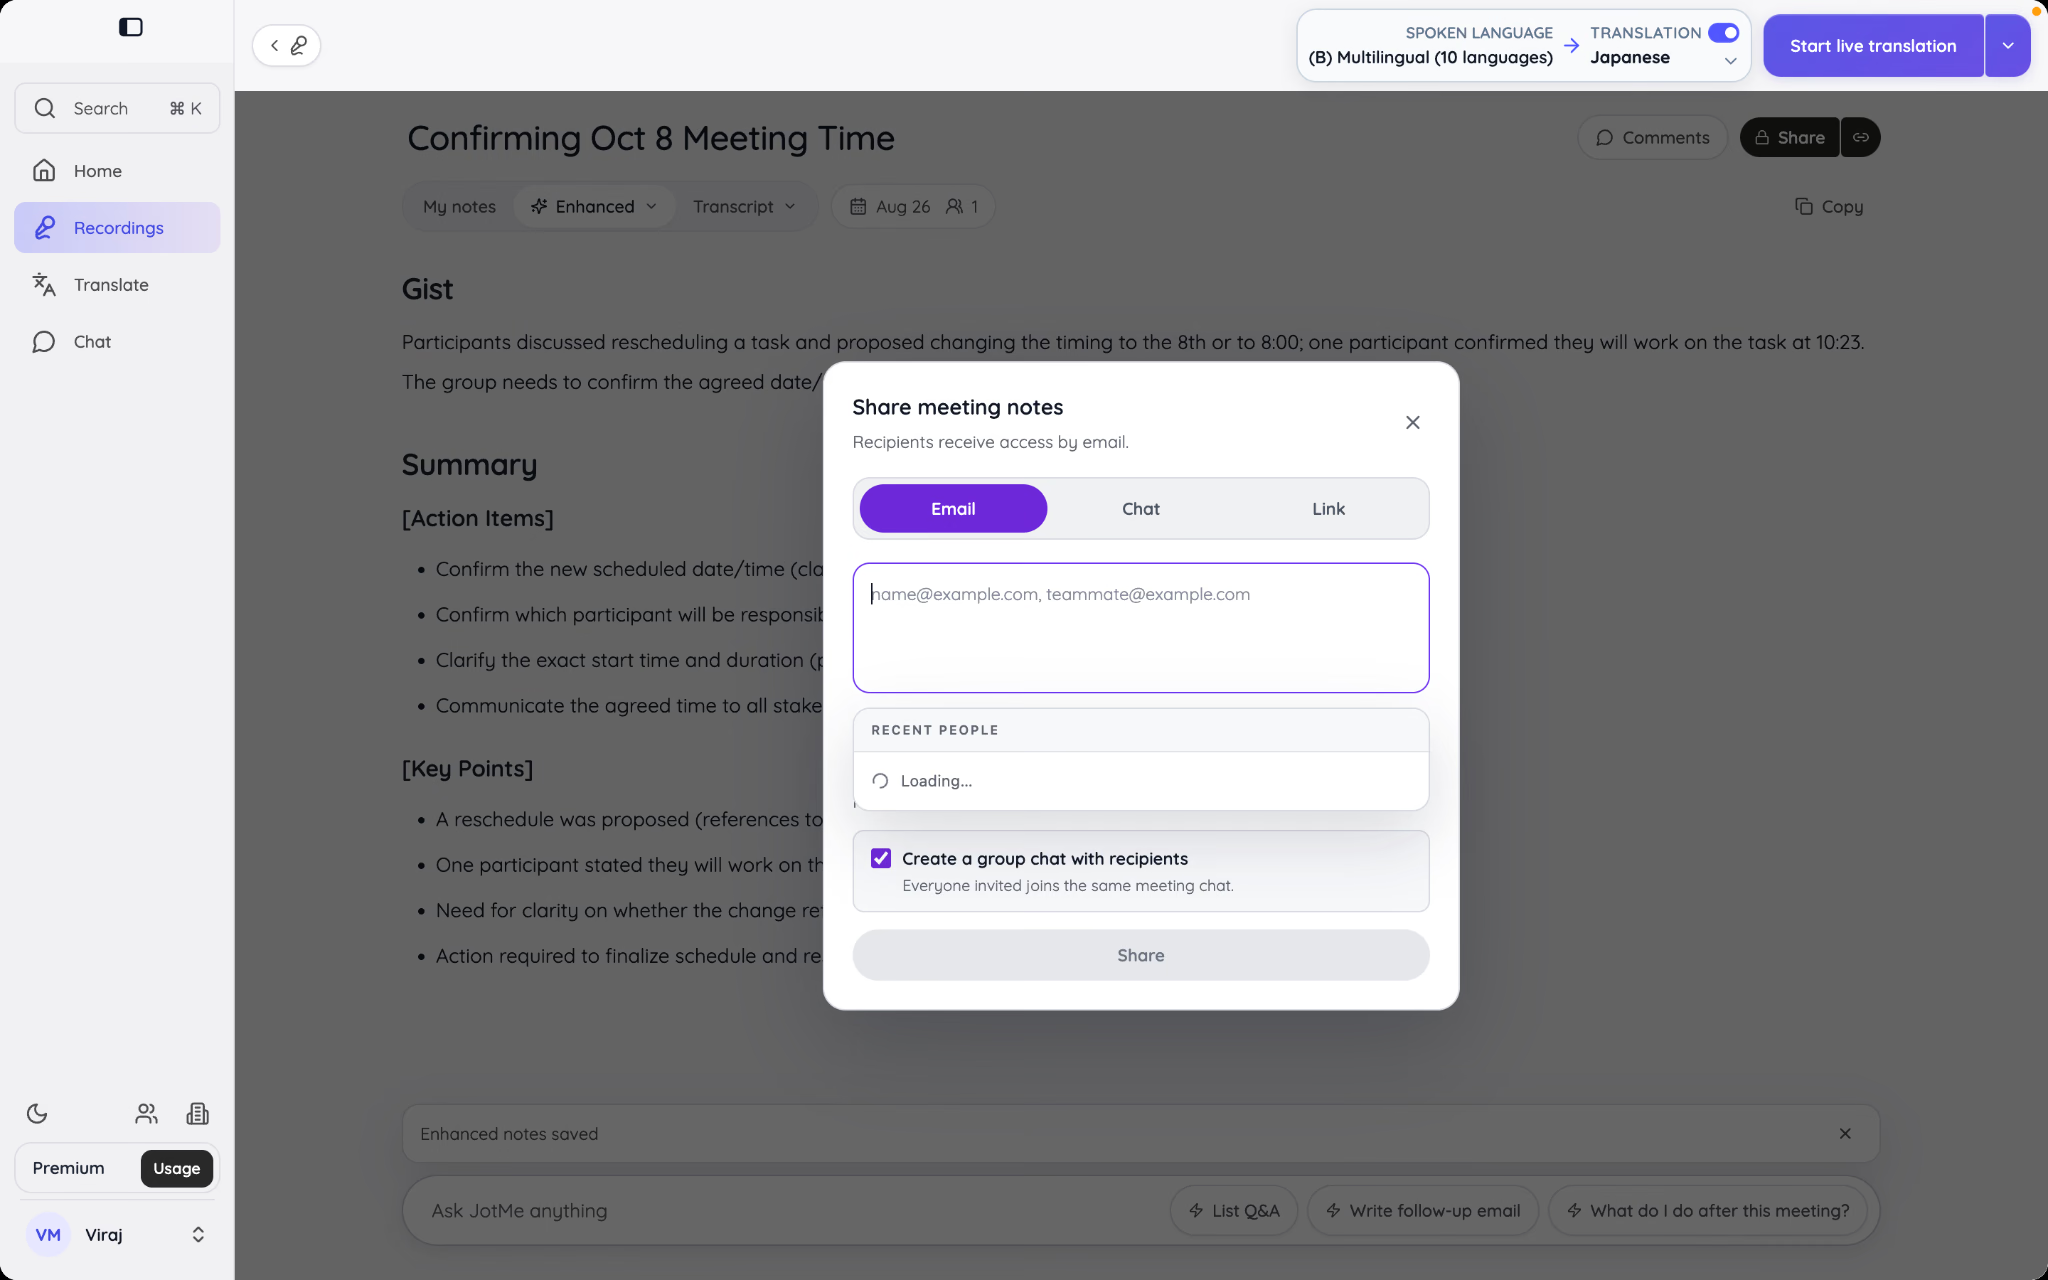
When sharing a recording, assign the permission that matches the collaboration you want:
- View lets recipients play the recording and read the AI notes and transcript.
- Comment adds the ability to leave comments.
- Edit lets recipients change the shared notes or transcript text as well as comment.
Your private content under My notes is not included in the shared meeting notes. Enhanced notes, the transcript, and the audio recording form the shareable meeting record.
Search and copy the transcript
Open the Transcript view when you need the detailed conversation. Use the transcript search field to find a name, customer request, number, deadline, technical term, or repeated subject.
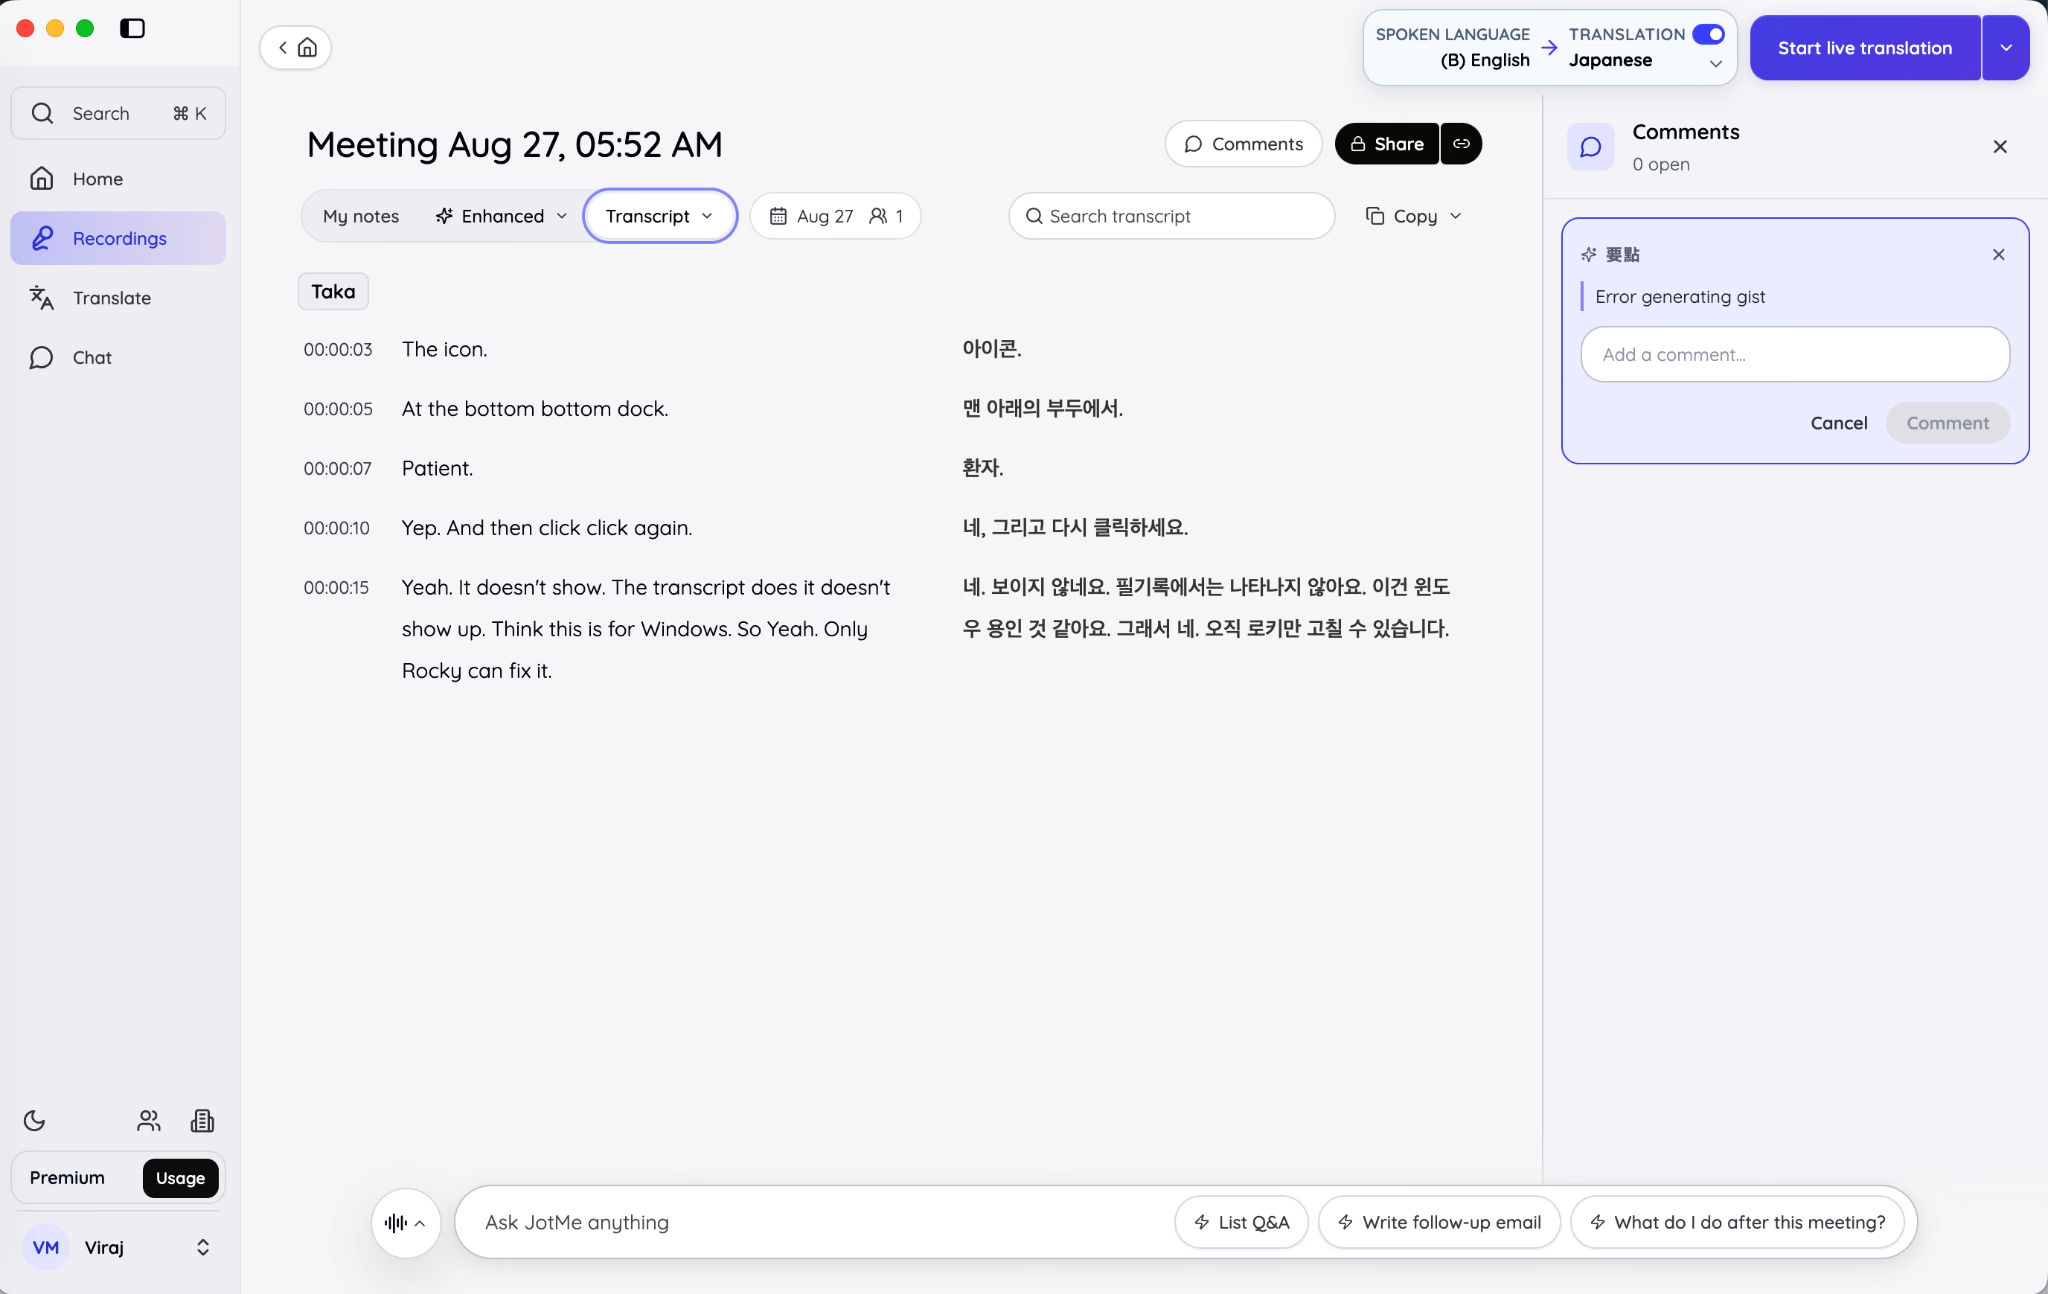
Copy the relevant text when you need to move a verified passage into another document. Avoid copying an isolated sentence if the surrounding exchange changes its meaning. The timestamp and speaker label provide useful context for internal documentation.
The transcript is also the best place to inspect whether the selected environment produced sensible speaker separation. In an in-person session, numbered speakers are expected. In an online session, JotMe distinguishes your microphone as You and labels the other audio separately.
Use Ask JotMe during or after the meeting
Ask JotMe is tied to the session you opened. It reads that meeting's transcript and notes, so its answer should be based on what was actually said in that conversation rather than on general web knowledge.
During a live session, the Ask JotMe panel sits below the Transcript and Note areas. After the session, it opens within the saved recording and retains a separate chat history for that meeting.
Useful questions include:
- What did we decide, and what remains unresolved?
- Which actions were assigned, to whom, and by when?
- What numbers or dates were mentioned?
- What did a particular speaker commit to?
- Which questions did the customer ask?
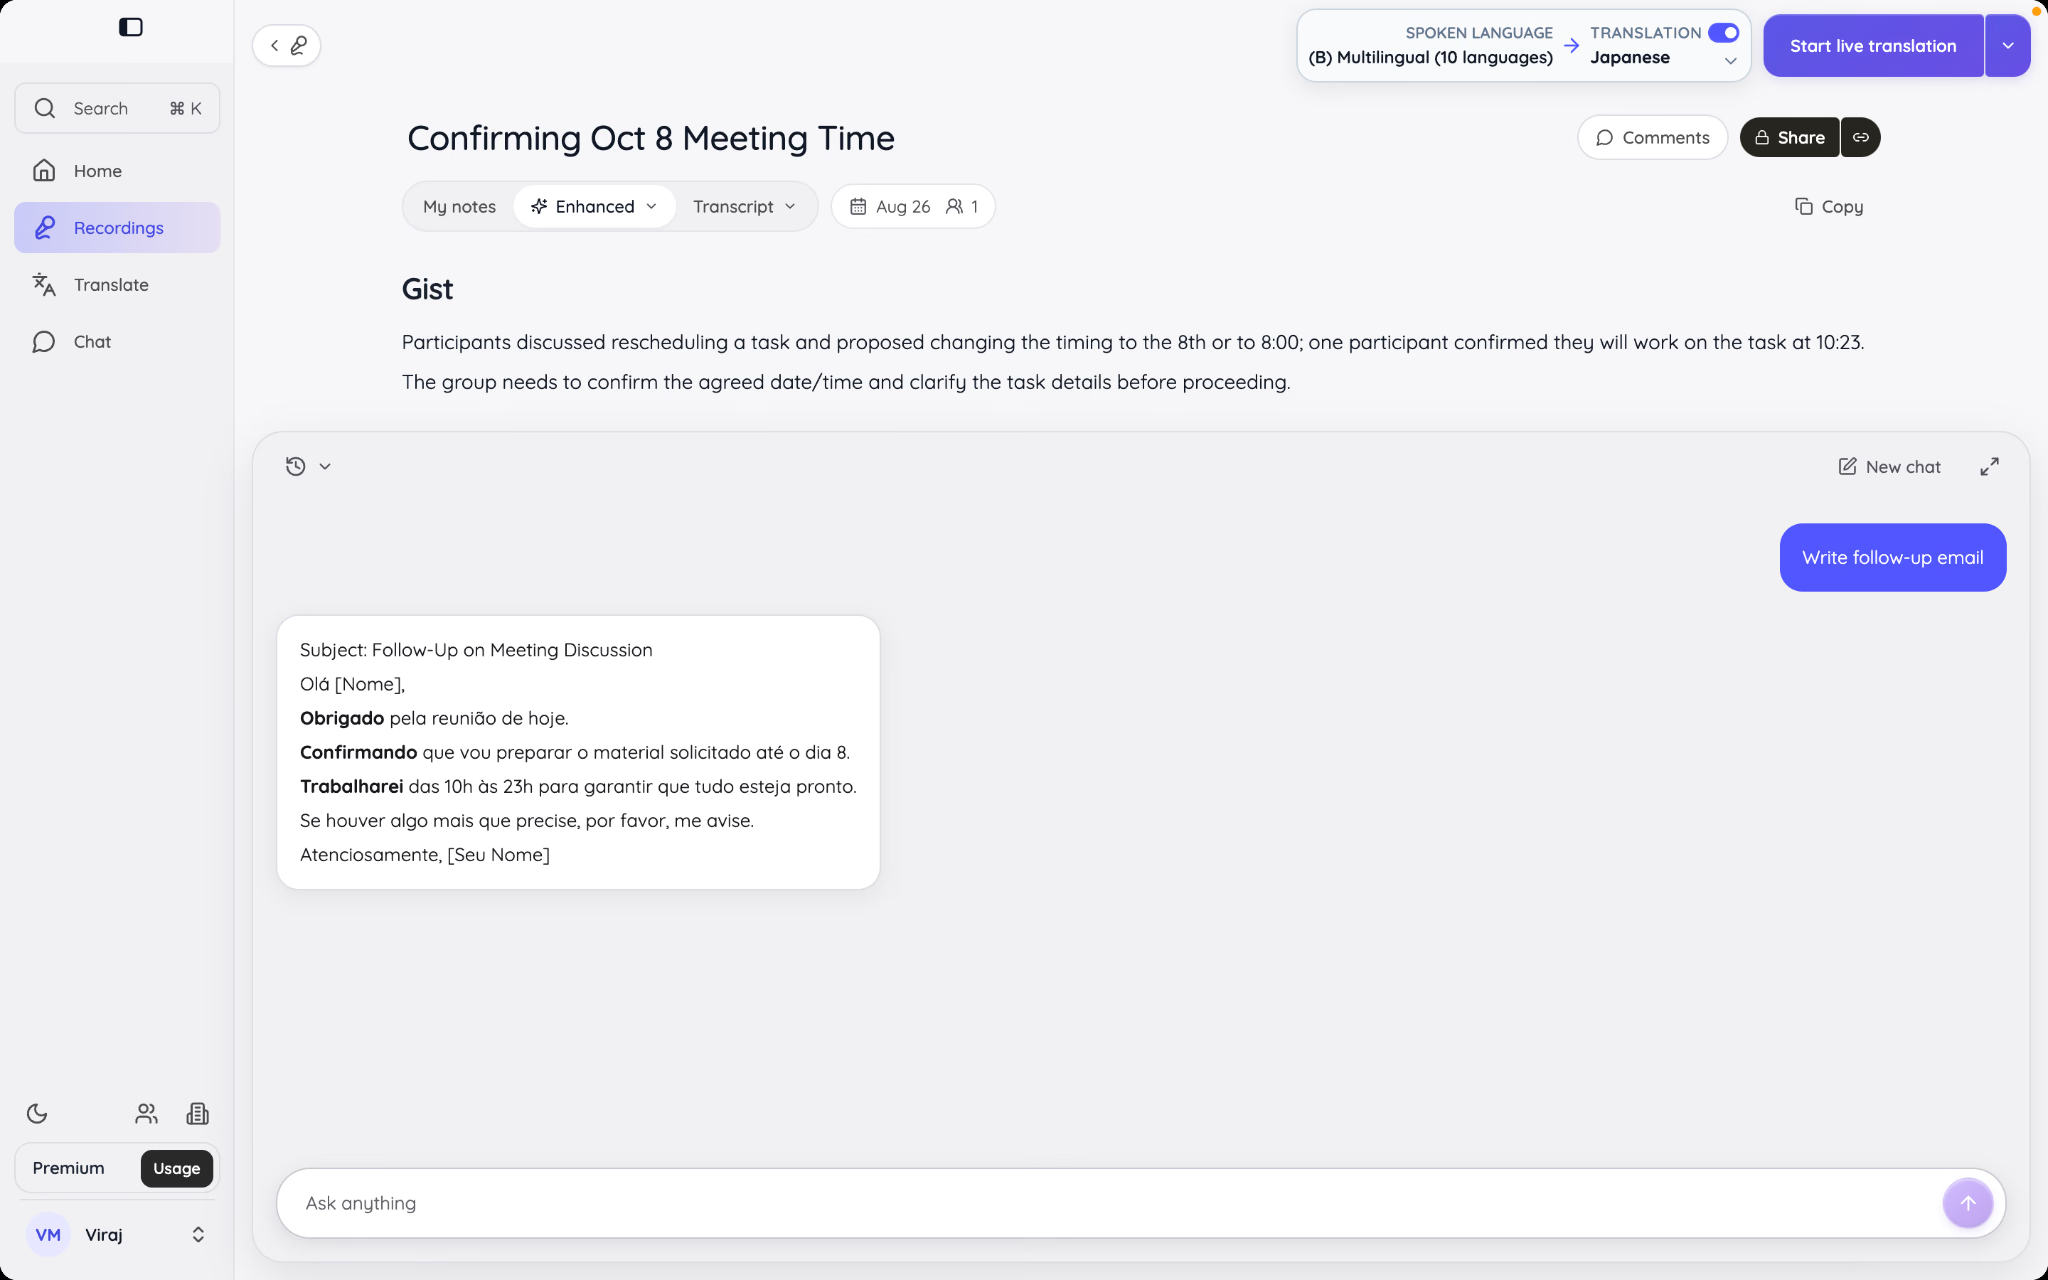
- Write a follow-up email using the decisions from this meeting.
- Summarize the discussion for someone who could not attend.
The suggested prompts in the interface include List Q&A, Write follow-up email, and What do I do after this meeting? They are starting points, not fixed reports. Ask a follow-up question when the first answer identifies an issue that needs more detail.
Ask JotMe keeps conversations per recording. Starting a new chat clears the current conversational thread but retains the same meeting as the evidence source. It does not search across every recording in your account at once.
Each Ask JotMe question uses an AI credit under the current documented usage model. If you are planning several questions, begin with a broad request such as “List all decisions, owners, deadlines, and unresolved questions.” Then drill into the items that need verification.
Share or download the meeting record
Use Share when another person should access the recording inside JotMe or through an enabled link. Choose the appropriate permission before sending it to a chat or email recipient.
Use Download when you need an offline copy of an available output. The exact download choices can depend on the recording and the outputs that finished processing.
For external communication, share the reviewed Enhanced notes rather than a raw transcript whenever possible. A transcript can be long, repetitive, and full of spoken fragments. Include the transcript when the recipient needs evidence, exact wording, or the ability to audit the summary.
How Do You Translate Text, Files, Images, Audio, and Video?
The Translate workspace separates content by medium because each medium requires a different process. Text can be translated immediately. A formatted document must preserve structure. An image requires text detection and rendering. Audio and video can require multilingual transcription, dubbing, speaker handling, and captions.
Select Translate in the left sidebar, then choose the content type at the top. The workspace keeps translation history so you can return to completed jobs without locating the original file again.
Translate typed or pasted text
Choose Text for short content such as an email, message, product description, meeting follow-up, or paragraph from a document.
The basic process is:
- Leave the source language on Auto detect or select it manually.
- Choose the target language.
- Type or paste the source text.
- Add an optional translation preference.
- Select Translate.
- Review and copy the result.
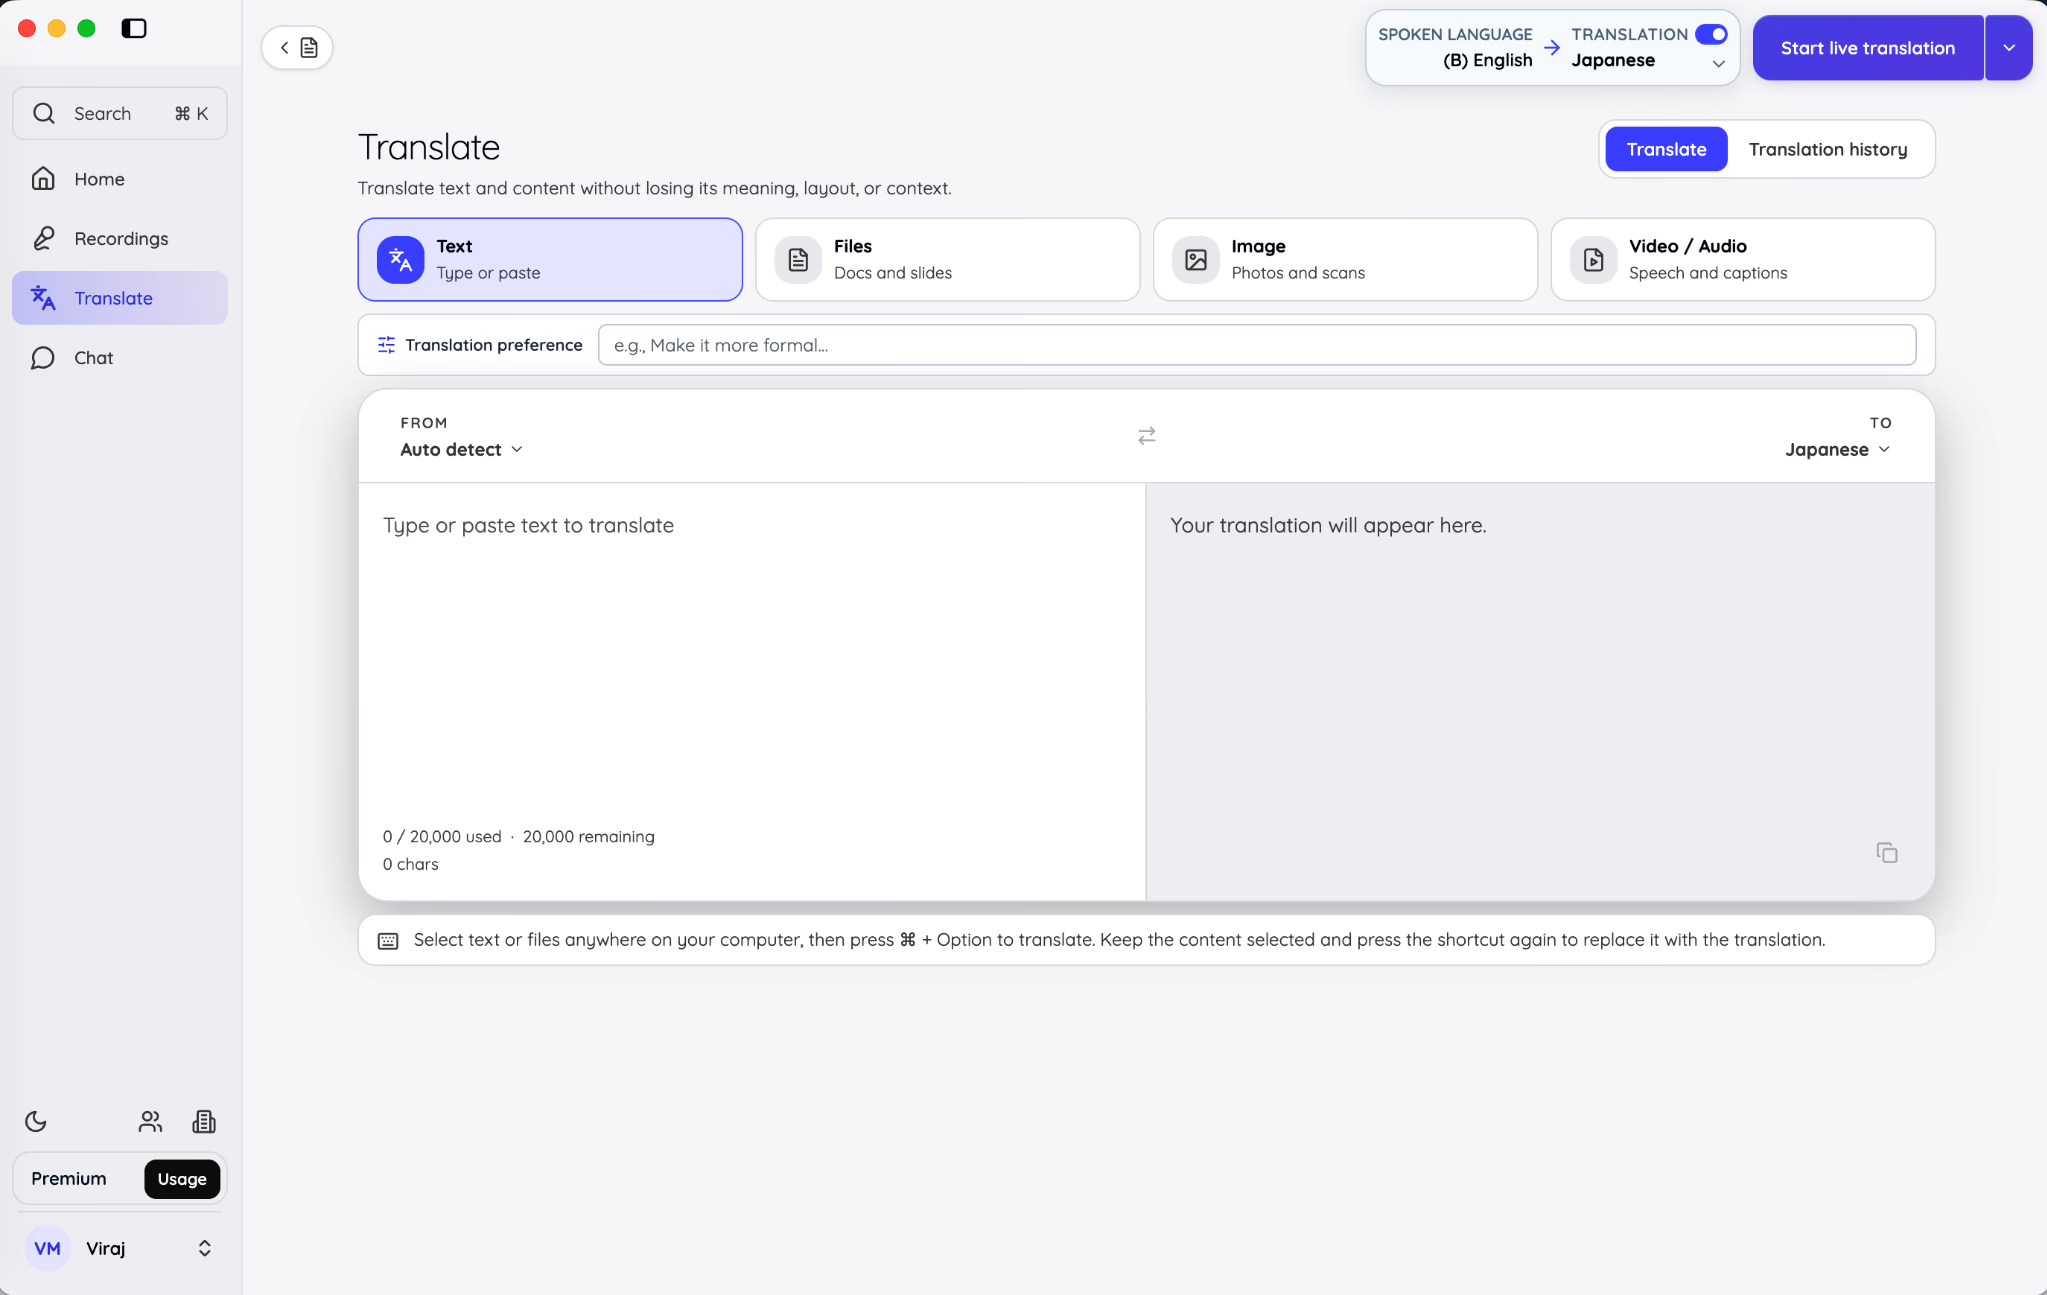
The translation preference is where you can describe the required tone or treatment in plain language. You might ask JotMe to make the translation more formal, keep product names unchanged, use language suitable for a customer-support reply, or preserve a direct and concise tone.
Write the preference as a concrete instruction. “Make it better” gives the model no useful standard. “Use polite business Japanese, preserve the product names in English, and keep the response under 120 words” gives it a clear task.
Text translation shows a character count and places the result beside the source. The saved history is useful when you need to reuse or compare a previous translation, but deleting an item from history is permanent.
JotMe Desktop also supports translating text selected in another application through a system shortcut when that shortcut is enabled in Settings. This is helpful when you want to translate a sentence in a browser, document, or message without manually switching to the Translate workspace first.
Translate a document without flattening its structure
Choose File when the layout and file structure must survive the translation. JotMe returns a translated copy rather than only extracting all text into one plain block.
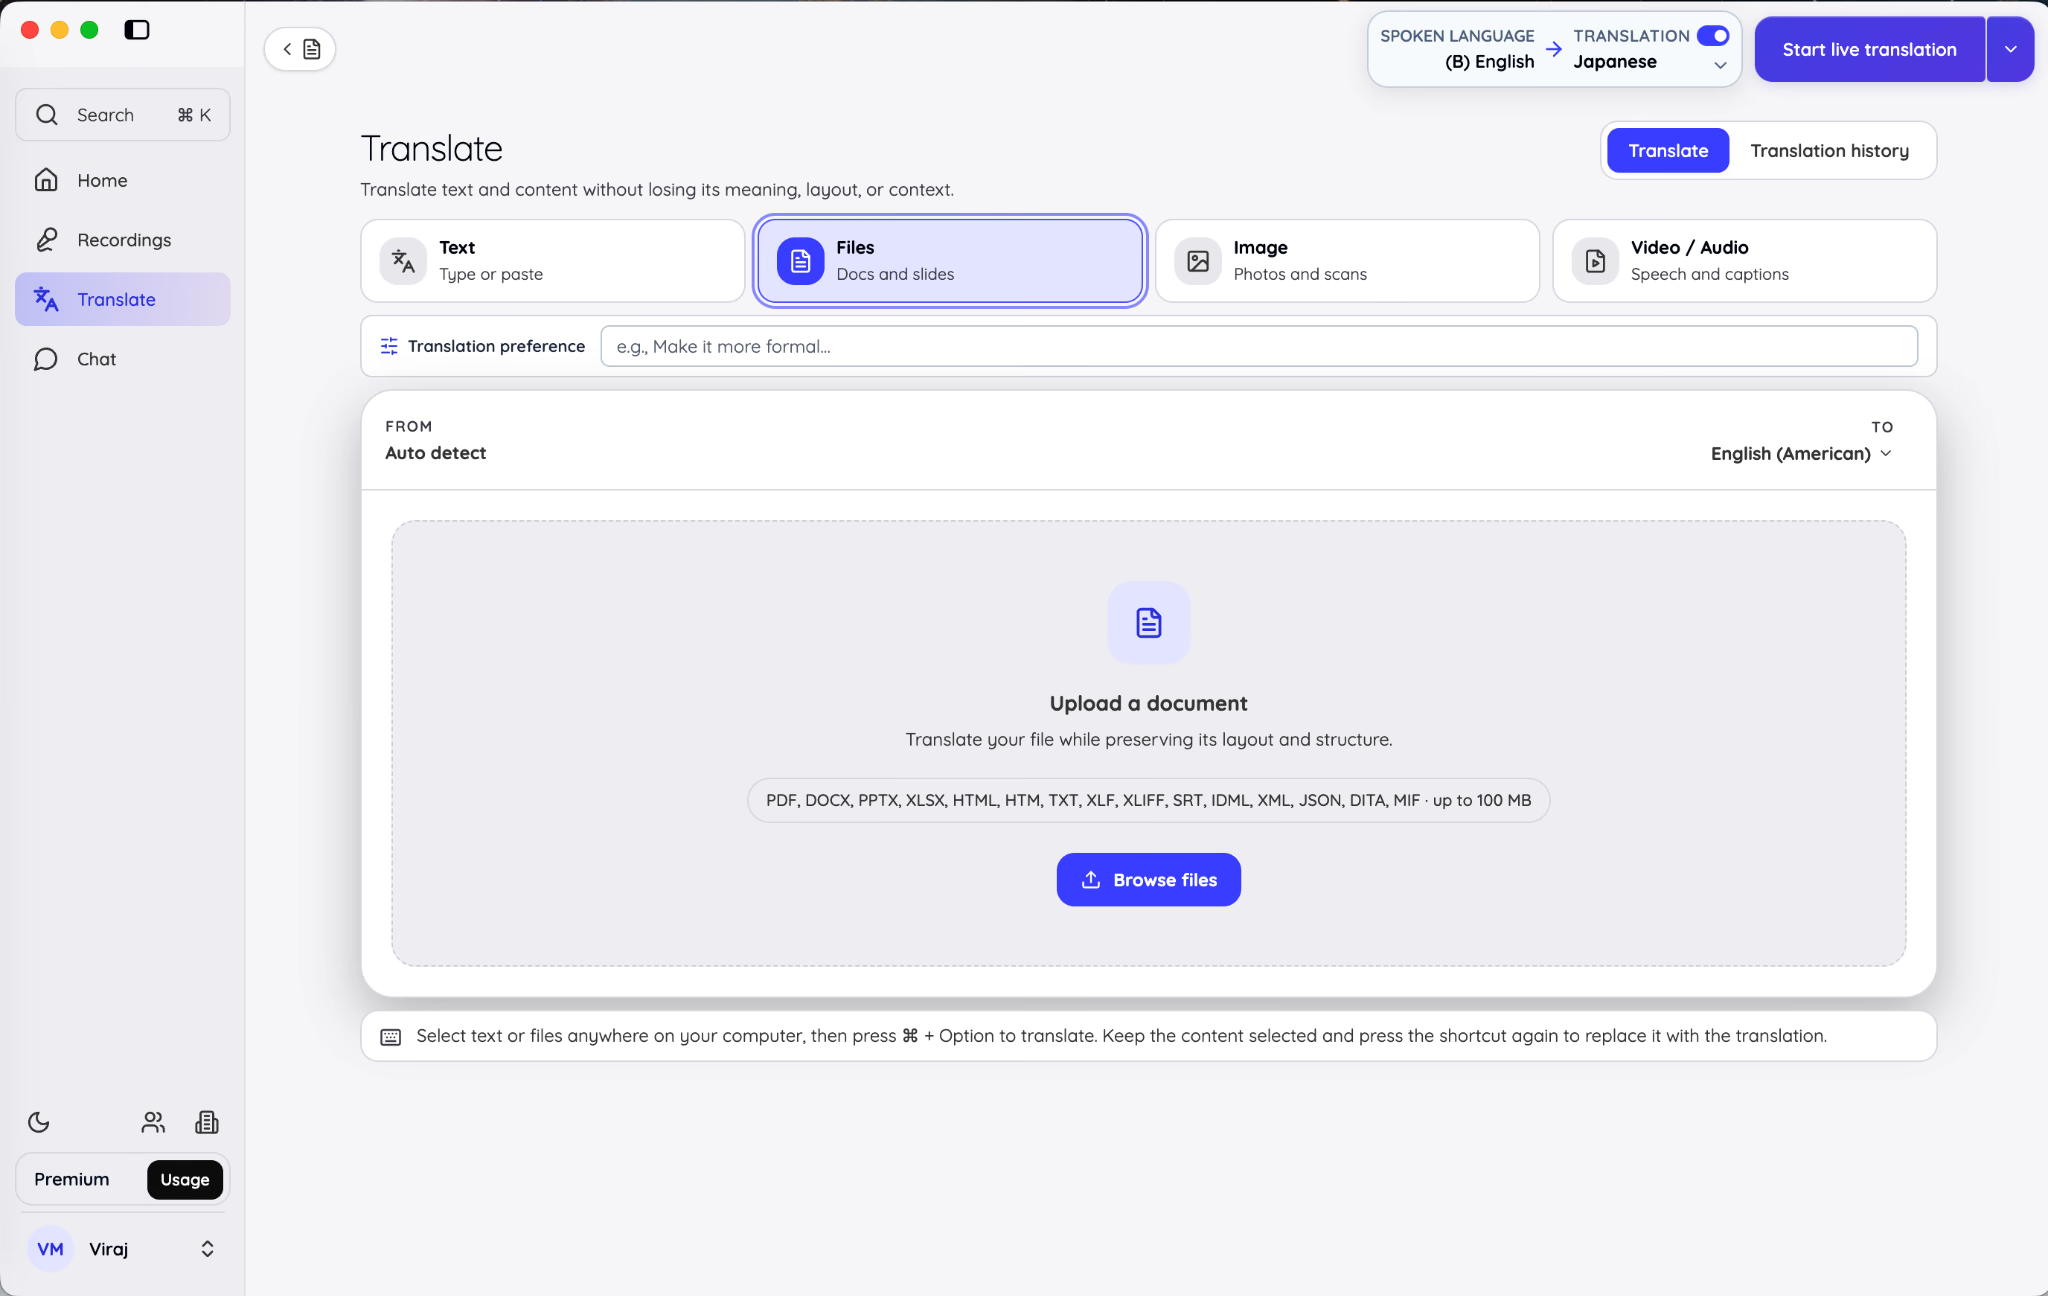
The process is straightforward:
- Select the source and target languages.
- Browse for the file or drag it into the upload area.
- Review the displayed usage estimate.
- Confirm the translation.
- Download the translated copy when processing finishes.
Version 1.0 supports a broad range of document, localization, caption, publishing, and structured-data formats:
The documented maximum is 100 MB per document. JotMe displays the initial credit requirement and warns that the final amount can increase with the number of characters. Review the target language and estimate before confirming a long file.
Different file types still need different human checks. In a PowerPoint, inspect text overflow and slide layout. In Excel, confirm formulas, references, number formats, and protected cells. In JSON or XML, check that keys, tags, placeholders, and variables remain structurally valid. Preserving a file's structure does not remove the need for subject-matter review.
This broad guide deliberately keeps format-specific advice brief. Use a dedicated file-format guide when a translation has operational consequences, such as software localization, a regulated document, or a presentation that will be delivered publicly.
For more information about how to translate text, voice, and documents free in 2026, you can check out our free language translator guide.
Translate text inside an image
Choose Image for a screenshot, scan, sign, poster, menu, form, or photograph containing text. Upload a PNG, JPG, JPEG, or WEBP file and choose the target language to translate text inside the image.
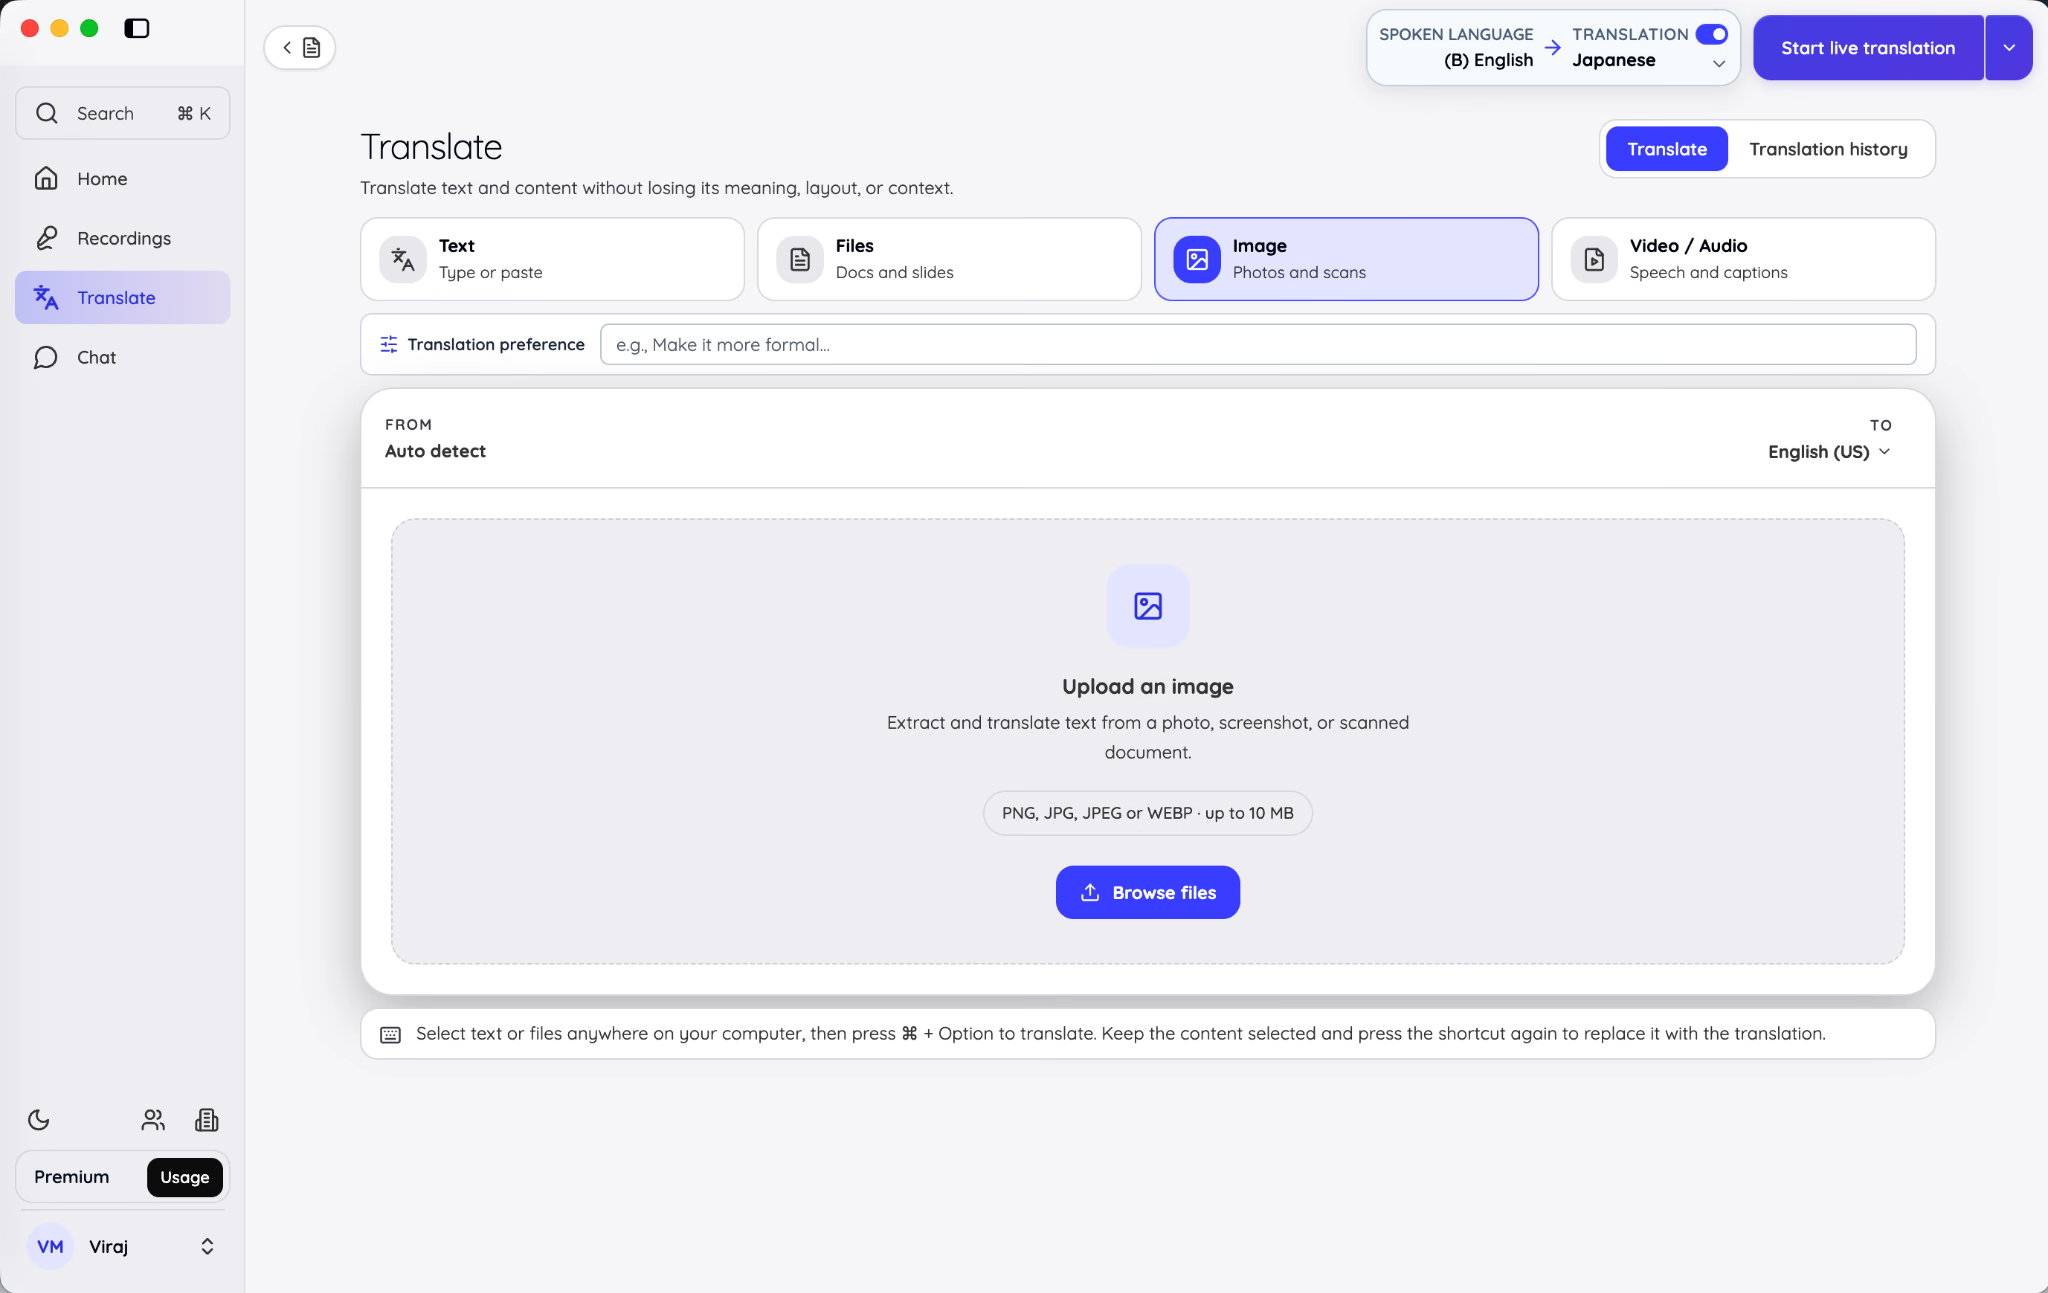
Image translation involves more than translating extracted words. JotMe identifies the text, translates it, prepares the affected areas, and renders translated text back into the image. The completed result can be downloaded as an image, while the translated text blocks can also be copied separately.
The documented limit is 10 MB per image. A clean, straight, high-resolution image with readable contrast gives the text-recognition step a better source than a blurred photograph taken from an angle.
Review names, prices, units, dates, and small labels before publishing the rendered image. Those details are easy to overlook because the completed design can appear visually convincing even when one short string is wrong.
Translate or dub an audio or video file
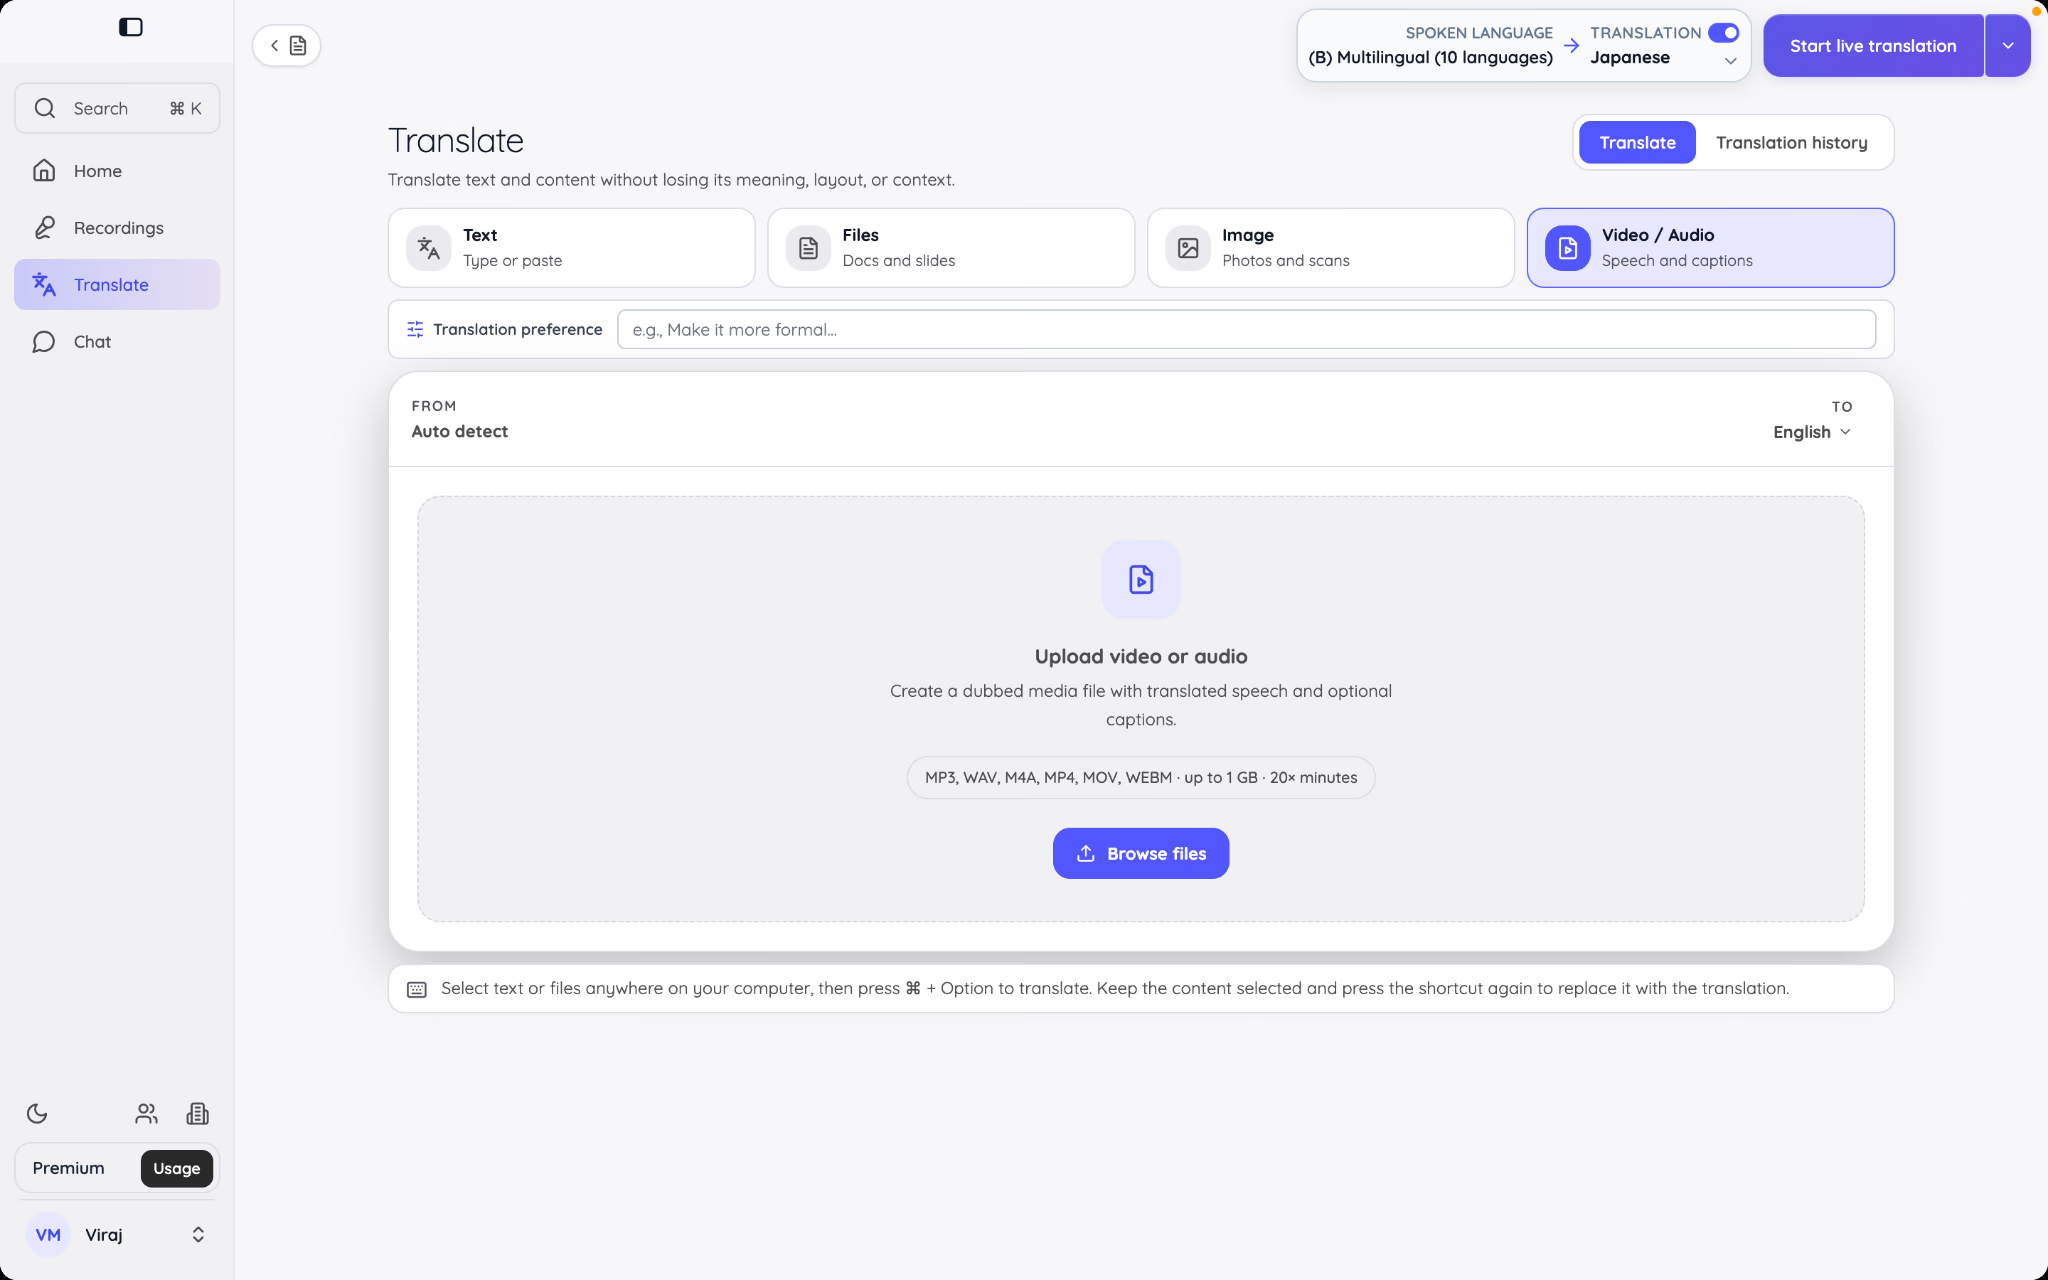
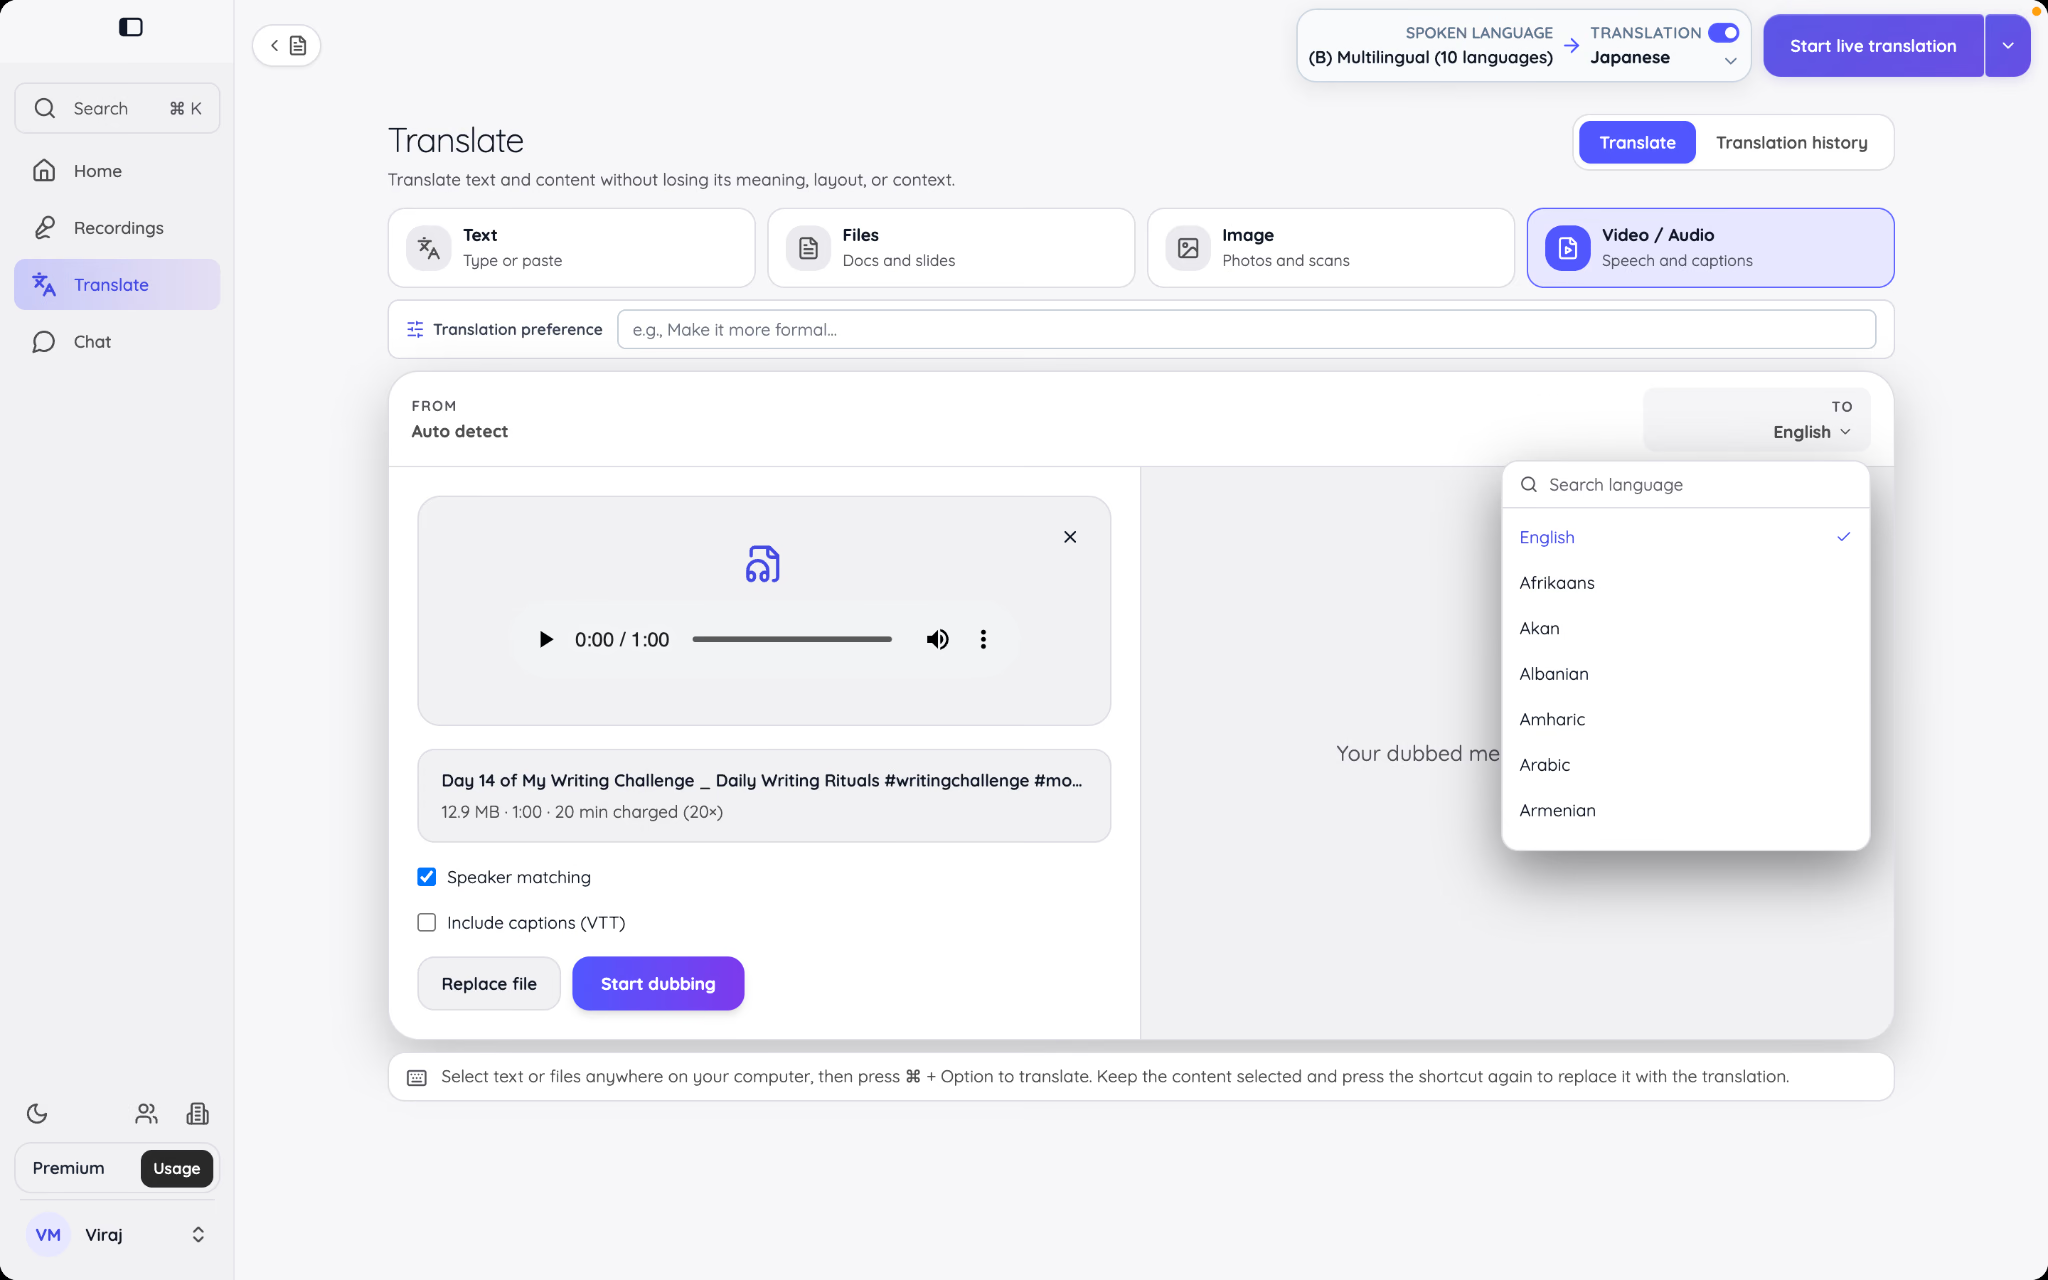
Choose Video / Audio when you need to translate audio or video online rather than only a written transcript. JotMe can generate a dubbed output in another language and optionally provide captions.
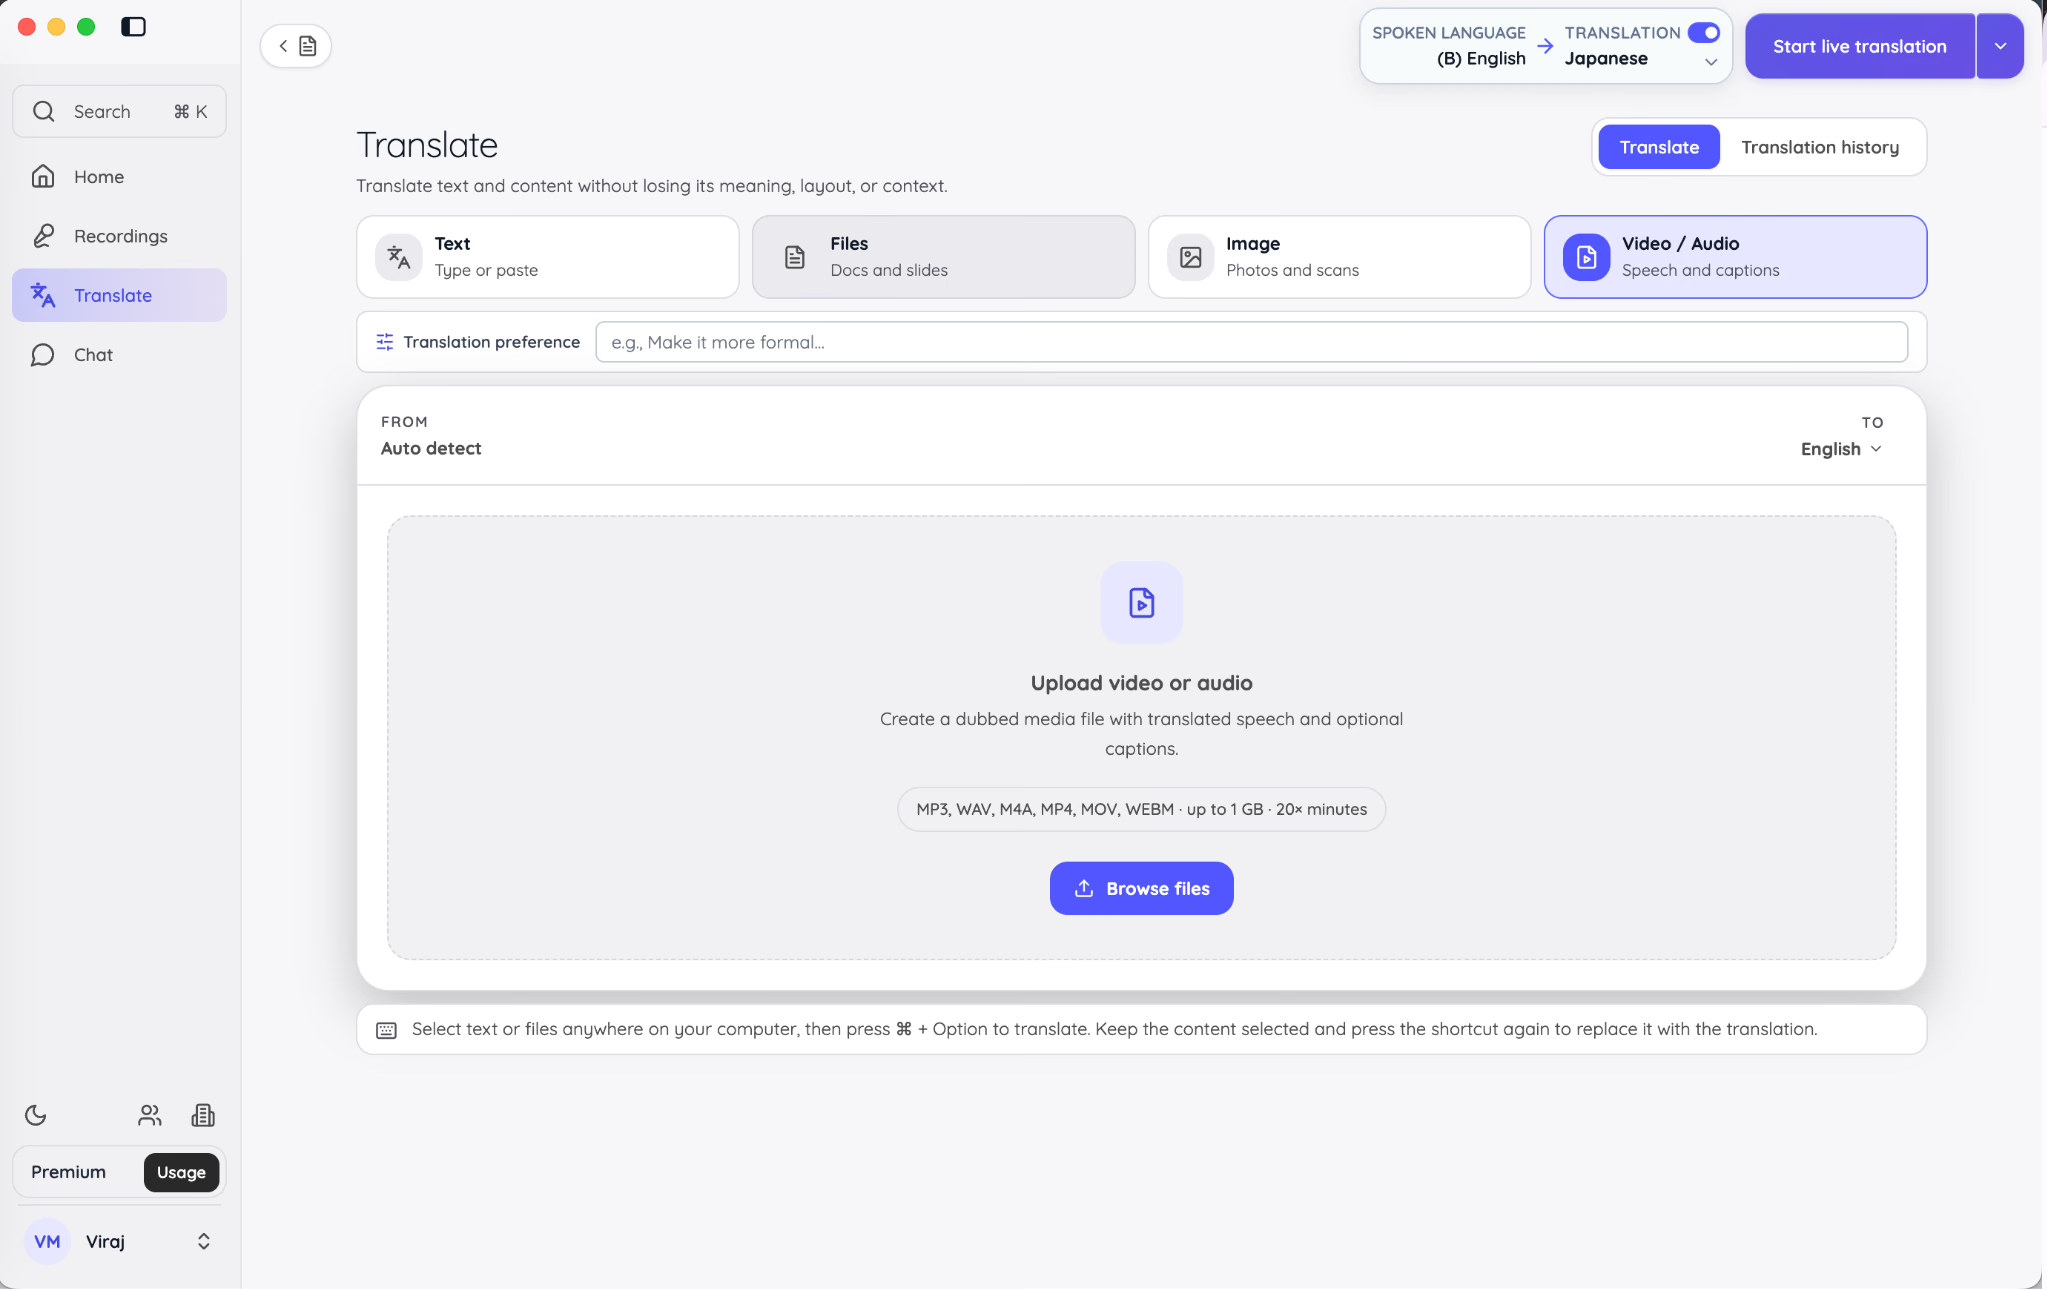
Supported media formats documented for this workflow include MP3, WAV, M4A, MP4, MOV, and WEBM, with a maximum file size of 1 GB. Available options include speaker matching and a VTT caption file.
Speaker matching helps keep different speakers distinct in the translated media. Captions are useful even when dubbing is enabled because viewers may watch without sound, need to verify a term, or prefer to read along.
Media dubbing is more resource-intensive than translating text. JotMe shows the duration and minute requirement before the job begins. Under the current documented model, dubbing uses translation minutes at a multiple of the media duration. Check the estimate in the app instead of calculating from the file size.
Longer jobs continue processing while you work elsewhere in JotMe. When the job finishes, download the dubbed media and captions, or run another translation into a different language.
Transcribe an existing audio or video recording
Use Upload file from the main action menu or Transcribe file from Recordings when the meeting, interview, lecture, or event has already ended. This workflow creates a recording entry with a transcript and any selected translations or meeting notes.
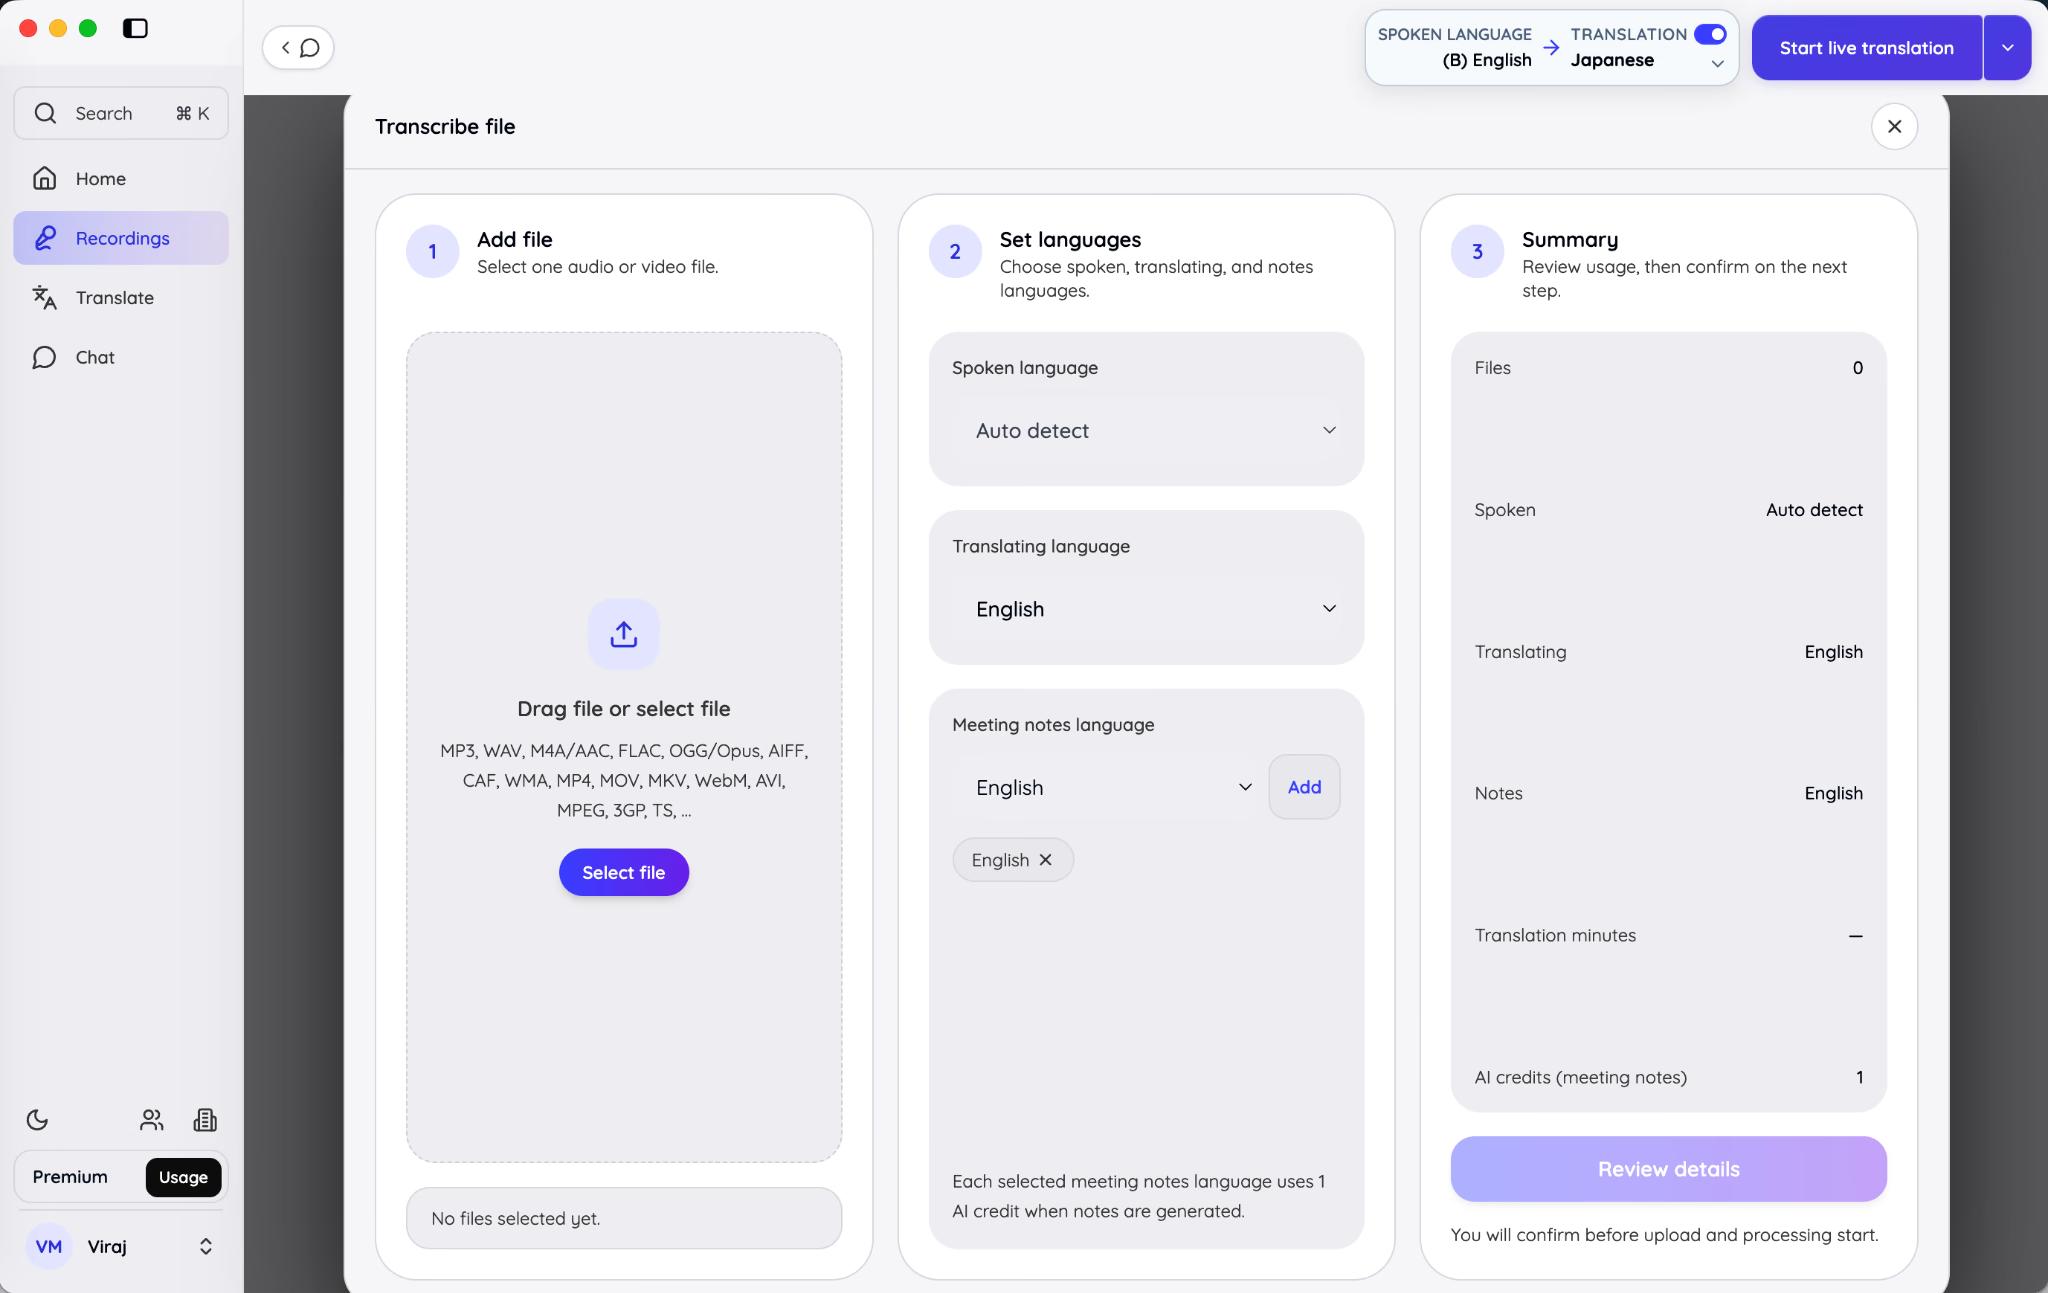
Here is how to convert audio to text in three stages.
1. Add file
Drag one recording into the upload panel or select a file. The interface lists common audio and video formats including MP3, WAV, M4A/AAC, FLAC, OGG/Opus, AIFF, CAF, WMA, MP4, MOV, MKV, WebM, AVI, MPEG, 3GP, and TS. JotMe documentation currently allows files up to 1 GB for uploaded transcription.
2. Set languages
Choose the spoken language or leave it on Auto detect. Then choose whether you want a translated transcript. Meeting-notes languages are selected independently, so the source speech, translated transcript, and generated notes do not have to use the same language.
For example, a recording can contain Japanese speech, produce an English translated transcript, and generate meeting notes in both English and Spanish. Each selected notes language can require an AI credit, so add only the outputs you need.
3. Review the summary
The right panel confirms the number of files, spoken-language setting, translation language, notes languages, transcription minutes, translation minutes, and AI credits. Select Review details and confirm before processing begins.
Nothing is uploaded merely because you opened the workspace or selected a file. The review stage gives you a final opportunity to check the outputs and usage before confirming.
When processing finishes, select the completed recording to open its notes and transcript. From there, the same search, playback, sharing, commenting, and Ask JotMe tools are available as they are for a live session.
How Do You Use JotMe Chat for Multilingual Communication?
JotMe Chat is a conversation space where each member can write in one language and read in another. It removes the repeated copy-paste routine of moving every message through a separate translator, while still keeping the original message available for review.
The JotMe multilingual chat is especially useful after a meeting. Instead of ending the language support when the live translation stops, the same participants can continue discussing actions, share the meeting record, and exchange translated files inside one thread.
Read translated messages without losing the original
Open Chat from the left sidebar and select a conversation. Messages appear in the reading language chosen for the current member. The original text remains accessible beneath the translation.
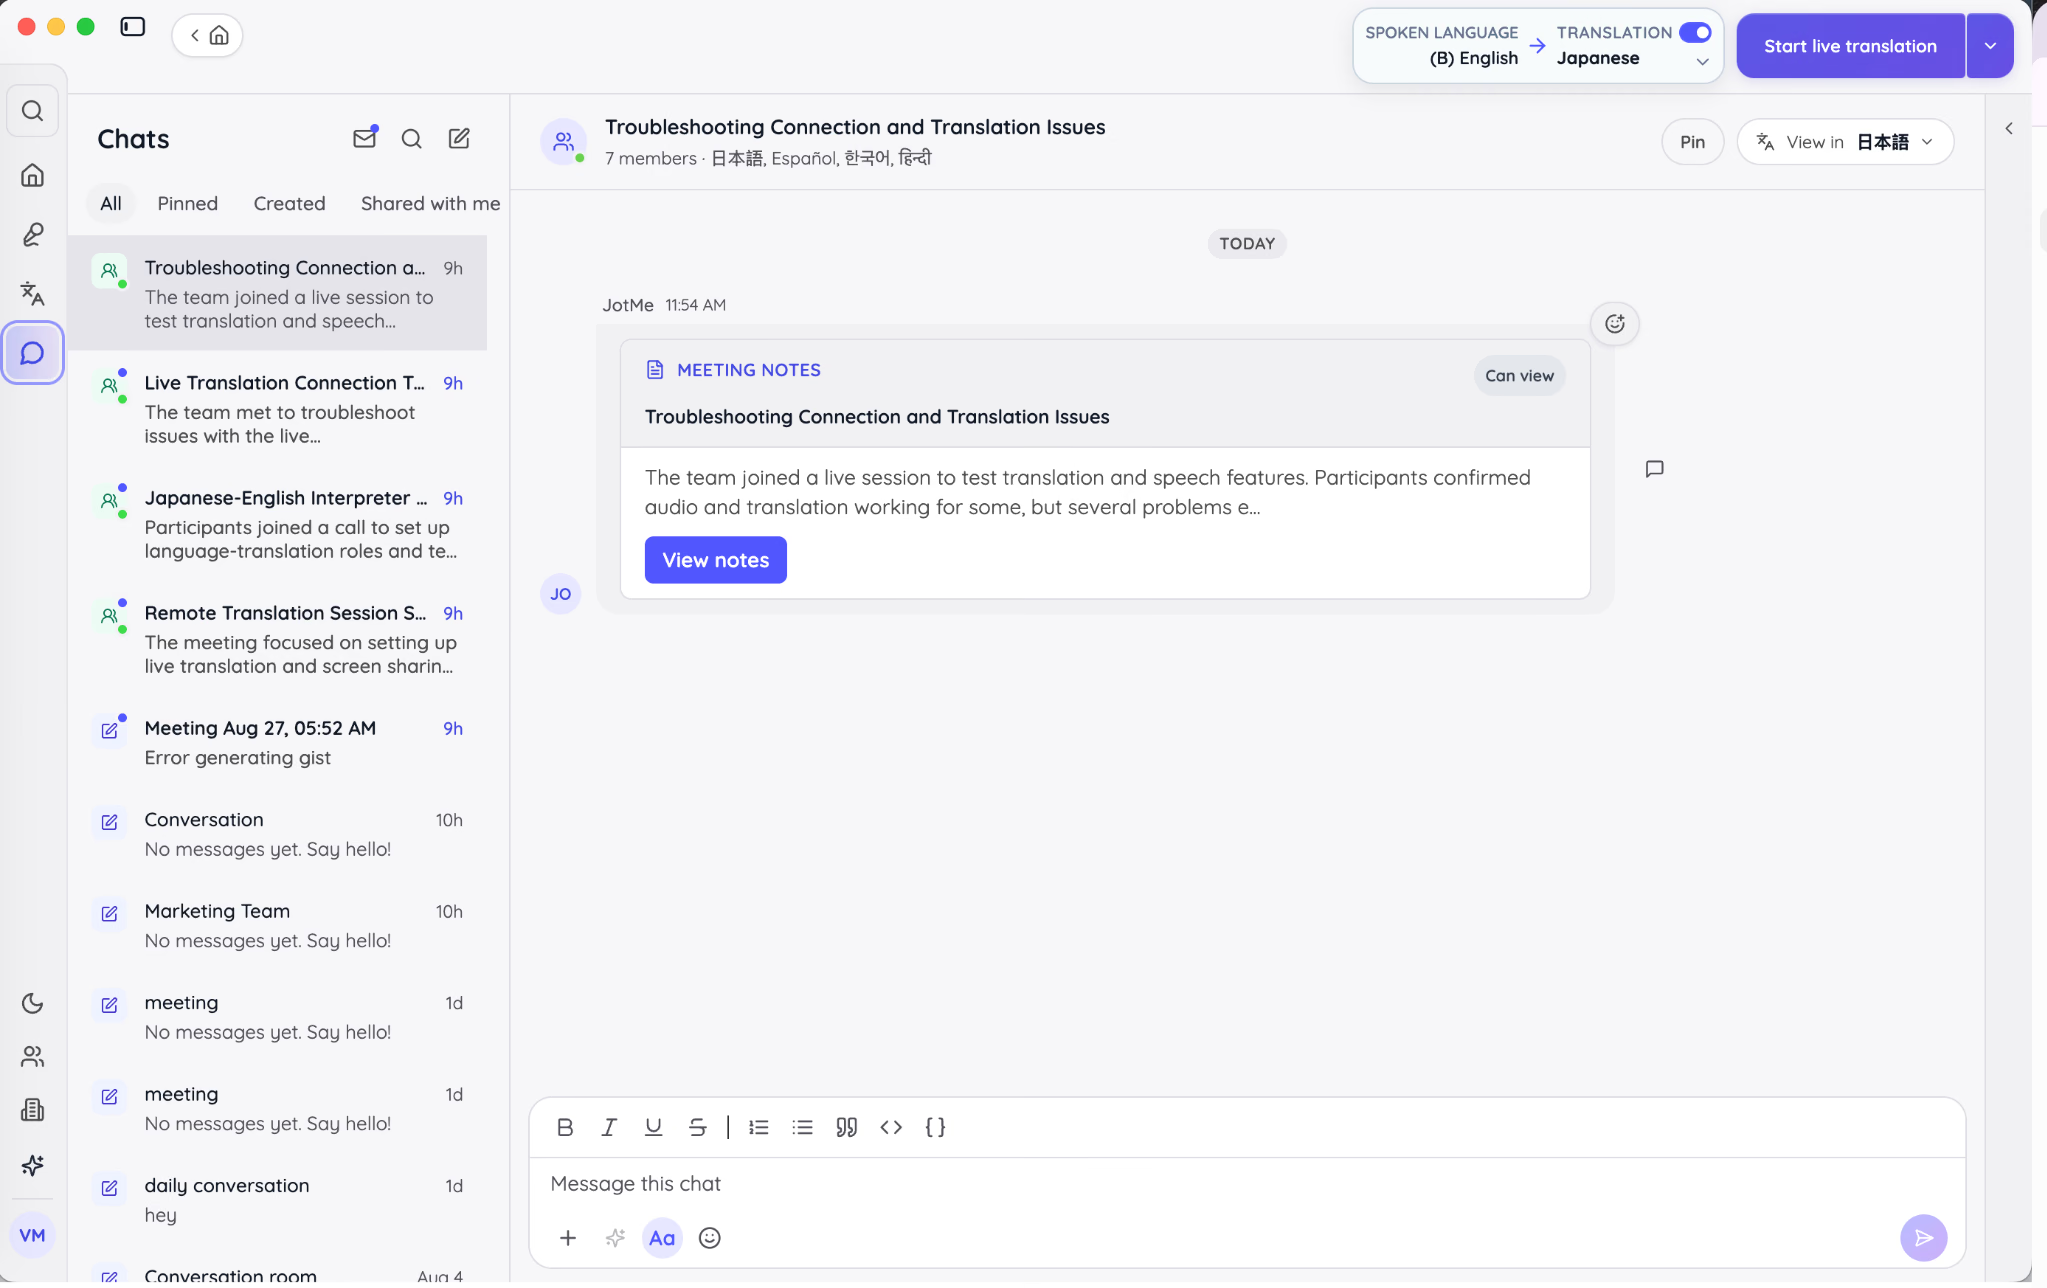
Keeping the original matters when a bilingual reviewer wants to verify wording or when a product name looks unusual in the translation. It also makes the conversation more transparent than a chat that silently replaces the source message.
The chat header shows the conversation name and participating languages. Use the View in control to change the language in which you read the thread. That choice belongs to the individual member, so one participant can read English while another reads Japanese or French.
JotMe maintains a conversation memory for each chat. The memory summarizes what the thread is about and gives later messages more context. A word used as a product name in the first part of the discussion is therefore less likely to be treated as an ordinary dictionary word later.
Create a new multilingual chatroom
Select the new-chat control and choose Create new chatroom. Enter a clear name that helps participants understand why the conversation exists.
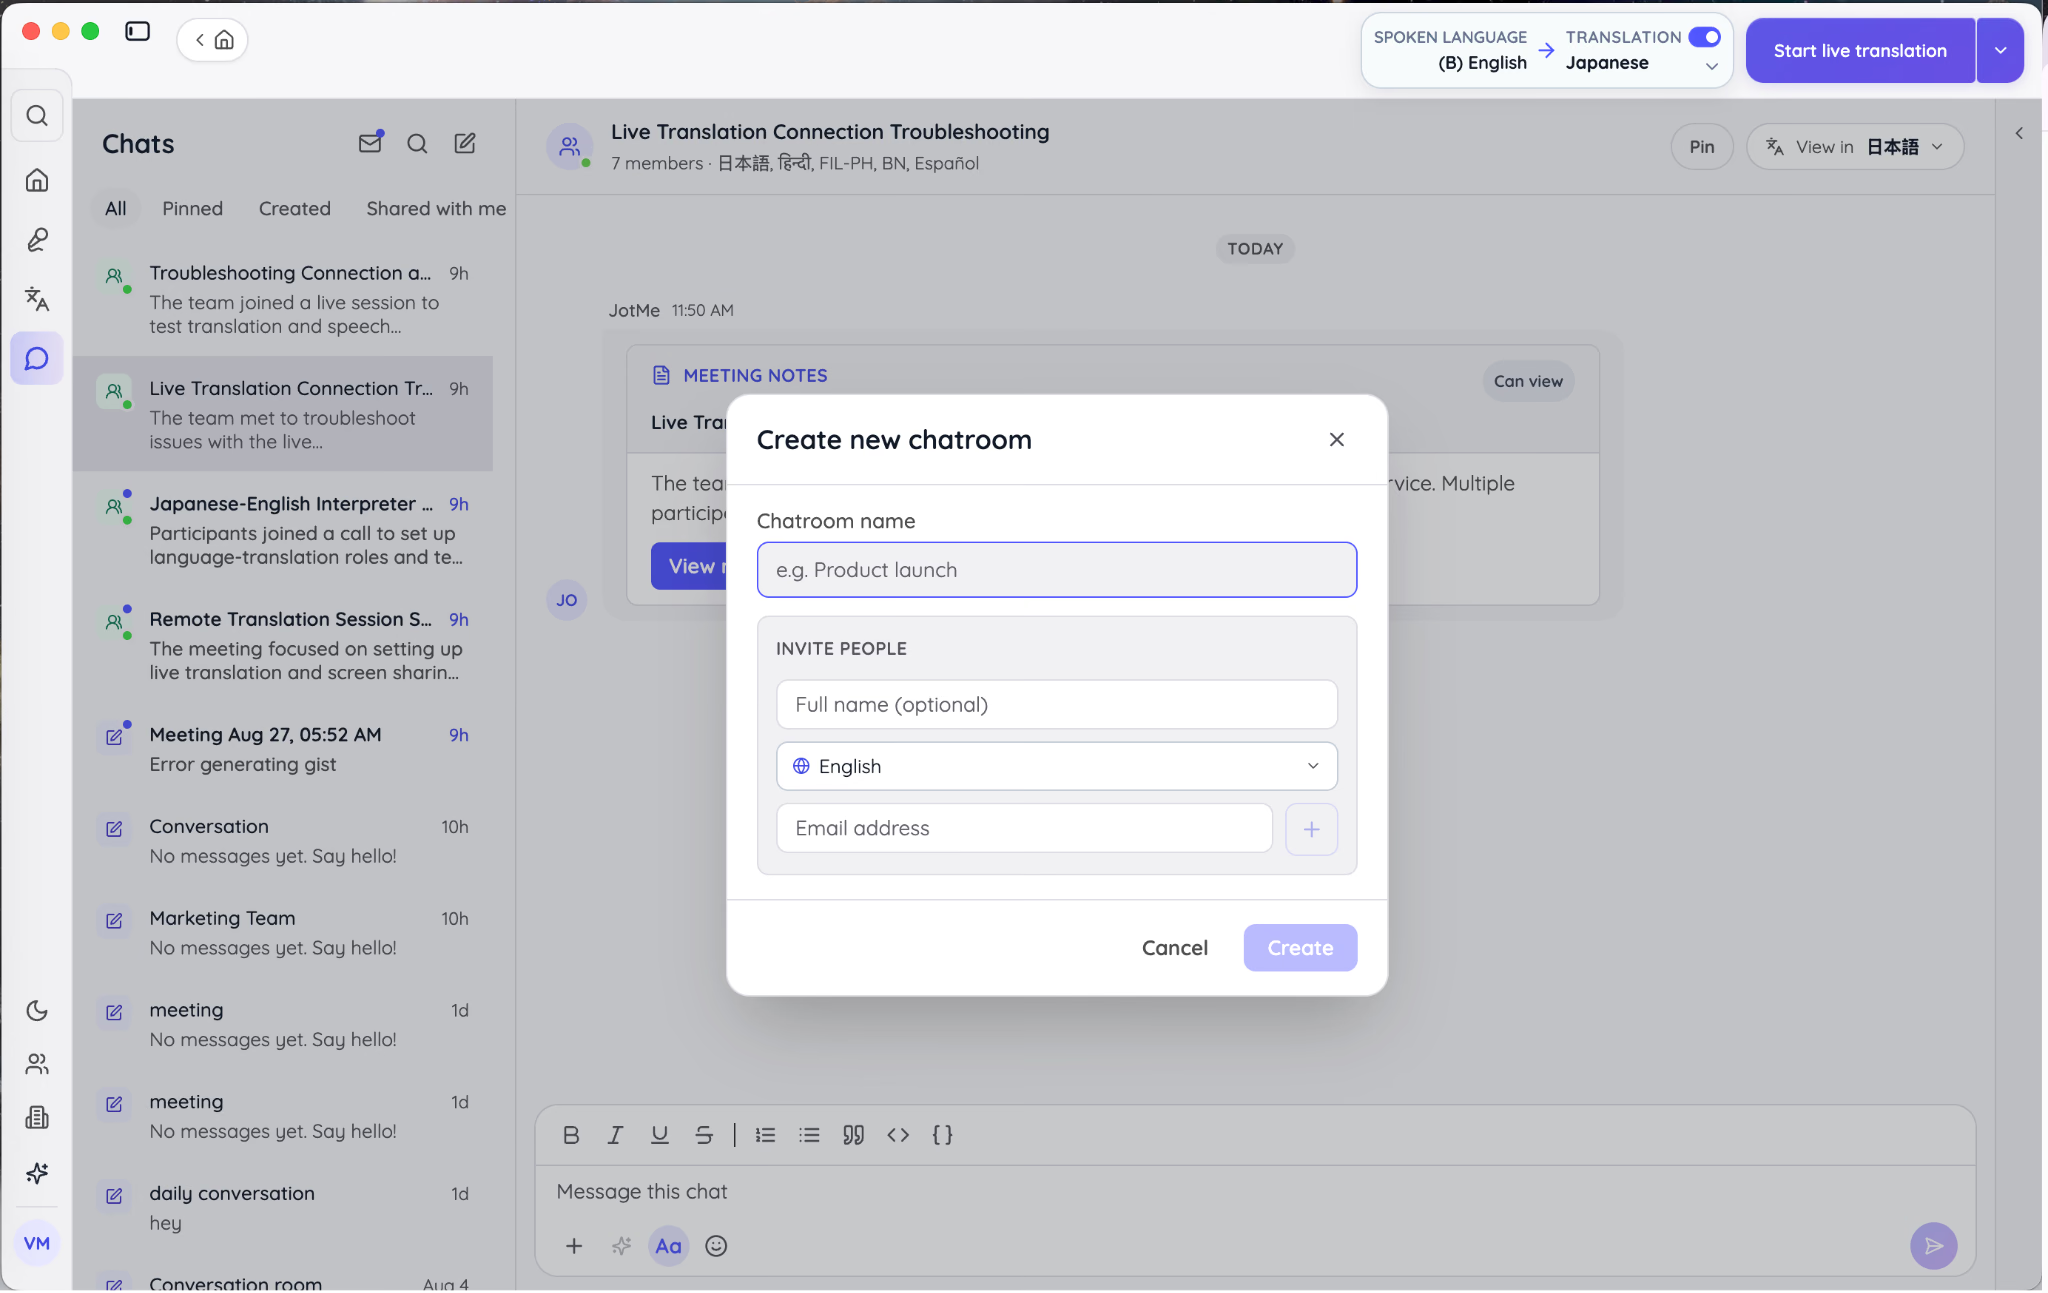
For a working chat, use a name such as “APAC Product Launch Review” rather than “New Chat.” Specific names improve search and reduce the risk of posting a confidential file into the wrong thread.
Add the people you want to invite. For each invitee, provide the required email and select the language in which that person should initially read messages. The language can be changed later by the member through the chat header.
Invitees do not need to create a JotMe account before opening the invitation. A guest can join using the invited email address, while an existing JotMe user can sign in.
Write naturally in your own language
Compose the message in the language you normally use. JotMe translates it for each recipient according to that person's reading language.
This per-member translation is different from producing one shared translation for everyone. In a three-language team, the sender does not need to create three versions of the message. Each participant receives the same conversation in the language selected for that account or guest session.
Keep normal communication principles in place. Translation can carry meaning, but it cannot repair a vague deadline, an unnamed owner, or an unclear request. “Please finish it soon” remains ambiguous in every language. “Mei, please upload the revised deck by 3:00 PM JST on Friday” gives the translation a precise instruction.
Attach meeting notes, translated files, or computer files
Select the attachment control beside the message field. Version 1.0 gives you three direct sources:
- Meeting notes from a saved JotMe recording
- Translated files from your Translate history
- Upload from computer for a local document, image, audio file, or video
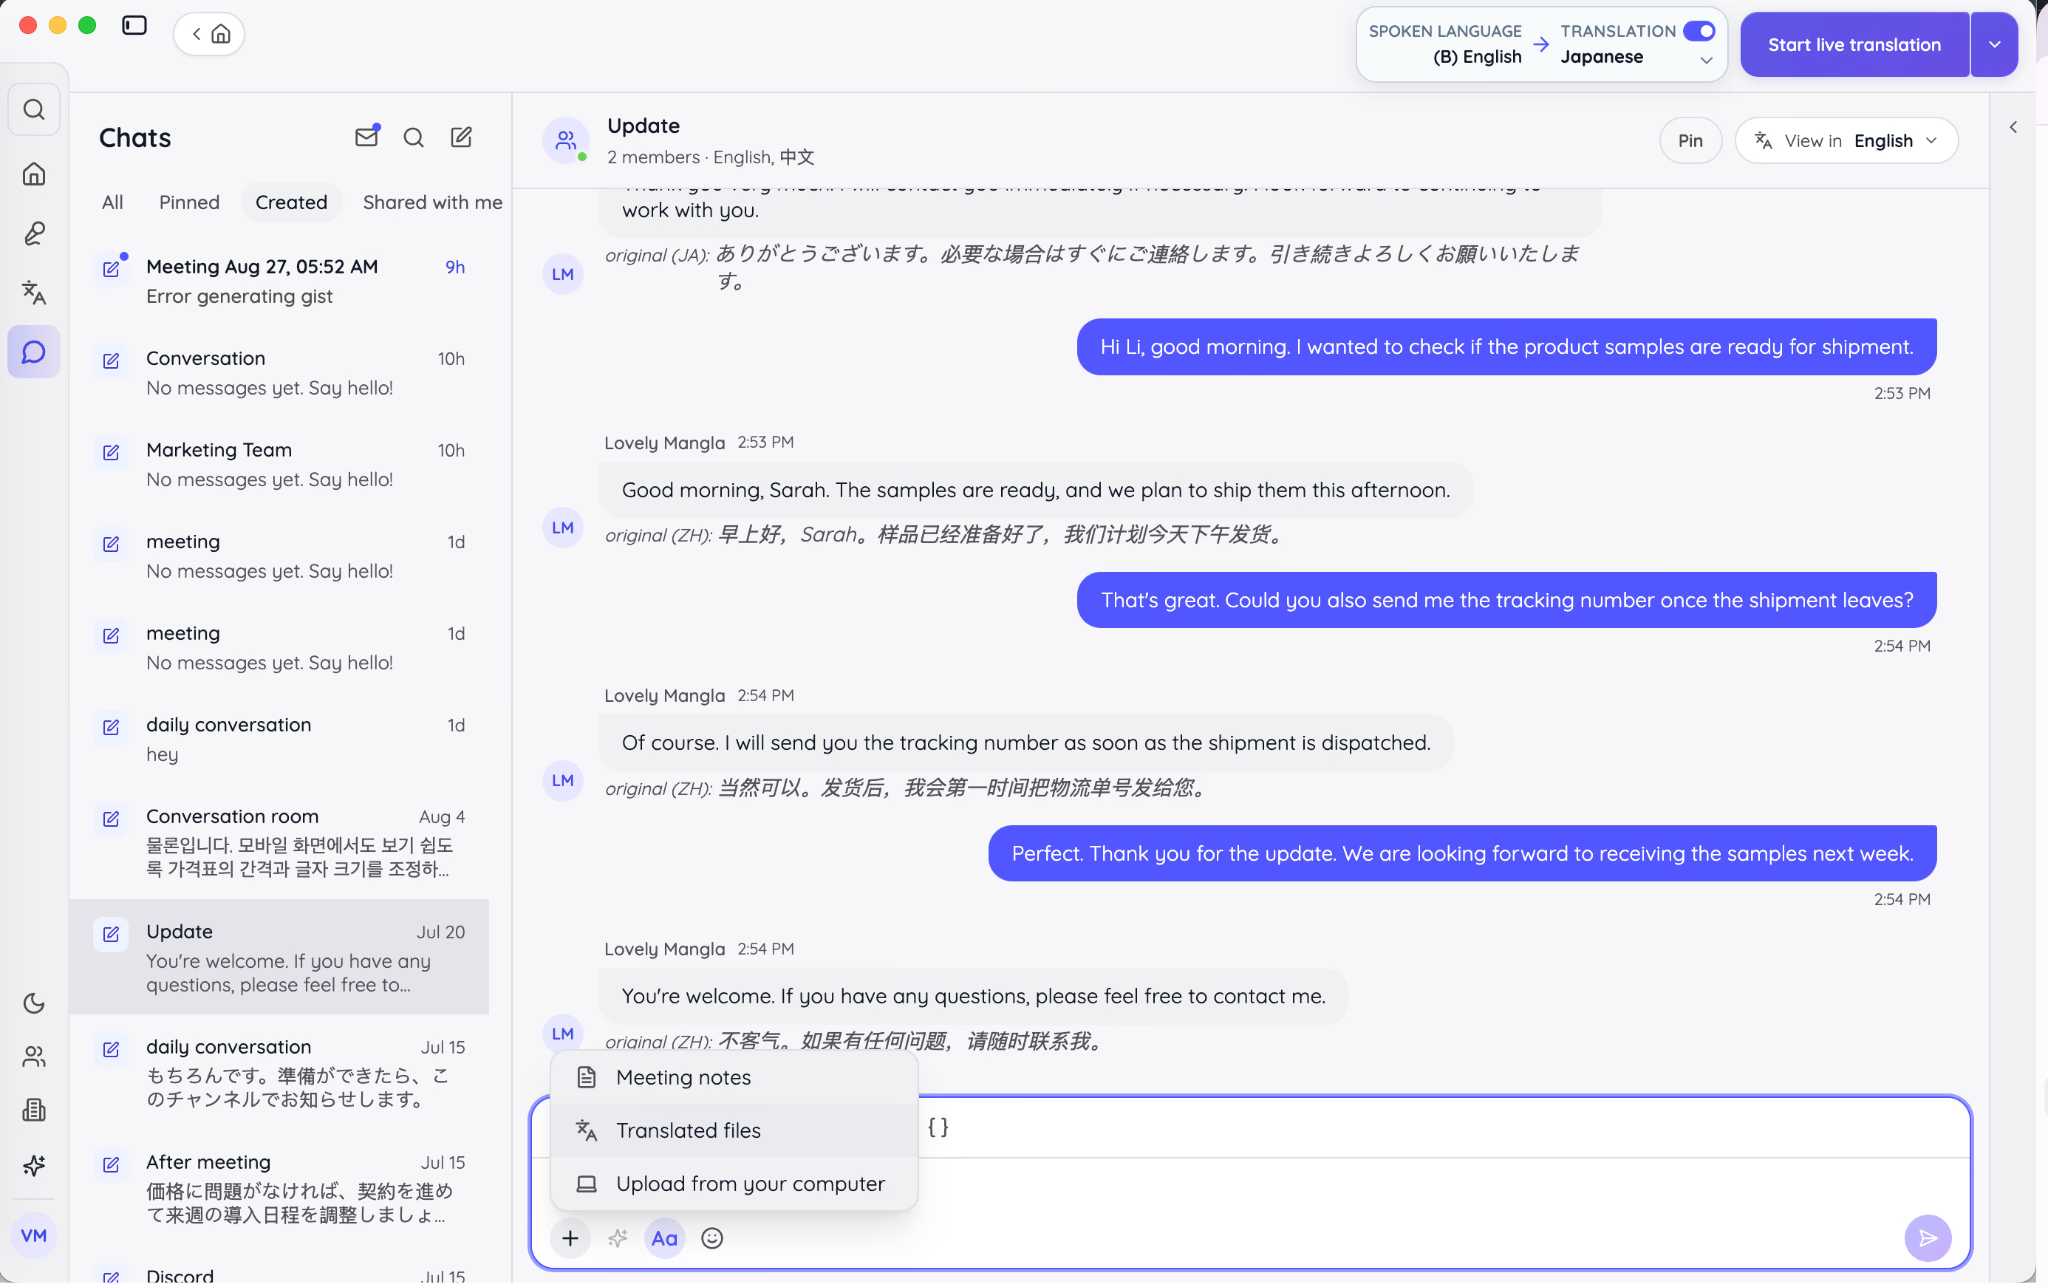
Sharing from JotMe history reduces duplicate downloading and uploading. It also keeps the attachment connected to the meeting or translation workflow that produced it.
Translated files can be shared with view, comment, or edit permission. Pick the permission based on the next action. A final reference document may need View access, while a draft reviewed by a localization team may need Comment or Edit access.
Attachments uploaded directly into a chat can be translated from the message. JotMe opens the appropriate translation panel for the file type. The chat owner is responsible for the credits or minutes used by in-chat attachment translation, so confirm that the requested output is necessary before processing a large file.
Continue a meeting inside Chat
After a session, share the Enhanced notes and transcript into the relevant chat. Participants can then ask for corrections, confirm ownership, or add a translated file without beginning a disconnected email chain.
For example, a Japanese-English product meeting can end with English Enhanced notes, a Japanese translated copy, and an action-item discussion in which each participant writes naturally. The meeting record provides the evidence, while Chat carries the work forward.
JotMe can also post a live-translation invitation into a chat. This is helpful for a recurring team that already uses the thread. Participants receive the join information in the same place where they will later receive the meeting notes.
Use the existing detailed JotMe multilingual chat guide for a deeper explanation of chat-specific controls. In this complete desktop guide, Chat is one stage in the larger flow from live conversation to follow-up.
How Do You Configure JotMe's General, Translation, and Vocabulary Settings?
Settings determine what JotMe can hear, what it saves, how quickly text is finalized, which languages participants can request, and how specialist terms are handled. Review these controls before the first important session because several of them affect the data and output created when you press Start.
Open Settings and check the installed version
Select your profile at the bottom-left of the app, then choose Settings. The same menu provides access to account information, usage, team controls, Voice Keyboard, referrals, support, and sign out.
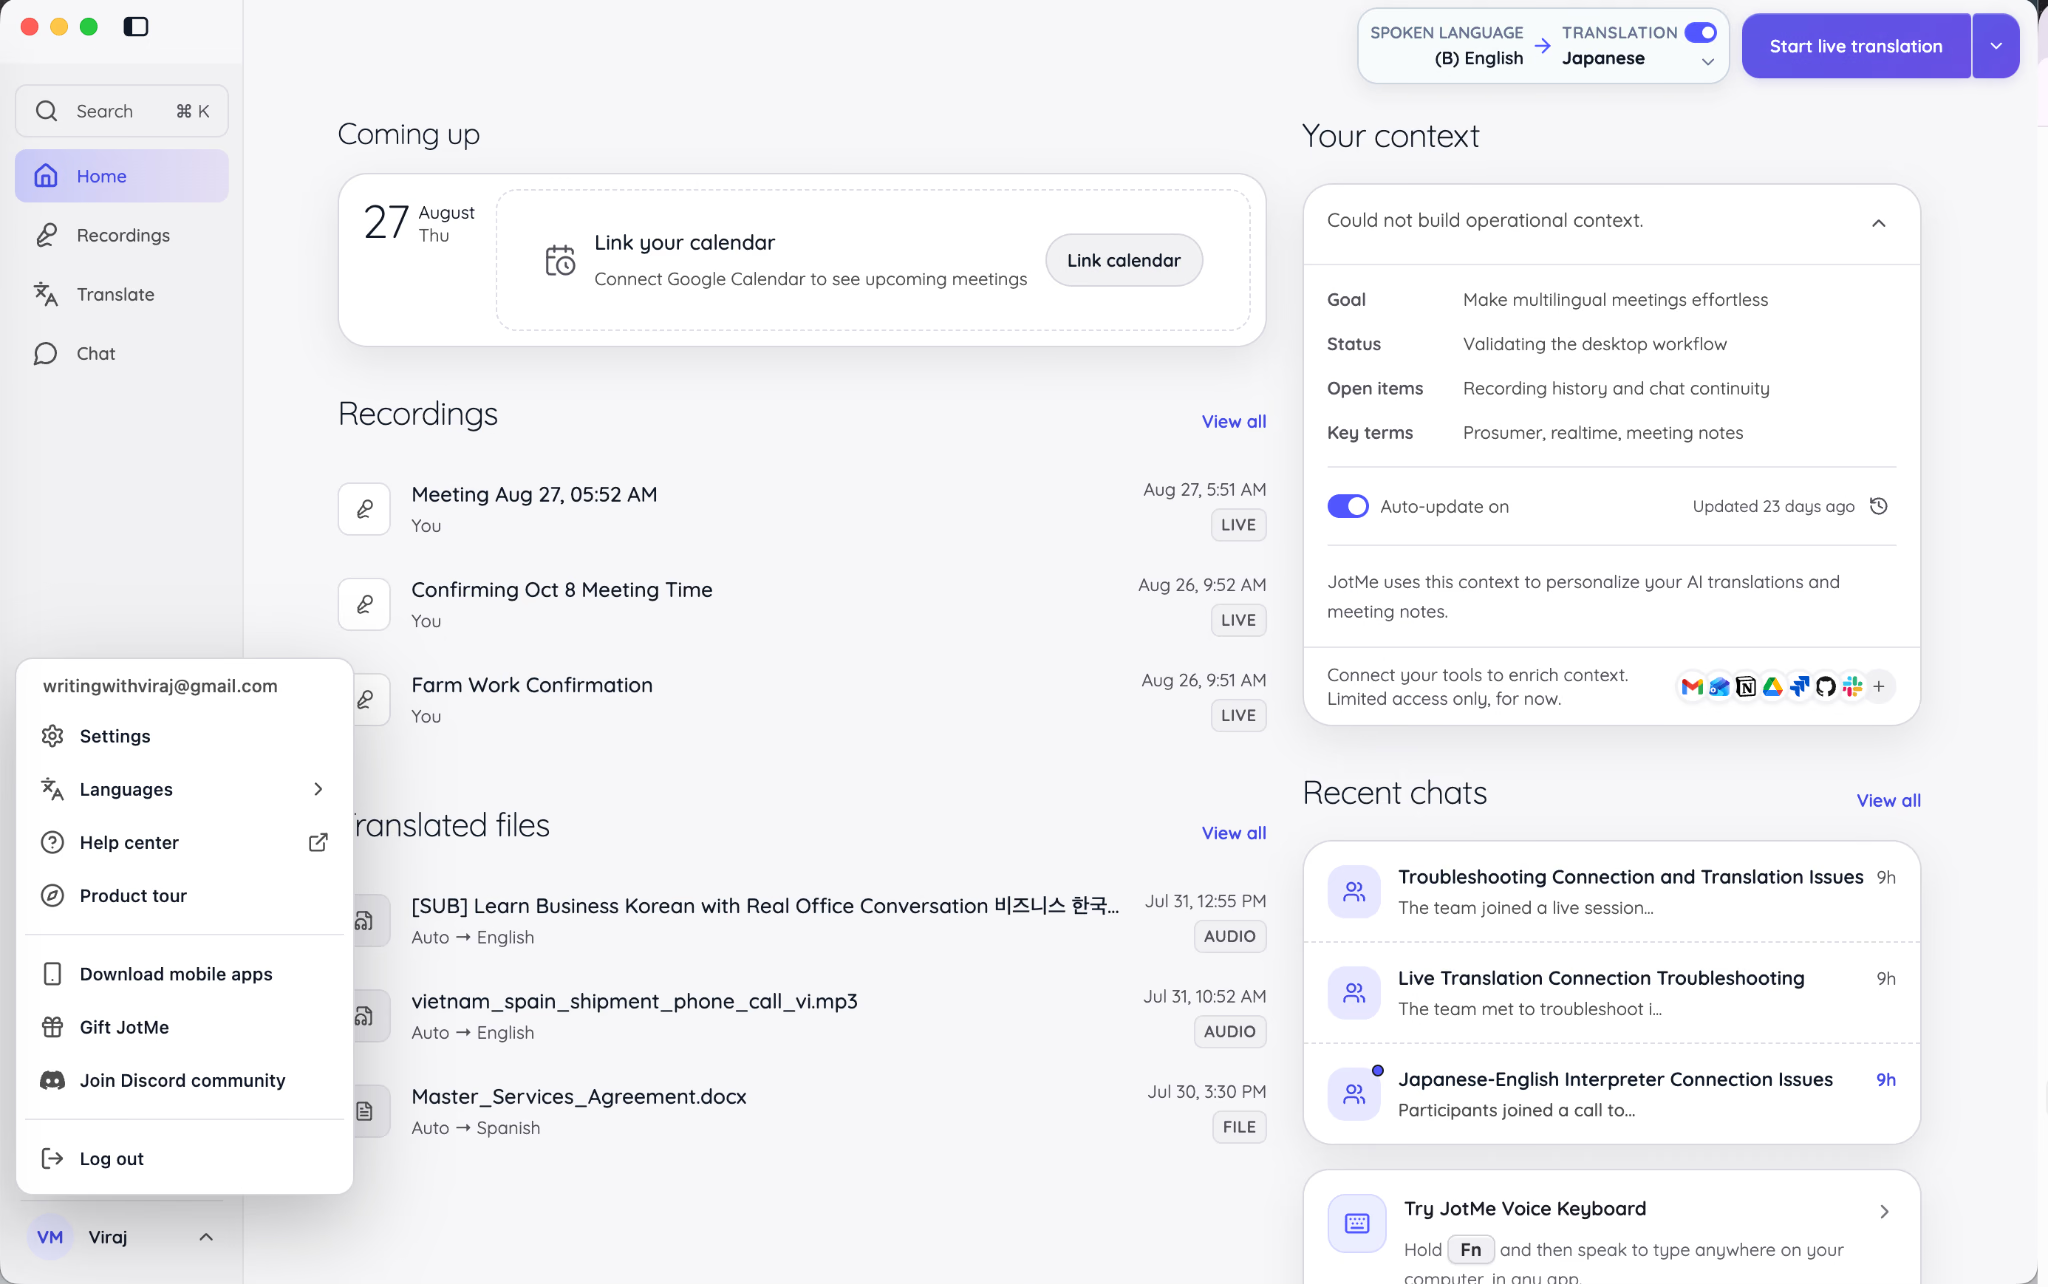
The Settings window includes General, Account, Setup, and Custom Vocabulary. The installed version and update status appear at the bottom of the sidebar.
When Latest appears beside Version 1.0.0, the installed app matches the current release available to that account. If an update is available, follow the displayed download or restart action. Updating the desktop build does not remove account-backed recordings, chats, notes, or translated files, although device-level permissions and shortcuts may need to be checked again.
Review audio and system permissions under Setup
Open Setup to verify the permissions behind each desktop workflow:
- Microphone access lets JotMe recognize your speech.
- Computer or system-audio access lets JotMe hear the other side of online calls.
- Voice Keyboard access lets JotMe accept the dictation shortcut and type in another application.
If the transcript shows only your voice during an online meeting, system audio is the first setting to inspect. If the Voice Keyboard does not respond, inspect both its enabled shortcut and the operating system access shown in Setup.
Change the size of the app
Under General, use App zoom to resize the complete interface. The setting affects chat, translation, notes, live-session controls, and Settings, not only the Home dashboard.
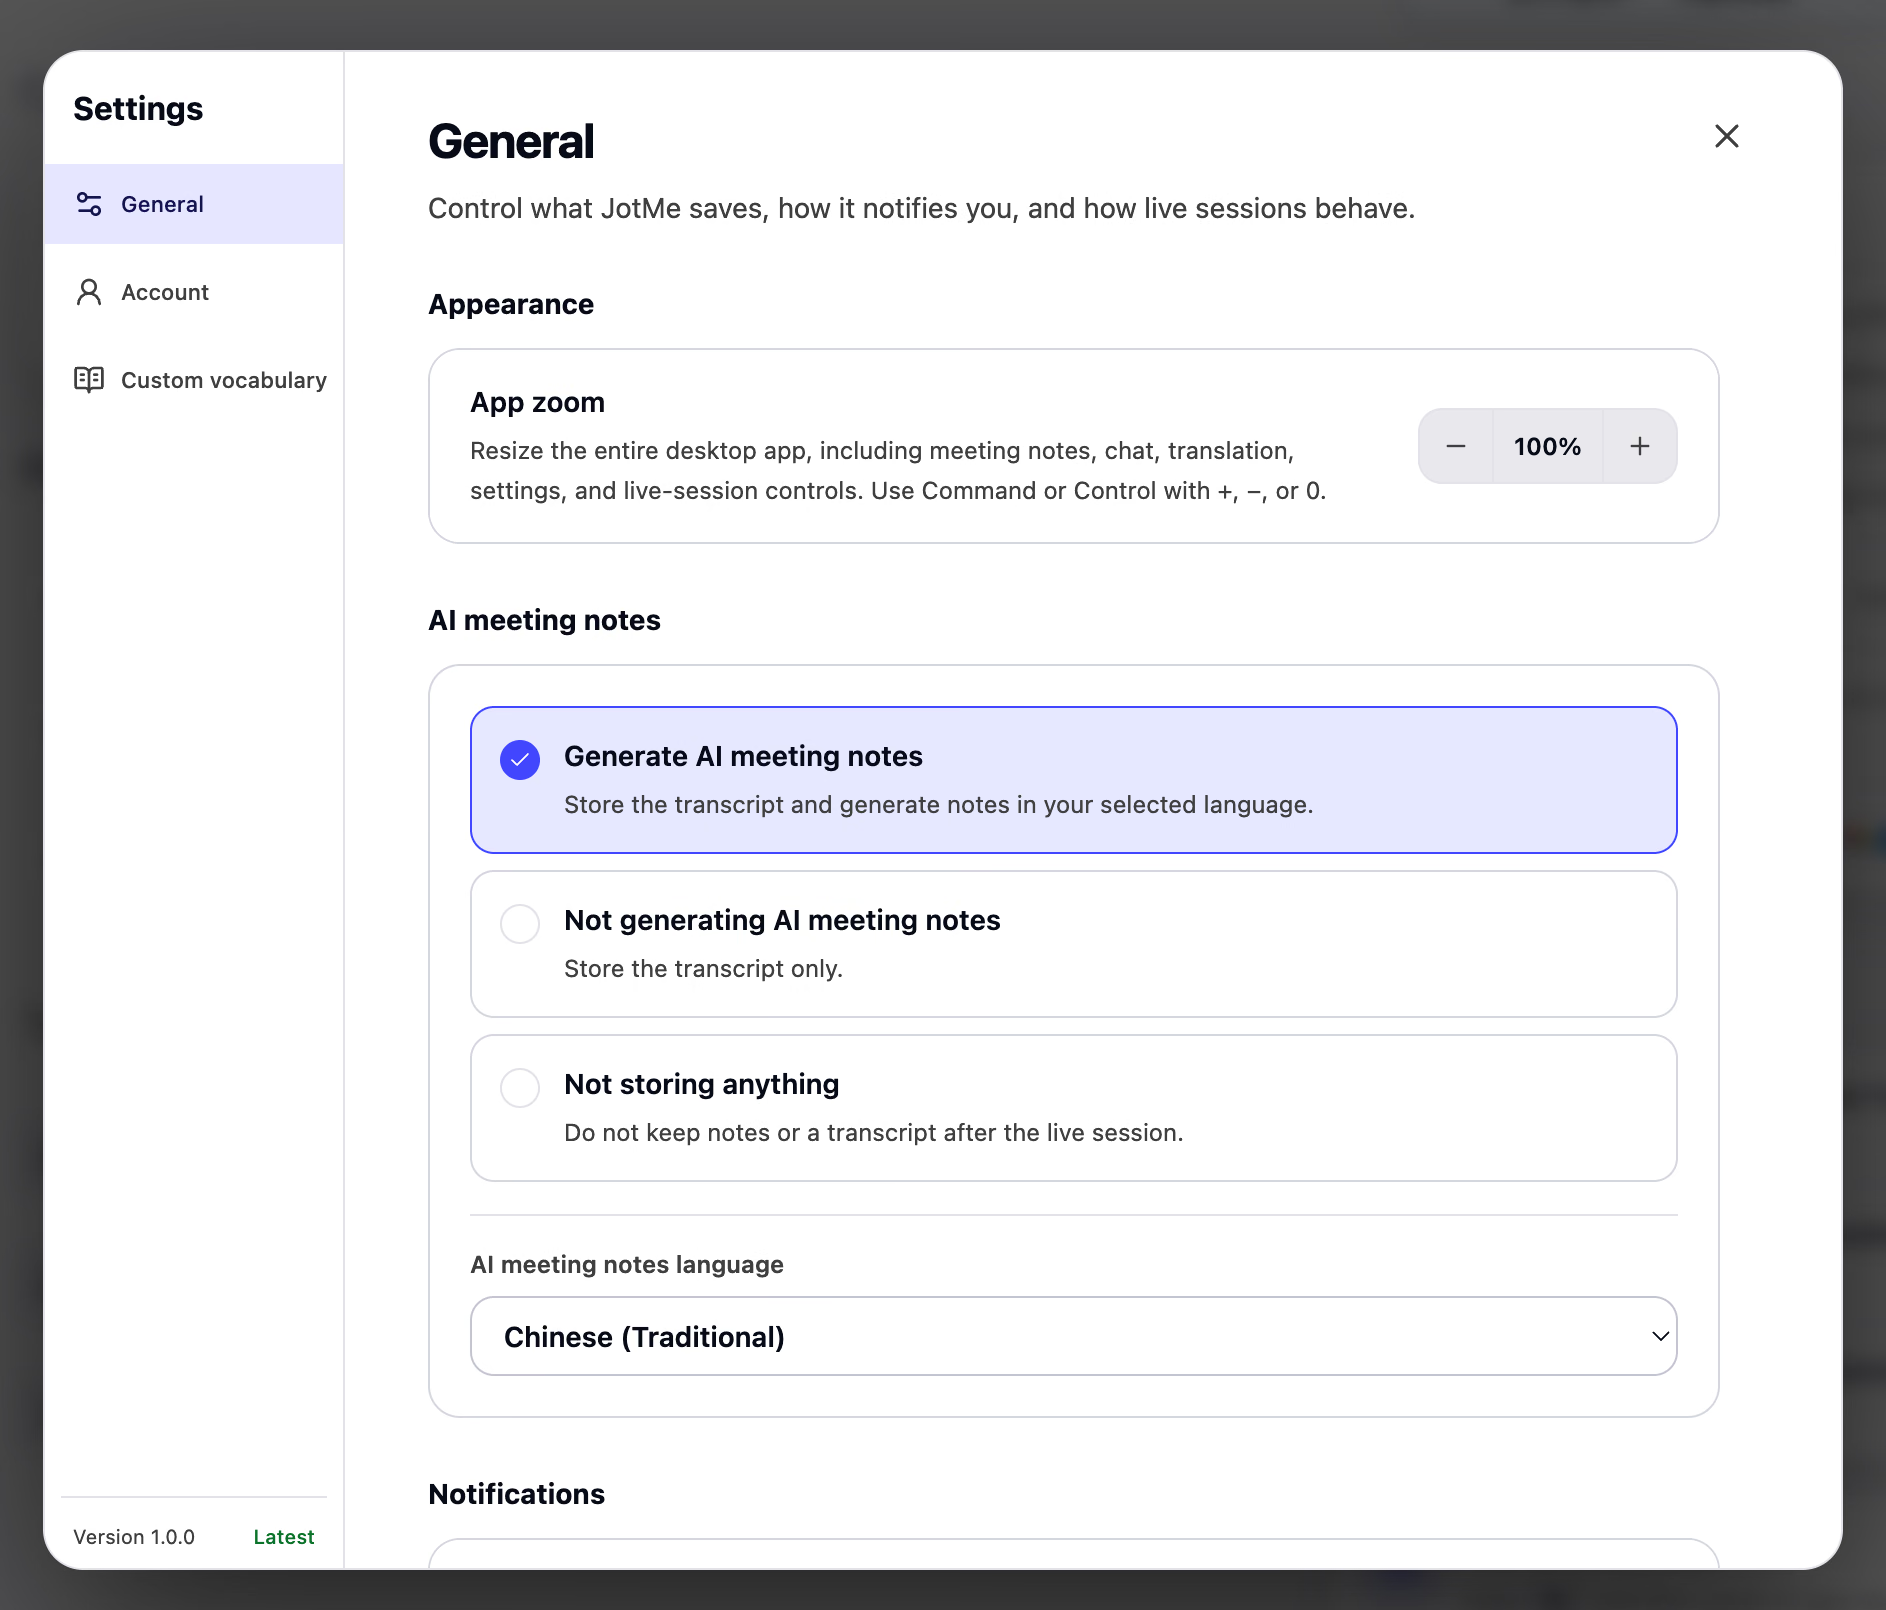
Increase zoom when the app is displayed on a high-resolution monitor or shared screen. Reduce it when you need more of a transcript or chat visible at once. Choose readability over fitting every control into one view.
Choose what JotMe stores after a session
The AI meeting-notes setting offers three distinct outcomes:
- Generate AI meeting notes: JotMe stores the transcript and produces AI meeting notes after the session.
- Do not generate AI meeting notes: JotMe stores the transcript without creating AI meeting notes.
- Do not store anything: JotMe does not retain meeting notes or the transcript for that session.
Select the setting based on the purpose and sensitivity of the conversation. A weekly planning meeting may benefit from a searchable transcript and Enhanced notes. A sensitive conversation may require no stored notes or transcript, subject to your organization's policy and applicable consent requirements.
When AI meeting notes are enabled, select their default language. This setting can differ from the spoken language and the live translation language. An English-Japanese call can therefore produce meeting notes in Spanish if that is the language required by the recipient.
Always obtain any consent required before recording or processing another person's conversation. A technical save setting does not replace your legal or organizational responsibility to tell participants what is being recorded.
Configure notifications, chat presence, and startup behavior
General settings also control desktop notifications for meetings and chats, typing indicators, and whether your chat presence appears Active or Away.
Use meeting reminders when you rely on connected calendar events. Turn off nonessential chat notifications during a presentation or interpreted event so they do not compete with the live window.
The startup control can open JotMe automatically when you sign in to your computer. This is convenient for people who use the app throughout the day. If the app is used only for scheduled events or shares a production computer with other tools, manual startup may be cleaner.
Set desktop shortcuts
JotMe provides shortcuts for opening the live-session workspace, voice typing, and translating selected text. Settings displays the keys for your operating system.
The shortcut that opens a live session only opens the workspace. It does not begin recording by itself. This distinction prevents an accidental recording when a key combination is pressed in another application.
Disable or change a shortcut when another desktop tool uses the same keys. Test the shortcut in the application where you intend to use it before relying on it during a real workflow.
Use Voice Keyboard in another desktop application
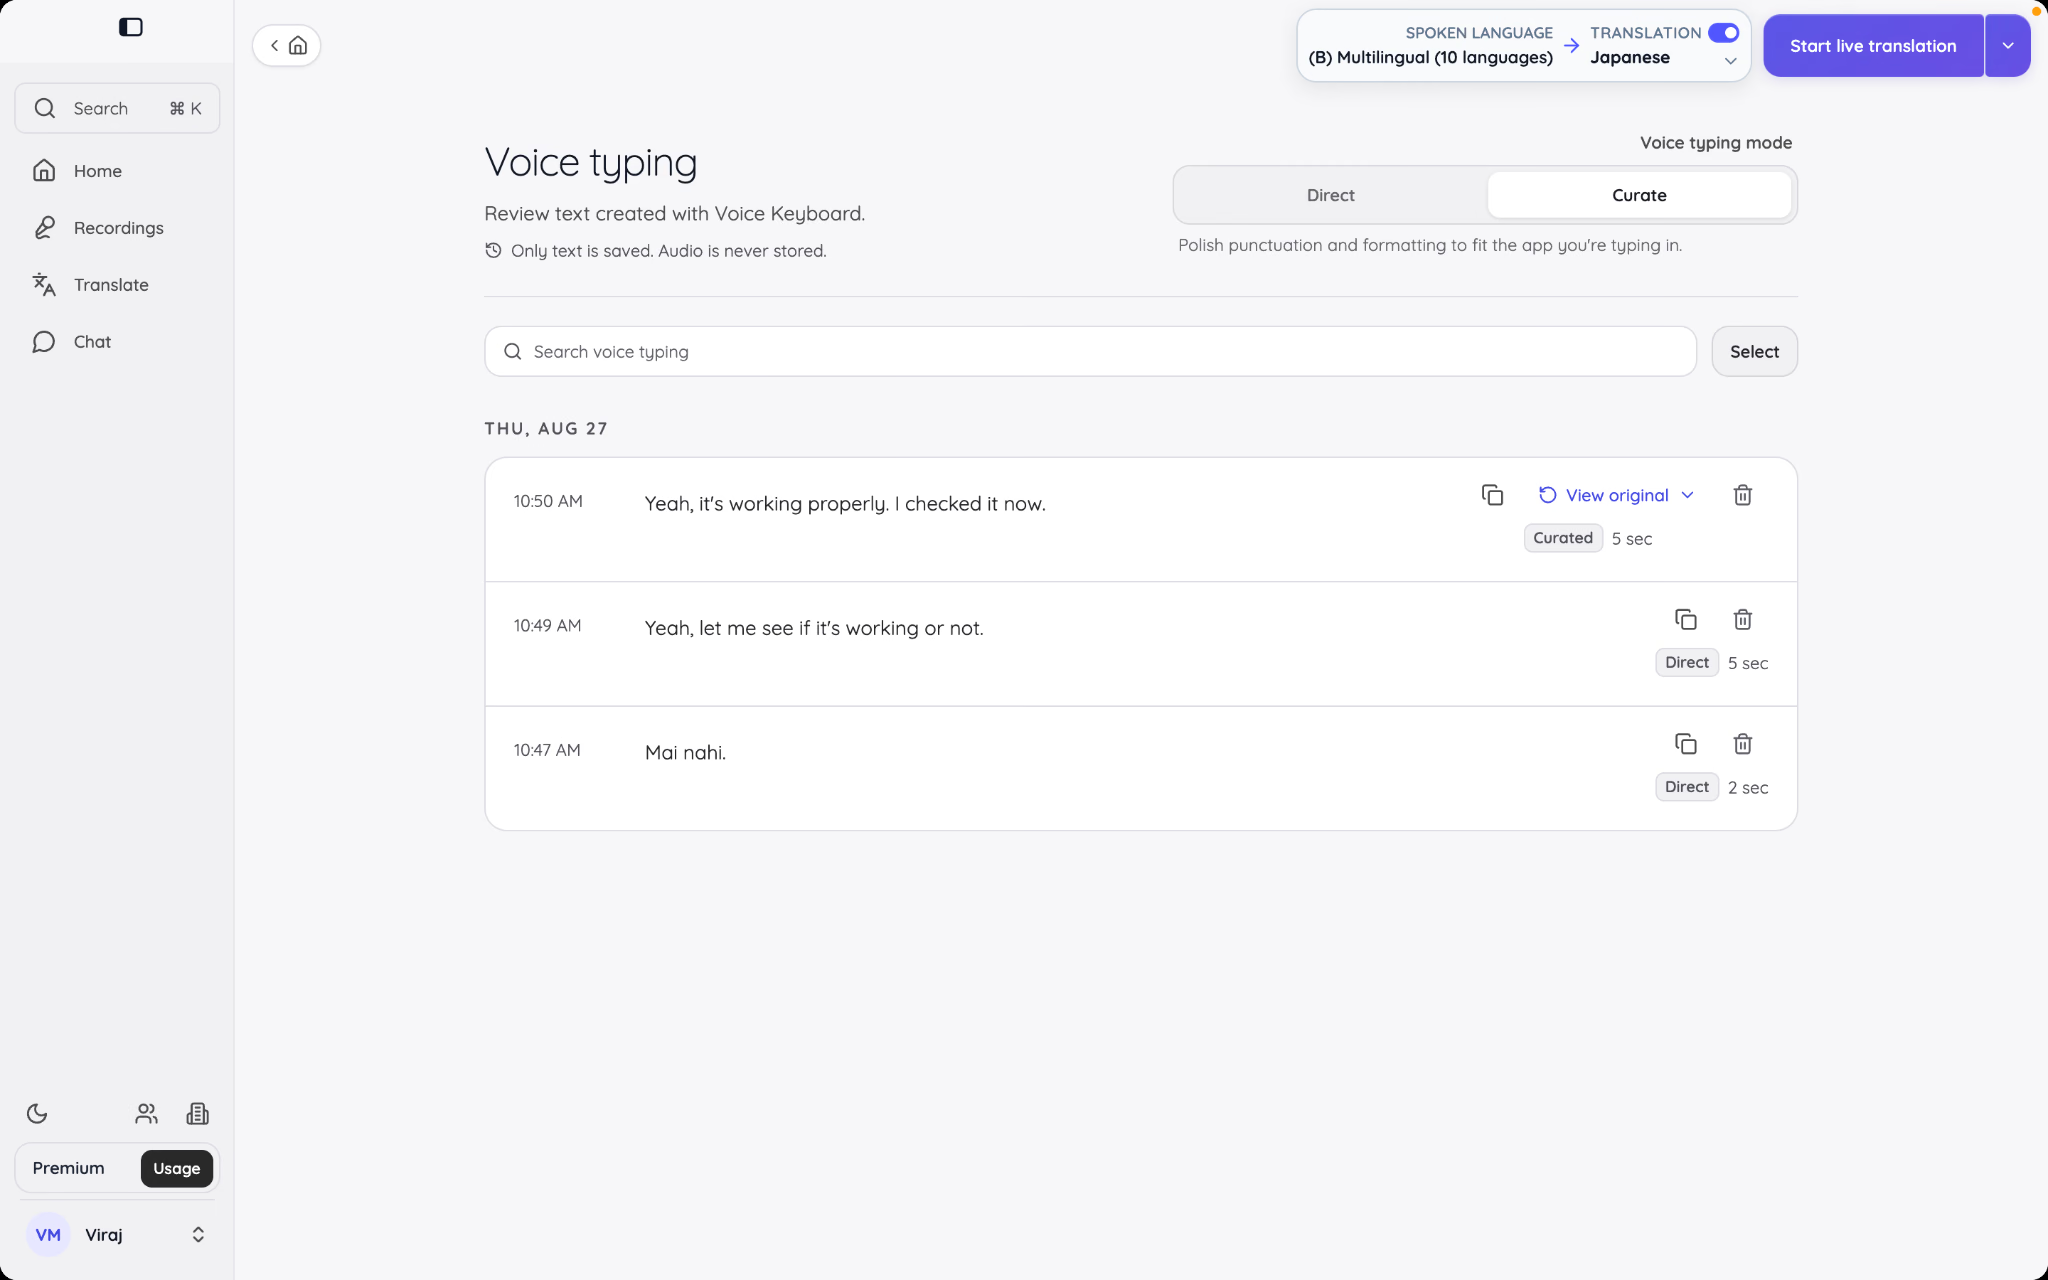
Voice Keyboard turns speech into text at the cursor inside an email, document, browser form, Slack message, or other desktop application. On macOS, hold Fn while speaking. On Windows, hold Ctrl + Win. Release the shortcut when you finish speaking.
JotMe keeps the resulting text in Voice Keyboard history so you can review, copy, edit, search, or delete it later. Entries can be direct transcriptions or curated versions in which JotMe cleans up the spoken wording and formatting.
JotMe's current documentation states that Voice Keyboard saves text but does not store the dictation audio. Deleting an entry from history is permanent.
Voice Keyboard is desktop-only because it depends on system-level shortcuts and the ability to type into other applications. Add names, products, and acronyms to Custom Vocabulary when you expect to dictate them frequently.
Configure live translation quality
The lower portion of General settings contains the same live-session quality controls introduced earlier:
- Speed-to-Contextual translation slider
- Continuous speech, Discussion, Normal meeting, Critical meeting, and Fragmented meeting presets
- Automatic adjustment
- Show real-time memory
- Transcription Quality slider and silence-finalization timing
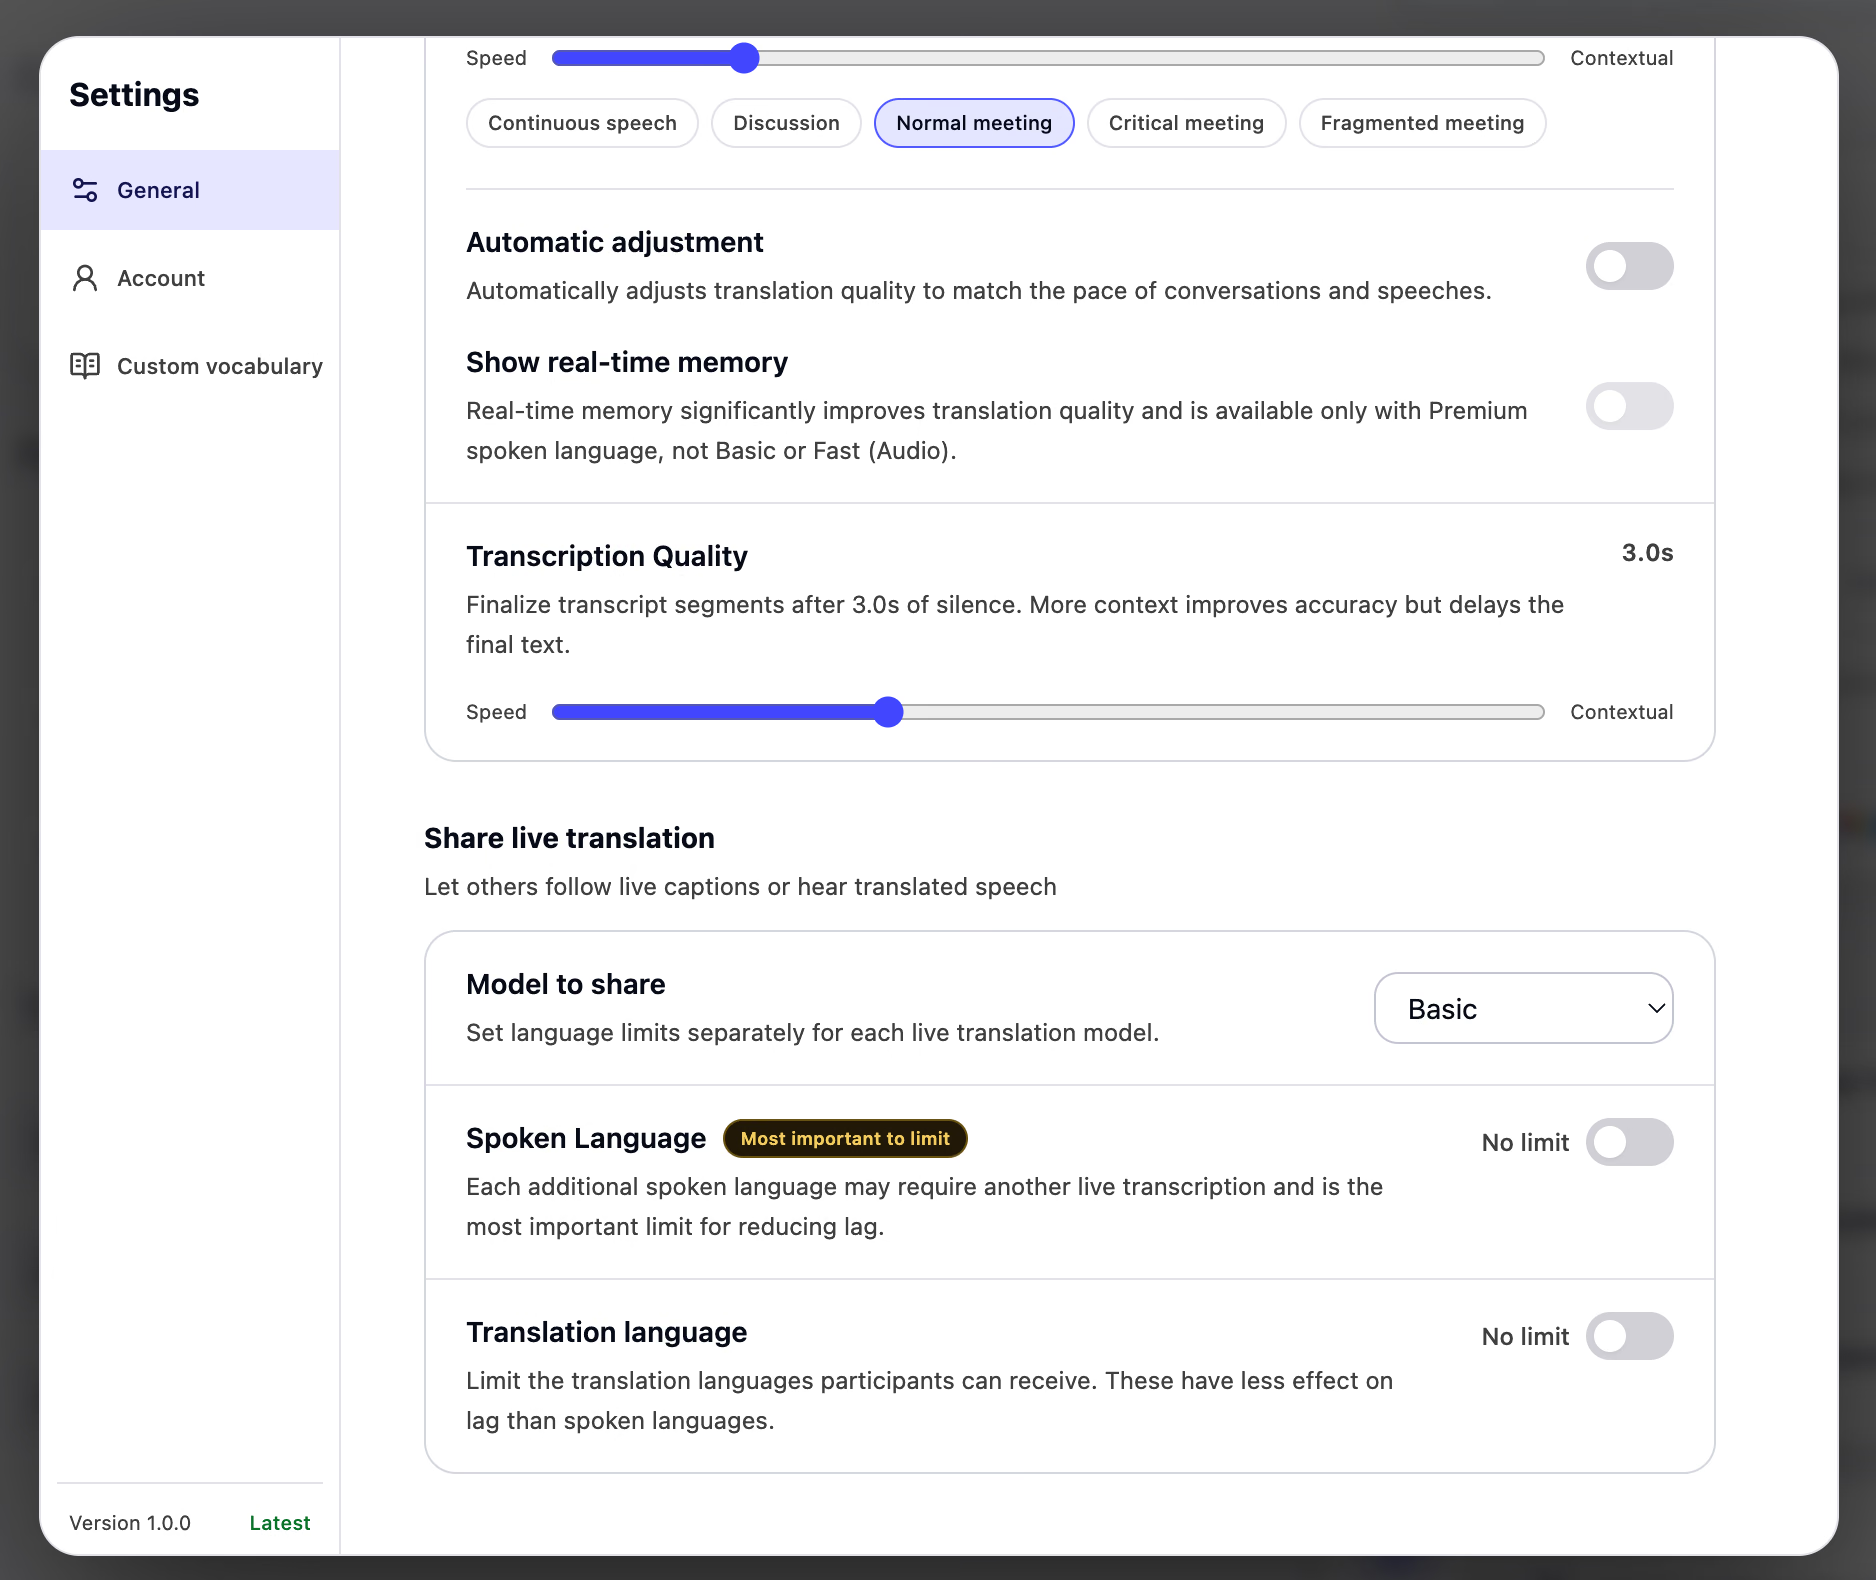
Set a sensible default for the kind of sessions you run most often. You can still adjust the live workspace for an individual meeting. Calendar events can remember event-specific choices on the same computer, so a recurring keynote and a weekly discussion do not have to share identical settings.
More context can improve the completeness of a sentence but delays finalized text. For an internal discussion, a small delay may be acceptable. For captions projected at a live event, responsiveness may matter more. Test with real speaking patterns rather than deciding from the slider label alone.
Limit the languages available in shared translation
The Share live translation settings let you choose the model to share and restrict the languages available to participants.
Spoken-language limits and translation-language limits are stored separately for each model. Restrict spoken languages first when you want to reduce lag with Basic or Premium, because each additional spoken language can require another live transcription stream.
Target-language limits control the languages participants can receive. For an English-and-Japanese webinar serving Spanish-and-French readers, offer those actual language needs rather than leaving the entire catalogue open.
Limits affect participant choices in the shared session, not the host's own language controls. They are particularly useful for conferences, webinars, and large meetings where many attendees open the same URL or QR code.
Add names, acronyms, and jargon to Custom Vocabulary
Open Custom Vocabulary from Settings. Vocabulary is account-wide, which means supported JotMe workflows can use the same registry across live transcription, translation, uploaded files, AI meeting notes, text translation, and Voice Keyboard. JotMe's Custom Vocabulary documentation contains the current account and plan details.
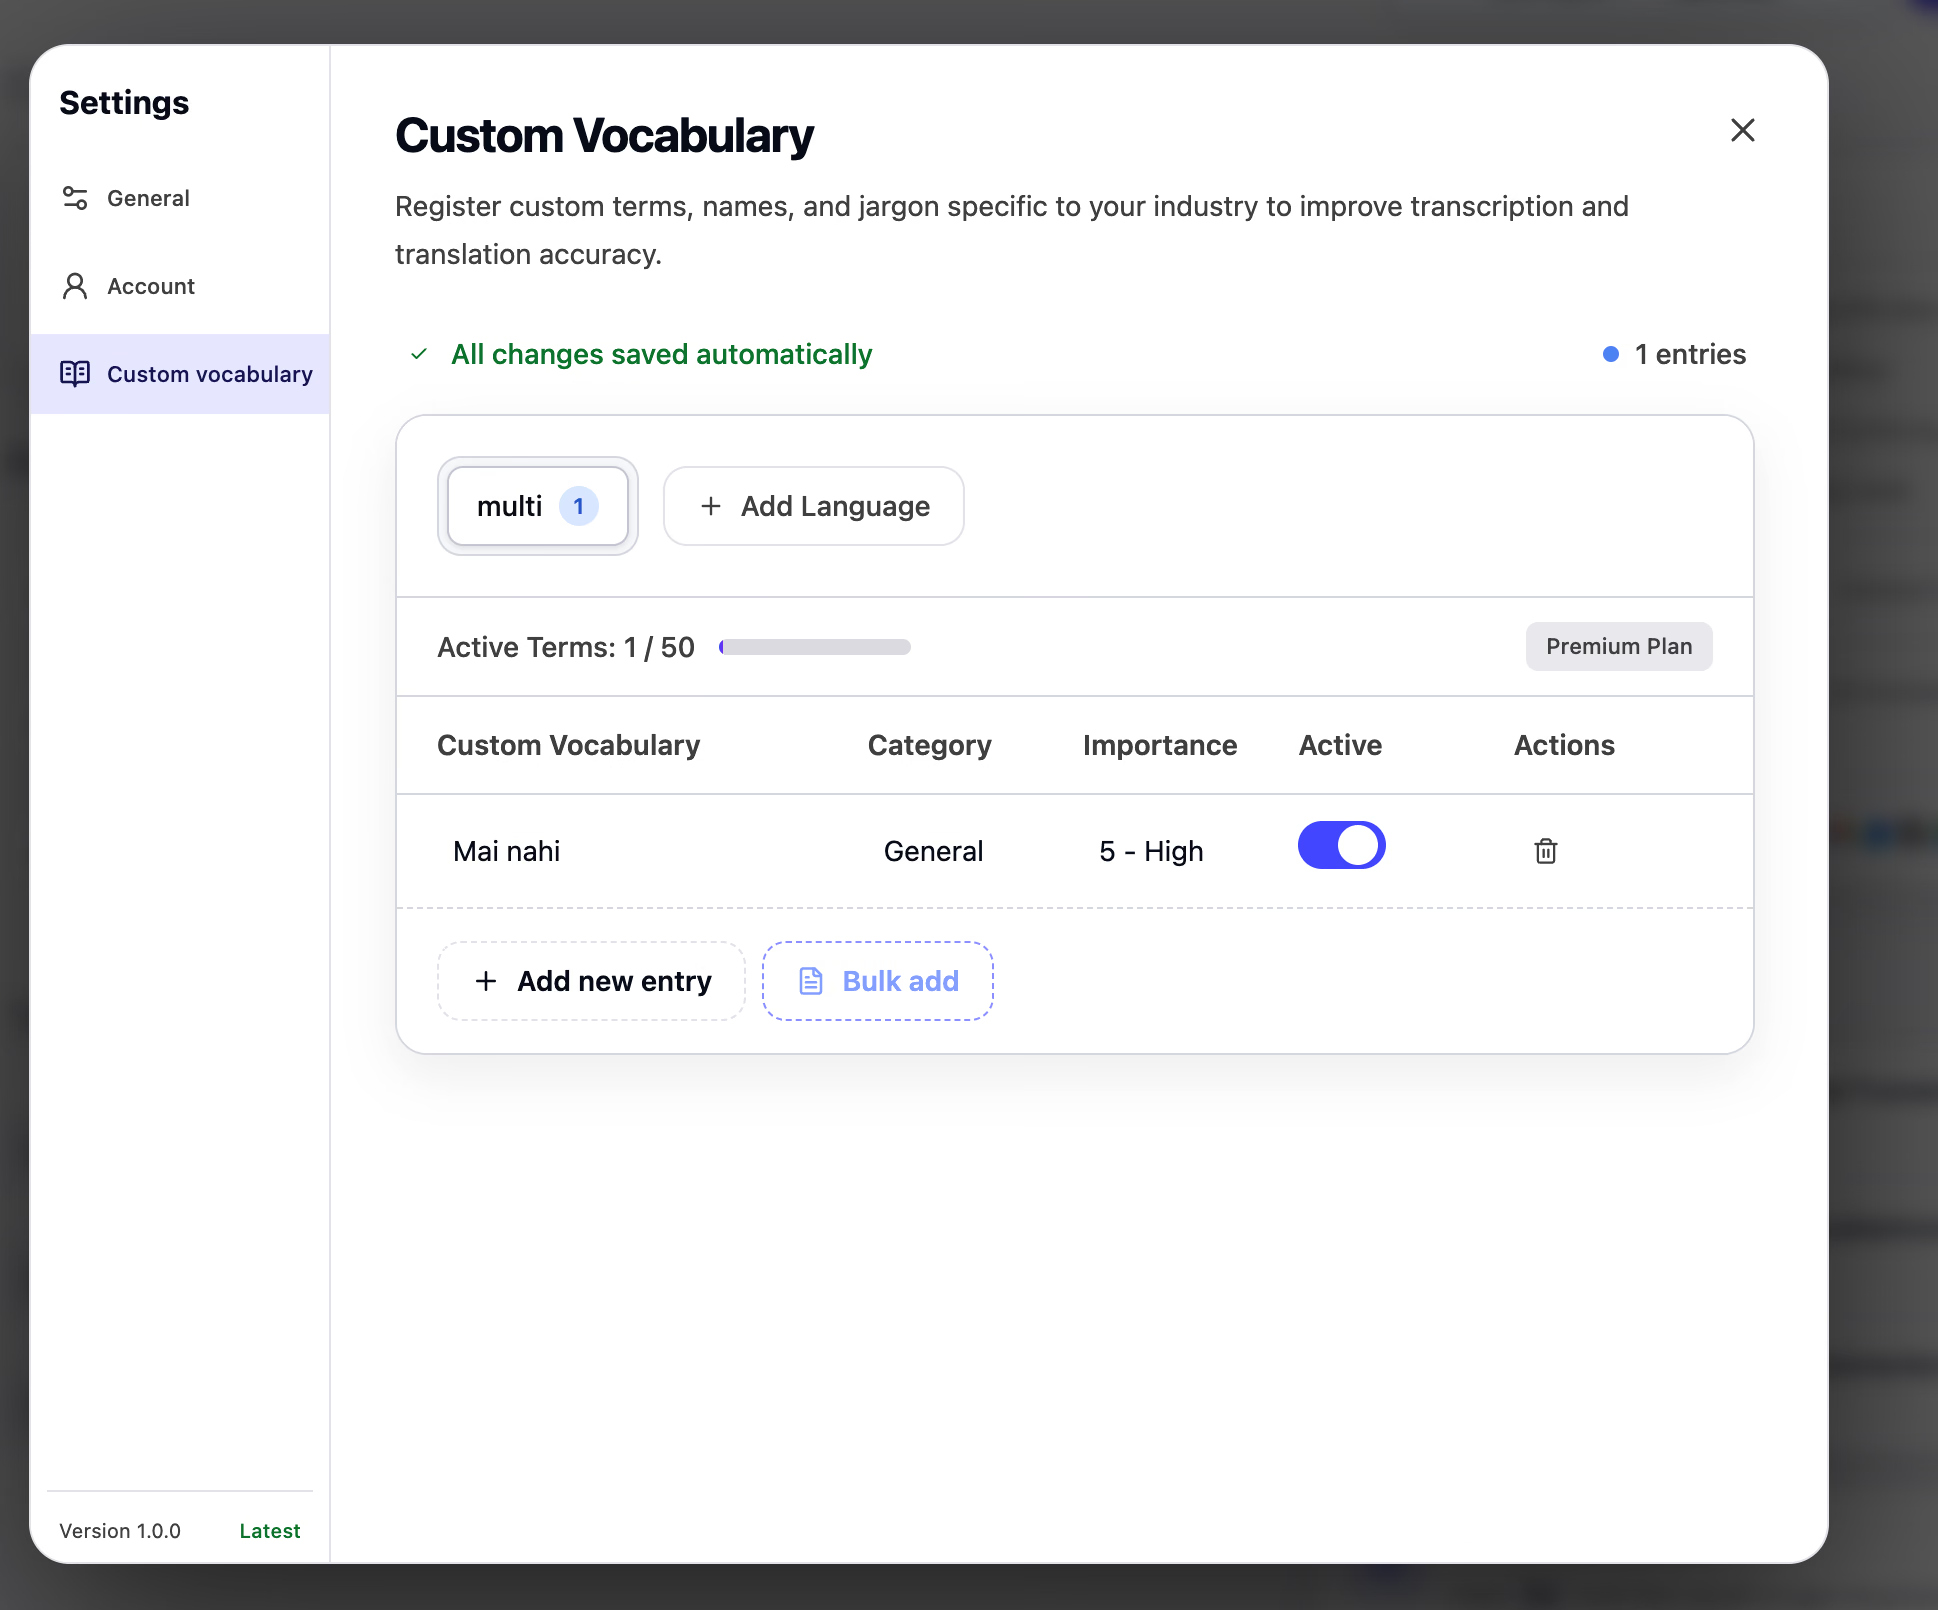
Add vocabulary with the following process:
- Select an existing source-language tab or choose Add Language.
- Select Add new entry.
- Enter the exact term JotMe should recognize.
- Assign an appropriate category, such as Name, Technical, or Business.
- Set the importance from low to high.
- Leave the entry active when it should be applied.
Add the term under the language in which it will be spoken, typed, or found in the source content. You do not need to duplicate the same source term under every language into which it might be translated.
Use short, distinctive entries. “JotMe,” “Sora Tanaka,” and “Nova-3” are better vocabulary entries than an entire sentence explaining where each term appears. Create separate entries when several related names require help.
Set a higher importance for uncommon terms that are repeatedly misrecognized or must remain exact. Pause an entry by turning Active off when you want to retain it without applying it. Remove an entry when it no longer belongs in the language registry.
Vocabulary improves the source that later features depend on. If a project name is wrong in the transcript, the same error can carry into translation, Enhanced notes, Ask JotMe answers, and follow-up messages. Correct recognition at the beginning is more reliable than fixing the term in every output afterwards.
Frequently Asked Questions
Is JotMe Desktop App 1.0 bot-free?
Yes. JotMe captures microphone and system audio from your computer, so it can work beside online meeting platforms without joining the participant list as a bot. Other participants do not need to install JotMe for you to record, transcribe, or translate the call. Participants opening a shared live-translation URL only need a supported browser.
Can JotMe translate both online and in-person conversations?
Yes. Choose Online for calls in which your microphone and meeting audio come from separate sources. Choose In-person when everyone is captured through a room microphone or event audio feed. The environment setting also changes how speakers are labelled in the transcript.
What types of content can JotMe translate?
JotMe Desktop App can translate typed text, formatted documents, images, audio, and video. It can also create a transcript, translated transcript, and AI meeting notes from an uploaded audio or video recording. Supported formats and language coverage vary by workflow, so check the relevant upload panel before preparing a large job.
Can other people follow a live translation without installing JotMe?
Yes. Share the live translation with a browser URL or QR code. Attendees can open it on a phone, tablet, or computer and choose from the languages allowed by the host. JotMe also supports a desktop join code, a maximized transcript window, and Subtitle Camera for video workflows.
Can I prevent JotMe from saving notes or transcripts?
Yes. Under Settings, choose whether JotMe should generate AI meeting notes and store the transcript, store only the transcript, or store neither. Select the appropriate preference before the session begins and follow the recording-consent requirements that apply to your meeting.
How can I improve accuracy for names and specialist terminology?
Add the exact names, acronyms, product terms, and industry vocabulary under Custom Vocabulary. Choose the source language, assign a category and importance, and keep the entry active. Also update Your context when a meeting concerns a specific project, goal, status, or set of open items.
What is the difference between My notes and Enhanced notes?
My notes are the notes you write during the session. Enhanced notes are generated by JotMe from the transcript and your writing after the session ends. Your original notes remain separate and are not automatically included when the shared meeting record is sent to another person.
Can Ask JotMe answer questions across all my meetings?
Ask JotMe is scoped to the live session or saved recording from which you open it. It can answer follow-up questions using that meeting's transcript and notes, but it does not search every recording in your account as one combined knowledge base.
Use JotMe Desktop App as One Connected Workflow
JotMe Desktop App 1.0 is most useful when its features are treated as one workflow rather than a collection of isolated tools. Start from Home, prepare the languages and audio, run the live conversation, review the saved record, and use Ask JotMe, translation, or multilingual Chat to turn what was said into the next action. The same account keeps the calendar, recordings, translated files, chats, context, and vocabulary connected.
Before your first important session, complete three checks: confirm the microphone and computer audio, choose what JotMe may store, and add the names or technical terms the conversation will depend on. Once those settings are in place, open the meeting or event, select the spoken and translation languages, and start the workflow that matches what participants actually need.
Last updated on
September 4, 2026
Follow us on social media:
![JotMe — Is Google Translate Accurate? [2026 Test]](/_webflow-assets/0d0512afc7b037d74dff536f22fed08f.avif)